 Plant As Deco
Home Organization & Storage
Kitchen Drawer Organization Ideas: A Drawer-by-Drawer Plan
By Plant As Deco · Updated 16 November 2026
A kitchen drawer is not one drawer. The one beside the stove holds the tools that cook dinner, the shallow one under the counter holds knives and the sliver next to the oven holds pot holders — and treating them all the same is why a drawer full of universal trays still feels like a dig. This plan goes drawer by drawer: the utensil drawer, the deep drawers, the knife and cutting-board question, spices, the wrap drawer, and the junk drawer every kitchen hides. It is written for renters — shallow boxes, no soft-close, dividers that walk — and nothing here drills, glues or screws into the cabinet.
Weekend-ready: $0–$150, one weekend for a whole kitchen of drawers. Renter-safe — every tray lifts out and nothing is attached to the cabinet itself.
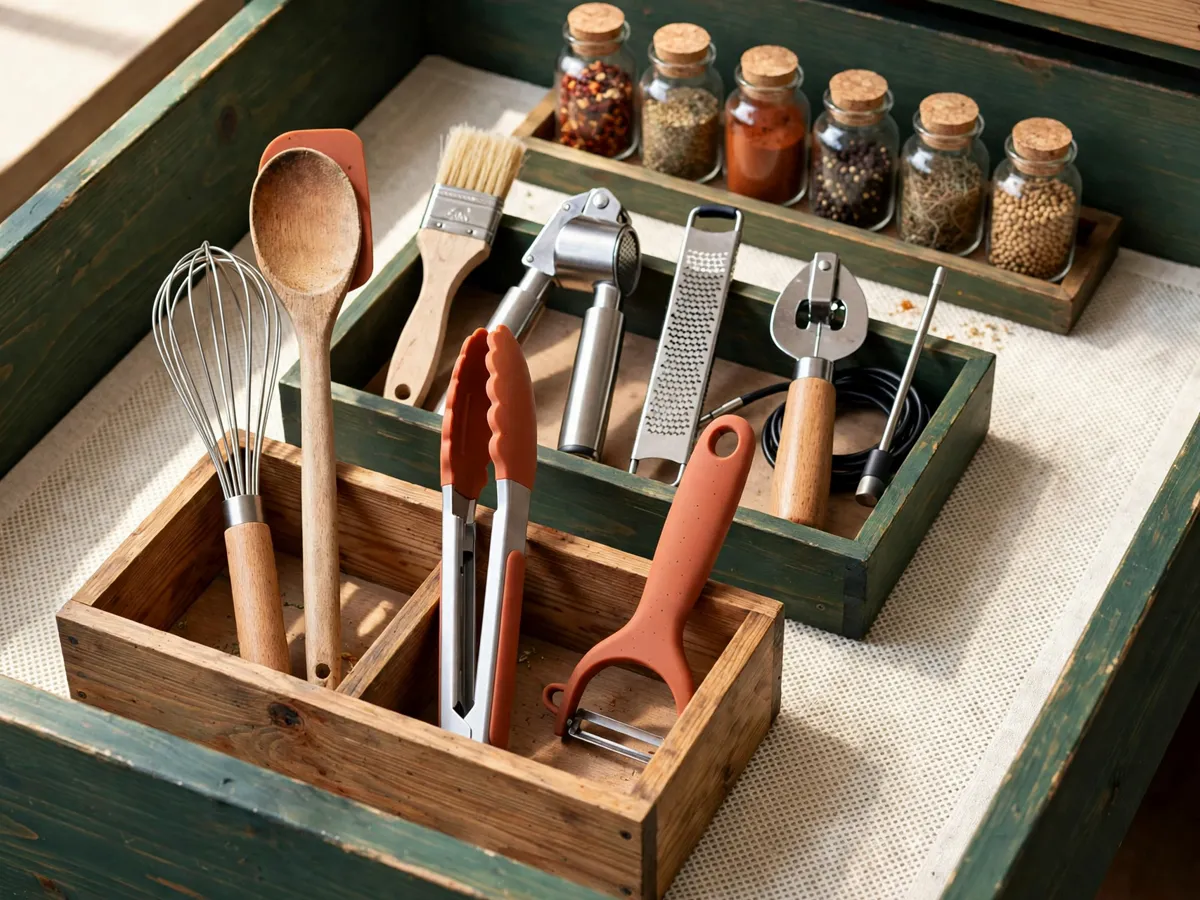
1. Give every drawer a job before you shop
Kitchen drawer plans fail at the shopping stage because trays get bought for "drawers" in general. A kitchen is a set of work zones, and each drawer belongs to one: the drawer beside the stove is the cooking drawer, the one under your prep counter is the knife and prep drawer, the deep bottom drawers are cabinet storage on the floor, and the drawer near the fridge or sink is where wraps and bags want to live. The junk drawer, in every kitchen, sits wherever things get dropped — usually by the entry of the room, and that is fine.
Walk your kitchen and write the map on your phone: each drawer, where it is, and the one job it gets. Be honest about the prime spot — the drawer closest to the stove is opened more than any other in the room, so it earns the everyday cooking tools, not the melon baller. If a drawer is awkward — too shallow, too narrow, wedged under the oven — the map is where you decide what flat, light thing it holds instead of forcing a tray into it.
The map also tells you what to stop storing. If the measuring cups live three drawers from the baking counter, the fix is not a new tray — it is moving them to the drawer that already serves baking. Most of what feels like a drawer problem in a kitchen is a placement problem, and it costs nothing to fix. The whole cabinet-level version of this is the kitchen storage checklist.
Cost: $0. Time: 30–45 minutes for the walk-through. Keep the map on your phone at the store — trays are bought for named drawers, not for drawers in general.
2. The utensil drawer: two trays, not one
Most utensil drawers hold thirty tools and use six. Split them in two before anything is bought. The everyday set — spatula, tongs, wooden spoon, ladle, peeler, the whisk — is the tray nearest the drawer front, sized so each tool stands upright and the whole set reads in one glance. The second tray holds the occasional tools: the garlic press, the zester, the baster, everything that cooks a monthly meal. If that second set is honestly used twice a year, it does not need drawer space at all — a small box at the back of a cabinet frees the whole drawer for the tools that cook.
Two trays sit front to back, everyday set at the front. The one-motion rule does the deciding: if you have to lift the baster to reach the spatula, the trays are in the wrong order. Measure the inside floor of the drawer — between the slide rails, minus half an inch — before buying anything, and for a first layout, build the grid from a shipping box for nothing: the general drawer guide walks the measuring and the cardboard build step by step.
One honest tradeoff: the counter crock. A crock of spoons by the stove looks pro and saves drawer depth, but it costs counter space, and in a small rental kitchen the counter is the scarcer resource. The drawer wins for the everyday set; the crock makes sense only when the drawer is under three inches deep inside and no upright tray will ever fit.
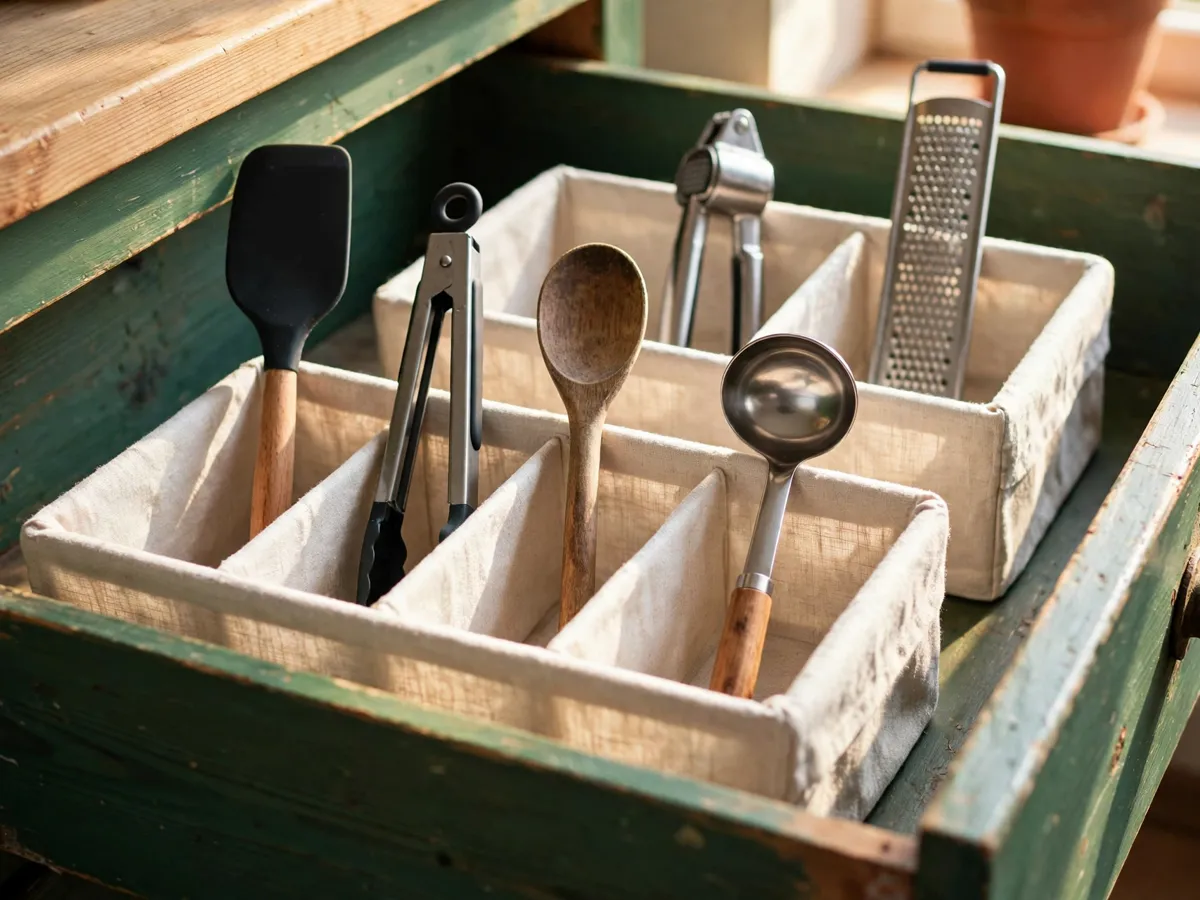
Cost: $10–$30 for one bought tray, $0 with cardboard. Time: 45–60 minutes including the sort. Caveat: a drawer under three inches deep holds flat trays only — check before the order.
3. Deep drawers: pots, lids, and what goes where
A deep drawer — anything over about eight inches inside — is a cabinet with better access, and it wants cabinet contents, not drawer trays. Pots nest by size, largest on the bottom of the lowest drawer, with a dish towel between nested pieces so the nonstick surfaces do not scrape. The heaviest cookware goes in the lowest deep drawer, both because the drawer slides there are built for weight and because lifting a cast iron pan up at waist height is the wrong job for a top drawer.
Lids are the real decision. A lid rack keeps them sorted and readable, and a basic one runs $10–$20 — but measure the drawer depth first, because racks are taller than they look online. The $0 version stands lids on edge, leaning against the drawer front, largest behind smallest; it is less tidy and costs nothing. Peg systems — the rows of upright pegs that divide a deep drawer into a grid — are the third option at $25–$45, and they are worth it only in a drawer that is both deep and wide, because the pegs need a base plate and room to mean anything.
One rental-kitchen honesty note: thin drawer slides. The top drawer in an older apartment runs on hardware never meant to carry thirty pounds of cookware, and loading it teaches you this with a sagging drawer in a year. Weight goes low, near the floor; light goes high. If a deep drawer fights you when half-full, that is the slide, not your layout.
Cost: $0–$40. Time: 45–60 minutes per deep drawer. Caveat: check what the slide hardware is rated for before the cast iron moves in.
4. Knives and cutting boards off the counter
The knife block eats a square foot of counter, and the wall strip needs screws — which a rental kitchen does not allow. The renter answer is the in-drawer knife tray: blades lying flat in slots, edges protected, handles visible at a glance, and the counter stays clear. A decent bamboo one runs $20–$40, and the only measurements that matter are the drawer — inside floor length and width minus the half inch, plus enough height for the handle to sit below the drawer above when it closes.
Count your knives before buying the tray. A block with fifteen slots wastes the drawer of a person who owns four knives — the empty slots still eat the length. Three good knives (a chef, a paring, a bread or serrated) cover nearly all home cooking, and a four-to-six slot tray sized to the drawer beats the showroom set every time. The knives that never leave the block are sharpening candidates, not storage problems.
Cutting boards stand on edge, not in stacks. On edge they take about three inches of drawer width for four boards, they dry instead of staying damp at the bottom of a pile, and pulling one does not avalanche the rest. They fit best along the side of a deep drawer or standing in the cabinet next to the knives, so the board and the blade that cuts on it live one motion apart.
Cost: $20–$40 for the tray, $0 for standing the boards on edge. Time: 30 minutes. Caveat: measure the drawer before the tray, and count the knives before the slots.
5. Spices: when the drawer beats the rack
The counter rack and the wall rack both spend real kitchen resources — counter space and a drill hole. The spice drawer spends neither. Jars lying in rows, label up, in a shallow tray read from above in one glance, and the drawer also protects them: direct light and stove heat shorten the life of dried spices, and a drawer blocks both. That is the honest case for the drawer, and it holds as long as two things are true.
First, the drawer is one step from where you cook — spices in a drawer across the kitchen get walked to, and a spice you have to fetch is a spice you stop using. Second, the drawer is not the one beside or under the oven, which radiates heat every time it runs. If the only spare drawer fails both tests, a small counter rack by the stove is the better tool, and the drawer should hold something else from the map.
The layout inside is simple and mostly free. Uniform small jars in rows on their sides or standing label-out in a shallow tray; a store-bought drawer insert at $12–$30 if you want the finished look. The rule that saves the project: measure jar height against drawer depth before anything is bought — a four-inch jar does not fit a three-inch drawer, and that discovery after purchase is a return trip. Label the lids, one word, masking tape if nothing else.
Cost: $0 with the tins you own in a tray, $12–$30 for an insert or jar set. Time: 60–90 minutes including labels. Caveat: keep the drawer a step from the stove and away from the oven, or the rack wins.
6. Wrap, foil, and the bag drawer
The wrap zone fails the same way in every kitchen: boxes lying flat across a whole drawer, rolls sliding loose under everything, and the gallon bags in three separate places. The fix is one rule — every box stands on edge. Foil, plastic wrap, parchment, zip bags, the sandwich rolls: standing on edge in a single row, each box is a book on a shelf, readable by its spine and pulled without disturbing the rest. A foil box is about two to three inches wide, so a drawer twelve inches wide holds a row of four — count your boxes before buying anything.
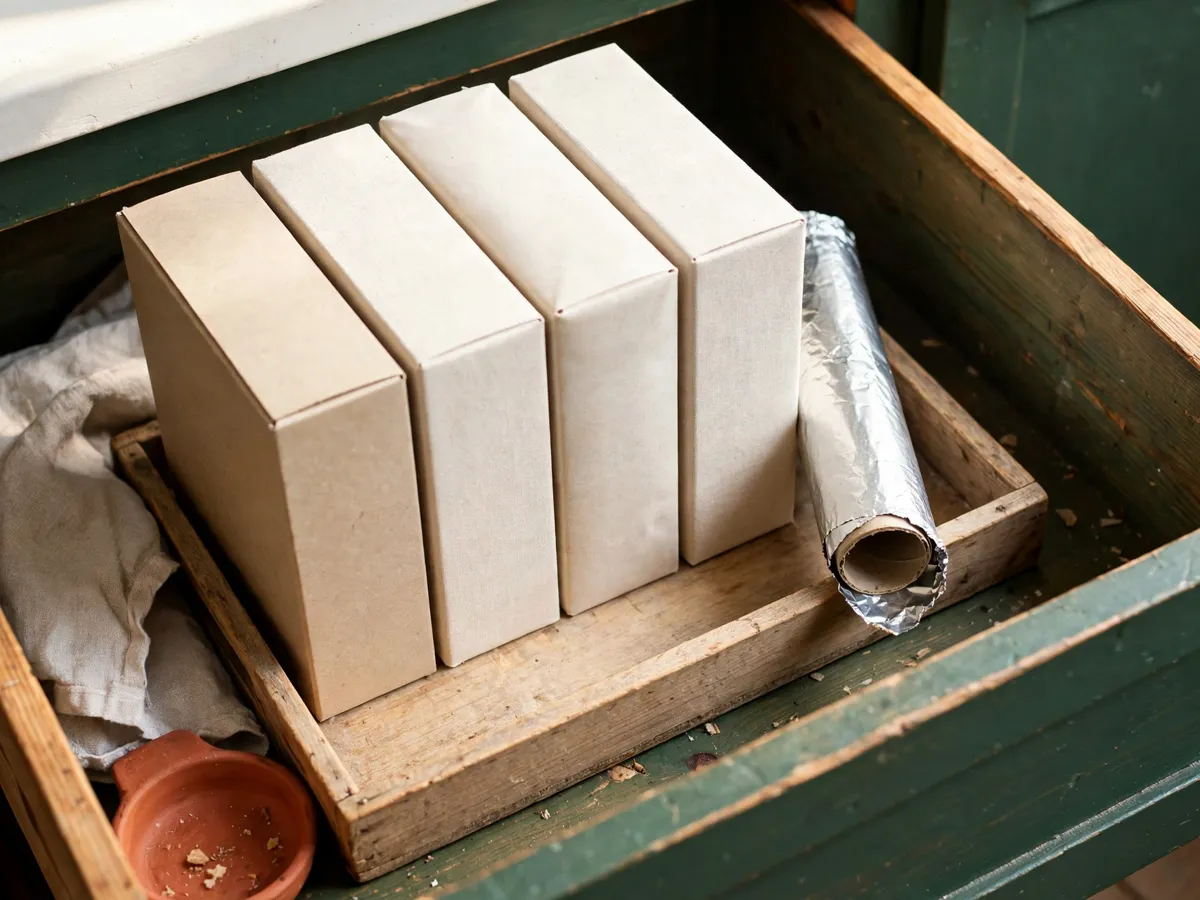
A low tray or a shoe box keeps the row from tipping and lifts out whole for cleaning — $0 with a box you have, $10–$20 for a tray. The loose rolls that will not stand (the half-used roll of foil) can live in the same tray, cut edge down, propped by the boxes. Spare trash bags flatten and stack in a small basket — the under-sink cabinet is their better home, and the under-sink plan places them around the pipes.
Put this drawer where lunch actually happens — near the fridge or the sink, not across the room. Wraps and bags are fetched mid-task with one hand, and a drawer that needs a walk gets replaced by the counter pile you are trying to end.
Cost: $0–$20. Time: 20–30 minutes. Caveat: count the boxes first — a row that does not fit spills into a second layer, and a second layer is the problem you started with.
7. The junk drawer: triage, not shame
Every kitchen has a drawer that collects, and the goal is not an empty one — it is a small, honest one. Empty it completely onto the counter, because sorting in place always leaves a layer. Then sort into three piles: tools that belong in another drawer from the map, things that belong outside the kitchen entirely (batteries, cables, the dead pen collection), and actual trash.
What is left is the honest keeper list, and it is short: tape, scissors, twist ties, rubber bands, birthday candles, the takeout menu, a lighter, the small screwdriver everyone in the house asks for. Those live in one small tray — the one-drawer version of a landing strip — and the keeper rule is the test: if it serves the kitchen monthly or serves the whole household (the tape measure), it stays; if it serves nobody, it goes. A drawer that still collects after the triage is one tray, not the whole box.
Plan the refill, because it will refill. A drawer near the entry of the kitchen collects what pockets empty into it, so give that spot a small tray for coins and keys and the collection stays contained — the re-triage is then ten minutes with the tray, not another full empty.
Cost: $0–$15 for one tray. Time: 45–60 minutes for a full triage. Caveat: it refills in about a month — plan the ten-minute version, not another afternoon.
8. What fails in a rental kitchen — and the fixes
The shallow drawer. Under three inches inside, no upright tray on the market fits, and buying one anyway is the most common wasted purchase in a rental kitchen. The fix is to stop fighting it: a shallow drawer is a flat-things drawer — pot holders, trivets, splatter screens, the cutting boards on edge if they fit, or a knife tray, which is flat by design. The two-inch sliver beside the oven is not a failure; it is a pot holder drawer.
No soft-close. Every slam walks the contents — and the dividers — an inch at a time, until the tray is against the back wall and the front half of the drawer is empty. Two fixes, both cheap: a non-slip drawer mat under the trays ($9–$15 for a two-pack, cut with scissors to the measured floor), and a snug friction fit on the dividers so nothing has room to travel. The mat alone solves most of it.
Dividers that slide. Wire and bamboo dividers bought to "standard" sizes wander because they are a half inch short of your drawer, not because they are badly made — which is a measuring problem, and the divider measuring method fixes it at the source. The emergency patch for a divider that still wanders: a low cardboard wall wedged beside it. It is not elegant and it holds.
The drawer you cannot fix. Some rental drawers are crooked, sticky or barely open — and no tray changes that. The honest move is to store the rarely-used things there (the seasonal cookie cutters) and spend the weekend on the drawers that work. A drawer that fights the hardware will fight the layout too.
Cost: $5–$25 for mats and patching. Time: 15 minutes per drawer. Caveat: mats need trimming to the measured floor — a mat that rides up the side jams the slide.
Before you buy anything: copy this
- Every drawer named with its one job — stove drawer holds the everyday tools, junk drawer near the entry
- Inside floor measured between the slide rails, minus half an inch, for every drawer getting a tray
- Drawer depth checked against tray height — under three inches means flat trays only
- Knives counted and jars measured before any slotted tray or insert is ordered
- A cardboard grid or a reused box tried first — the free version proves the layout
- One drawer finished start to finish before the next begins
- A non-slip mat cut for every drawer that slams shut
- Running total kept against the $150 ceiling
Cost: $0 to check. Time: 10 minutes, before the order goes through.
What we would skip
- The matching ten-piece tray set — sized for a showroom drawer, half of it unusable in yours.
- A knife block with fifteen slots for four knives — the empty slots still eat the drawer.
- A peg system before measuring — pegs need depth and width a rental deep drawer often does not have.
- Soft-close conversion kits in a rental — the slides belong to the landlord, and the mat does most of the same job for twelve dollars.
- Adhesive drawer liners and stick-on dividers — residue and deposits do not mix.
- A spinning spice insert in a drawer under four inches deep — it spends height you do not have.
Cost: $0 to skip, and it is the cheapest section on the page. Time: 2 minutes to read.
Questions renters ask
How do I organize kitchen drawers in a small rental?
Map every drawer to one job first, then organize one drawer at a time — everyday cooking tools nearest the stove, knives under the prep counter, wraps near the fridge. Measure the inside floor between the rails and subtract half an inch before any tray is bought, and try a cardboard grid or reused box before spending. The whole kitchen is a weekend at $0–$150.
How do I stop drawer dividers from sliding?
Dividers slide because they were bought to a standard size instead of measured to the drawer, and because a rental drawer without soft-close slams its contents an inch at a time. Cut or buy to the measured floor minus half an inch for a friction fit, put a non-slip mat under the trays, and wedge a low cardboard wall beside a divider that still wanders.
Should spices go in a drawer or on a rack?
The drawer wins when it is one step from the stove and away from the oven — jars in rows read from above, and the drawer blocks the light and heat that shorten spice life. A small counter rack wins when the only spare drawer is across the kitchen or too shallow for your jars. Measure jar height against drawer depth before deciding.
How do you organize deep kitchen drawers?
Treat them as cabinets with better access: pots nested by size with a towel between, heaviest cookware in the lowest drawer on slides built for weight, and lids on edge — in a rack if the drawer is deep enough, or leaning against the drawer front for free. A peg system is worth it only in a drawer that is both deep and wide.
What should actually live in a kitchen junk drawer?
The honest keeper list: tape, scissors, twist ties, rubber bands, birthday candles, the takeout menu, a lighter, and the one small screwdriver everyone asks for — all in a single small tray. Everything else in the drawer belongs to another room or the trash. Plan a ten-minute re-triage, because it refills in about a month.
Save these on Pinterest
Pin the drawer job map and the wrap-box row — every drawer named for one job, every box standing on edge — because those two pictures are what turn a stack of universal trays into a kitchen that opens in one motion. This page belongs with the pantry, fridge and declutter plans in the organization and storage guides.