 Plant As Deco
Organization & Storage
Drawer Organization Ideas: Dividers That Actually Fit
By Plant As Deco · Updated 16 November 2026
A drawer fails one way: loose dividers. The utensil holder slides, the bobby pins and the screwdrivers share a corner, and every kitchen search becomes a dig. This plan is for renters and small-home owners fighting shallow bathroom drawers, deep kitchen drawers and the clothing drawer that eats its own bottom layer. It measures first, matches the divider to the drawer's job, builds one from a shipping box for free, and folds clothes upright so every piece shows its edge. Nothing here drills, sticks or screws — it all lifts out when the lease ends.
Weekend-ready: $0–$40, one afternoon. Renter-safe — nothing is attached to the drawer itself.
1. Measure before you buy anything
The most common way drawer organization wastes money is buying dividers before knowing the drawer. Sold dividers come in a handful of standard sizes, and the drawer you actually own — especially an older apartment drawer — rarely matches a "standard" anything. Walls bow, widths wander an inch between drawers built in the same decade, and the back corners taper. A grid that fits the photo does not fit the box.
Measure the inside, not the outside. Open the drawer fully and measure the floor of the box: the width between the two inner walls, and the depth from the back wall to the inside face of the drawer front. That inside face sits behind the decorative front — the real depth is shorter than the drawer looks from outside, and buying to the outside dimension is how a divider ends up half an inch too long. Then measure the height from the drawer floor to the underside of the counter or the drawer above it, when the drawer is closed.
Two more checks finish the job. First, the slide hardware: along both side walls sit the rails and rollers the drawer rides on, and anything stored on top of them jams the slide. Measure the flat usable floor width between the rails, not the full inside width — a divider sitting on a roller stops the drawer mid-pull. Second, the clearance: subtract about half an inch from both the width and the depth you measured. Dividers need a little slide room to drop in, lift out and be wiped around. A grid cut or bought exactly to size wedges, and a wedged grid is worse than no grid — it cannot be removed to be cleaned. Write the three numbers — inside width, inside depth, and floor to underside — on your phone before you shop.
Cost: $0 — a tape measure you already own. Time: 10 minutes per drawer. Measure the usable floor between the slide rails, and always leave the half inch.
2. Match the divider to the drawer's job
A divider is not one product. A kitchen drawer, a vanity drawer and a clothing drawer hold three different shapes of things, and each job wants its own grid. Buying one type for all three is the second classic mistake — the deep grid drowns a vanity, and the shallow tray drowns in a deep kitchen drawer. Decide the job first, then the divider.
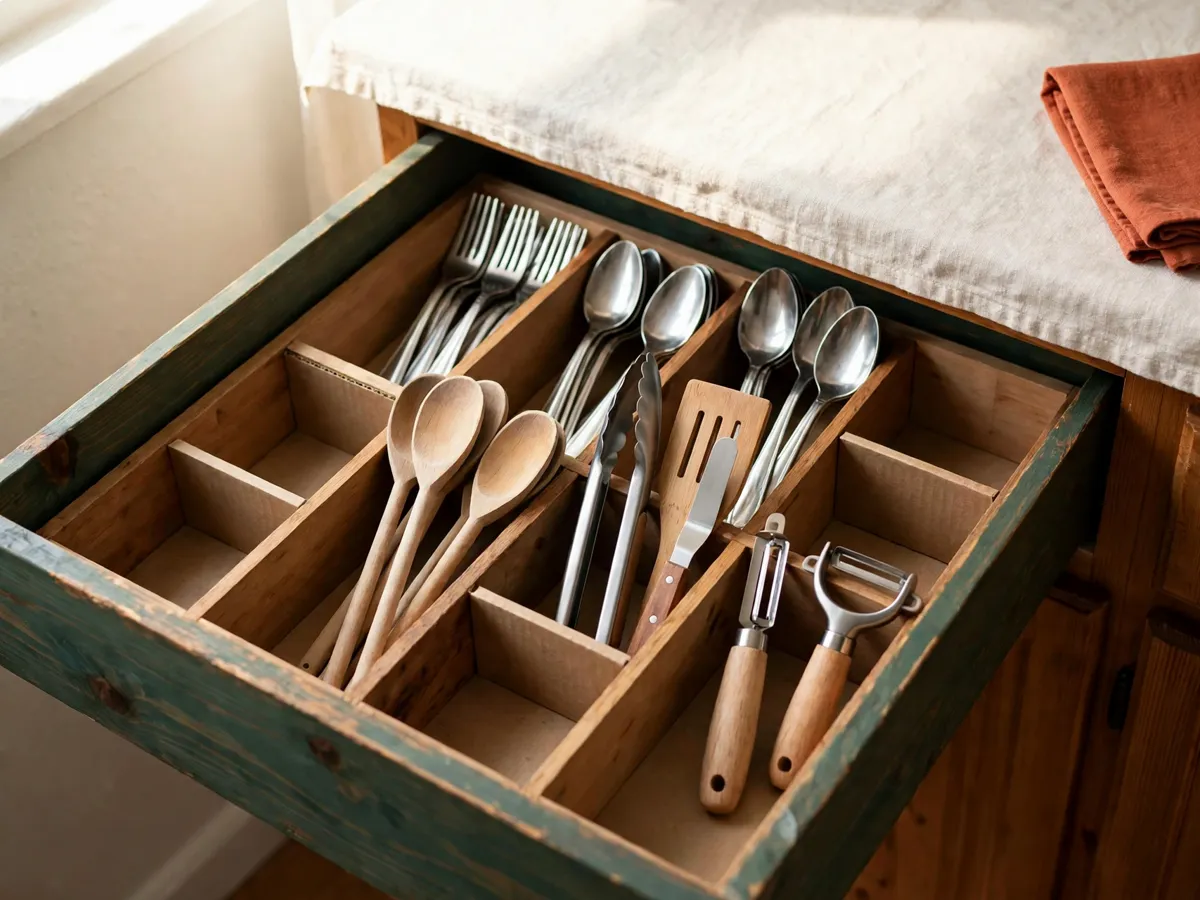
The deep kitchen drawer. Utensils, tools, the junk that accumulates near the stove: the job is standing storage, keeping tall things upright and sorted so the drawer opens to a read, not a dig. This drawer wants tall dividers in a grid of small boxes — the taller the walls, the better the standing. If the drawer is deeper than it is tall, one layer of grid is a waste of the top half; either use low walls and accept one layer, or build a second shallow grid that lifts out, sitting on top of the first. The same logic runs a kitchen's worth of drawers in the kitchen storage checklist.
The shallow vanity drawer. A bathroom drawer is often under three inches deep inside, and its contents are small and flat — hairpins, a razor, lip balm, the daily makeup. The job is a shallow tray with small compartments, not deep cells: anything deeper than the drawer swallows the contents whole. If the vanity drawer sits inside a small bathroom, pair it with the wider plan in the bathroom organization guide.
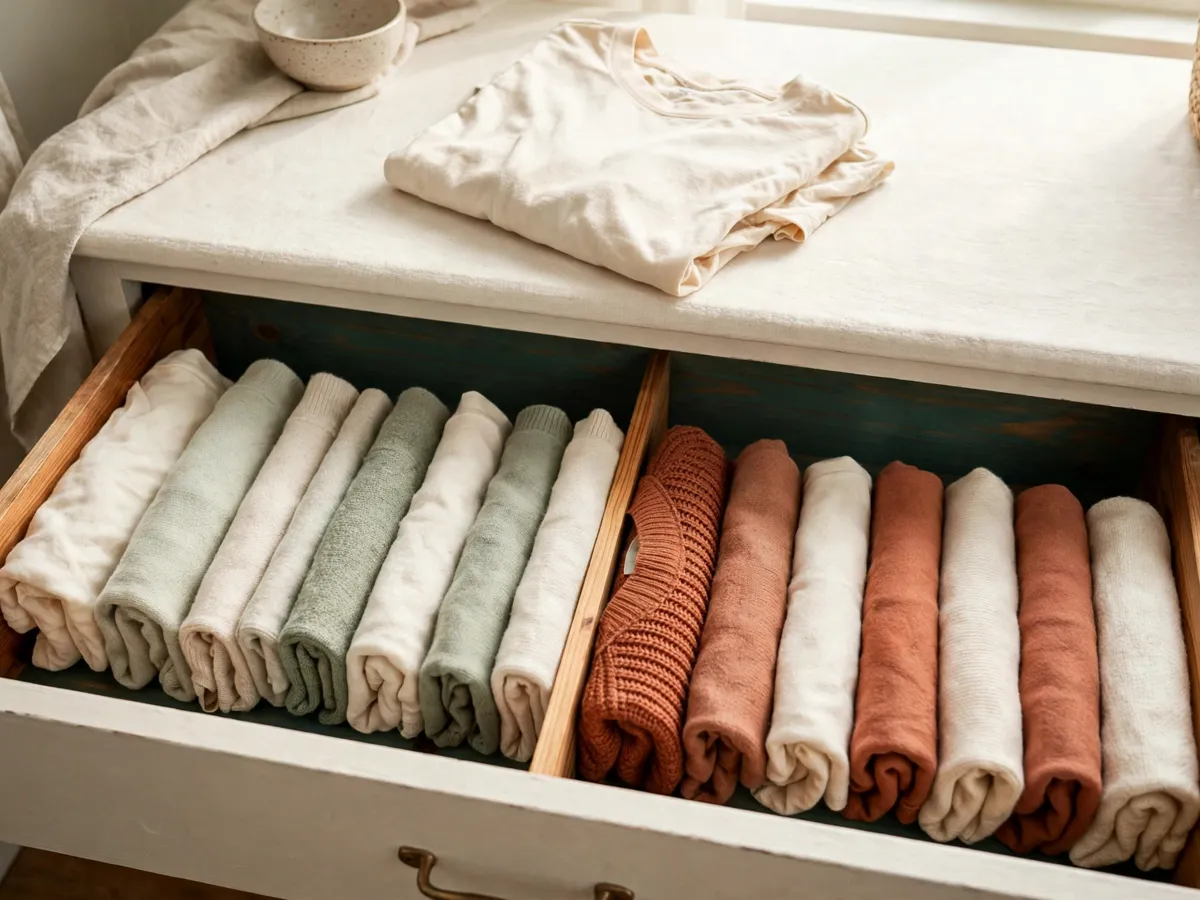
The clothing drawer. The job here is visibility — seeing every piece without excavating. Dividers act as bookends: a few long strips that partition the drawer into lanes — socks in one, underwear in another, T-shirts across the back — and each lane is filled with clothes folded to stand on edge, the way section four teaches. The full drawer method, rod zones and the nightly hang habit, is the small closet reset guide.
Cost: $15–$40 for a bought grid or two. Time: 20 minutes to sort one drawer into its job. The grid follows the job — a shallow tray in a deep drawer just slides around.
3. The cardboard divider you can make tonight
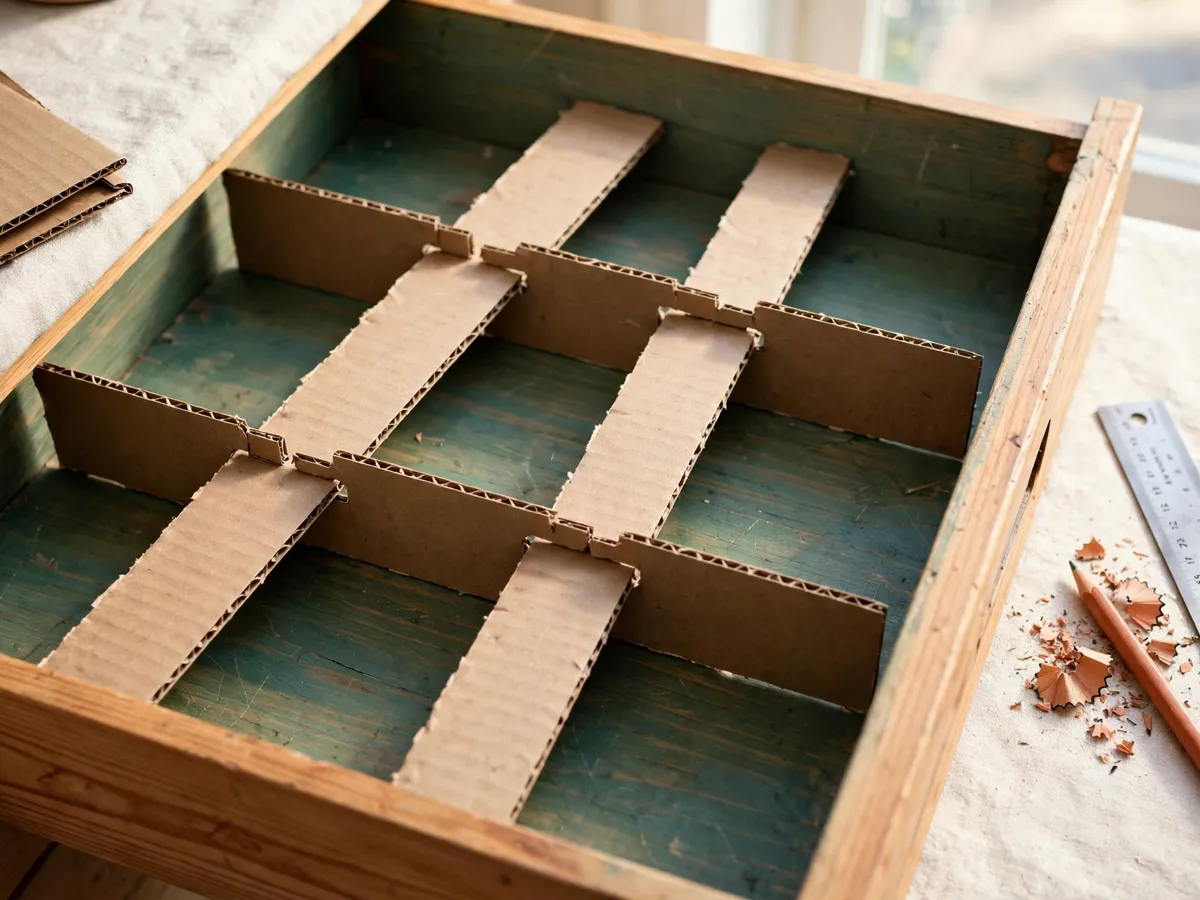
The best divider for a first attempt costs nothing and takes one evening: cut from a shipping box. Cardboard is the renter's perfect material — free, cut with a craft knife against a straight edge, stiff enough to stand when it's slotted together, and disposable when a section gets grimy. If the grid works, it has earned the right to be replaced by wood or a bought set. If it does not, you learned the drawer's grid for free.
Tools and materials
- One shipping box, flattened — single wall is fine
- A steel rule or straight edge and a pencil
- A craft knife, or scissors for a thin box
- A cutting surface — an old magazine works
- Masking tape, optional, to soften cut edges
Steps
- Measure the drawer as section one taught: usable floor width and depth between the rails.
- Decide the grid: how many long strips run front to back, and how many short strips cross them. Two by three gives six compartments — enough for a first kitchen or vanity grid.
- Cut the long strips: length = drawer depth minus half an inch; height = drawer height minus an inch, so the grid clears the drawer above when it closes.
- Cut the cross strips to the same height, length = strip spacing, minus half an inch.
- Mark and cut the slots: on each strip, at every crossing point, cut a notch half the strip height from the top edge down. Cut matching notches on the crossing strips so the notches face each other.
- Slot the strips together at the notches — the halves interlock and the grid stands on its own.
- Drop the grid in. It should slide a little, not rock. Trim if it wedges, tape a fold if a wall bows.
The notch is the whole trick. Two flat strips cannot cross without one bending over the other; two notched strips lock into a rigid cross without glue or tape. Four notches on a strip, mirrored on its partners, and a pile of cardboard becomes a standing grid that comes apart flat for cleaning or the move out. Keep the offcuts — they are next year's replacement walls.
Cost: $0 — one box, a knife, a rule. Time: 45–60 minutes for a first grid, faster after. Cardboard softens if it gets wet — skip it under the sink and keep it dry.
4. Fold clothes so you see everything
A clothing drawer hides its contents by default. Folded flat and stacked, every piece lies on top of the last, and only the top item exists — the shirt at the bottom of the stack may as well be in another room. Pulling from under the stack is what turns the drawer into the crumpled mess it was before the reset, and the crumpled mess is why nothing gets worn.
The fix is the file fold: stand clothes on edge, folded so each piece shows its fold line — the crease side up, the visible spine of the garment, like a row of files in a drawer. Fold in half, then in thirds until the piece stands about as tall as the drawer is deep. The magic is not the fold — the fold takes about ten seconds per piece — it is the visibility: every edge faces up, every piece is one glance away, and pulling one shirt does not disturb the row behind it.
Sort by lane before folding. The dividers from sections two and three split the drawer into lanes; fill each lane with one category, edges up, thickest pieces standing first at the back. Underwear and socks are the easiest start — small, forgiving, and their drawer is usually the worst one. The habit that keeps the drawer honest is refolding on the way back: ten seconds at the drawer instead of a future hour of re-digging, and the drawer stays the way the reset left it. It is the same two-minute nightly reset that keeps the whole apartment from sliding back — the room-by-room declutter checklist builds it into the evening.
Cost: $0. Time: 30 minutes for a full drawer, ten seconds per piece after. Fold to the drawer's depth — pieces taller than the drawer cannot stand.
5. The one-motion audit that keeps it tidy
A drawer is organized when you open it and touch what you came for in one motion. That is the whole standard — not how it photographs, but whether the scissors, the spare cable or the black socks arrive in the hand without digging. If you have to dig, if you have to pull two things out to reach the third, the grid is failing, and the fix is always one of two directions.
The grid has too few cells: the catch-all drawer lives in one big compartment, and the small things sink. Add a cross strip, split the cell, and the sinking stops. Or the grid has cells too big: a compartment sized for a saucepan swallows hairpins, and everything drifts to one corner anyway. Add dividers until every cell is small enough that its contents cannot hide from an opened drawer. When a cell holds one category and one row of it, the one-motion rule passes.
Run the audit once a month. Open each drawer, reach for three random things, and notice which pull became a dig. That dig is the drawer telling you which cell needs splitting or which lane needs refolding — a five-minute correction now instead of the next full reset. The audit is also the honest answer to "is it working?" — an organized drawer is not a drawer that looks organized once, it is one that still opens in one motion after a month of daily use.
Cost: $0. Time: 5 minutes a month, any drawer that needs it. One motion is the standard — a drawer you have to dig in is not organized, whatever it looks like.
What we would skip
Skip the spring-loaded plastic expanders. Their selling point is fitting any drawer — which means they fit none of them well: the spring loosens within months, and the whole unit slides sideways every time the drawer shuts. Skip the drawer "organizer set" with ten matching pieces — a set sized for a showroom drawer rarely matches yours, and the pieces you cannot use are the majority of what you paid for. Skip the adhesive bottom liners and sticky dividers: renter deposits and sticky residue do not mix, and nothing needs to be glued to a drawer that works by gravity. The one spend worth making, if the cardboard grid earns it: a wooden cross-grid cut to your measured dimensions, or a bamboo expandable divider sized after the half-inch clearance — bought once the free version has proven the layout.
Cost: $0 to skip. Time: the decisions that keep the next order from becoming the next drawer of unused plastic.
Before you buy: copy this
- Inside width and depth measured — the usable floor between the slide rails, not the outside of the box
- Half an inch subtracted from both, so the grid lifts out for cleaning
- Height measured from floor to the drawer above, closed — the grid must clear it
- The drawer's job named: deep kitchen standing grid, shallow vanity tray, or clothing lanes
- A cardboard grid built first — the free version proves the layout before anything is bought
- One replacement in mind — wood or bamboo, only after the cardboard has held up a month
Cost: $0 to check. Time: 10 minutes, before the order goes through.
Questions renters ask
How do I measure a drawer for dividers?
Measure the inside floor — width between the two inner walls and depth from the back wall to the inside face of the front — not the outside of the drawer. Then measure between the slide rails on the side walls, because a divider resting on a roller jams the pull. Subtract about half an inch from width and depth so the grid lifts out, and keep the height a full inch under the drawer above, closed.
Why don't my drawer dividers stay in place?
Because they were bought to a "standard" size rather than measured to yours, or because they rest on the slide rails. A divider that is too short for the drawer's width slides every time the drawer shuts; one that sits on a roller moves with the pull. Cut or buy to the measured inside floor minus half an inch, and a friction-fit grid stops wandering.
Can I make drawer dividers without buying anything?
Yes — one flattened shipping box, a steel rule, a pencil and a craft knife. Cut strips to your measured dimensions minus the half inch, notch half the strip height at each crossing point, and slot the notches together into a standing grid. It costs nothing, it comes apart flat, and it proves the layout before any bought divider earns a place.
What's the best way to fold clothes in a drawer?
File fold: stand each piece on edge, folded until it is about as tall as the drawer is deep, with the fold line facing up like the spine of a file. Every piece shows its edge, one glance reads the whole lane, and pulling one item does not disturb the row behind it. Refold on the way back — ten seconds per piece keeps the drawer the way the reset left it.
Save these on Pinterest
Pin the measuring rule and the cardboard grid — measure the usable floor, subtract half an inch, notch and slot — because those two pictures are what turn a drawer of sliding plastic into a grid that fits. This page belongs with the kitchen, bathroom, closet and declutter plans in the organization and storage guides.