 Plant As Deco
DIY Home Projects
DIY Pallet Fence Plans: Posts, Stringers and a Gate
By Plant As Deco · Updated 19 November 2026
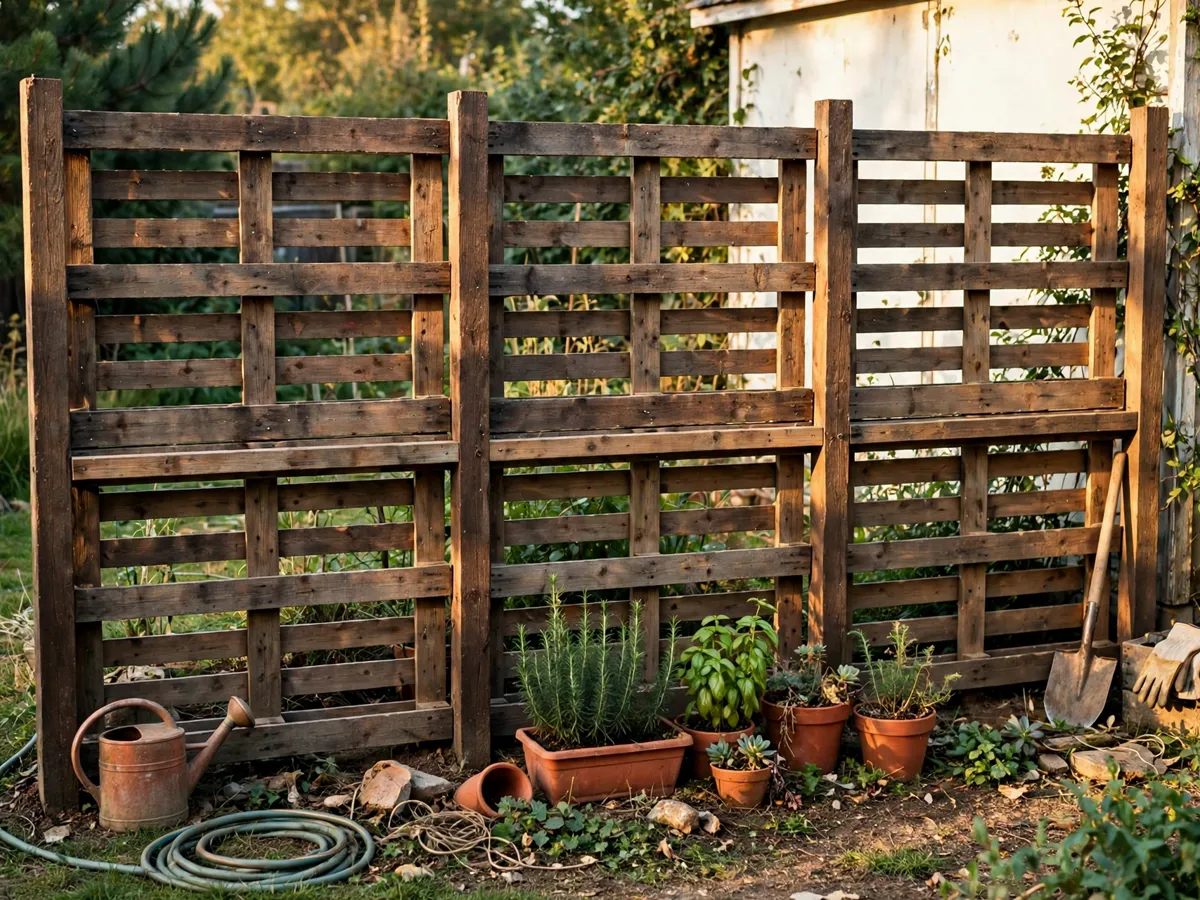
Most pallet fence advice online is a photo of stacked pallets and a line that says "just screw them together." That version leans after one winter, because a pallet on its own has nothing carrying the load sideways. The plan here is different: the posts and two horizontal stringers hold the fence up, and the pallet panels only fill the space between them. It is a border fence about 43 inches tall, and it stands on its frame rather than on the pallets.
Weekend-ready: $95–$210 for a 40-foot run, two weekends, renter-friendly only in the sense that the posts lift out later without a rebuilt yard.
1. Pick the pallets before you dig anything
A fence eats pallets faster than a bench does, and the wrong pallet in the row rots from the ground up in two seasons. Start with the stamp. Every pallet shipped internationally carries a small rectangle branded on two opposite corners: the IPPC logo, the country code, a registry number, and a two-letter treatment code. The code matters more than the rest.
- HT — heat treated. The pallet was kiln-dried to 56 degrees Celsius at the core. Safe to build with, safe to compost around, safe for a fence that touches soil. This is the only code to accept.
- MB — methyl bromide. A fumigant pesticide, restricted in most markets but still sitting in old stock. Burn it as marked waste or leave it in the pile. Never cut it into a fence that will hold soil or touch a child.
- No stamp at all. Domestic pallets sometimes skip the mark, and those are the ones that carried unknown freight. For a raised bed, skip them. For a fence that holds no food and no soil, they are acceptable if the boards are clean and dry.
Beyond the stamp, reject a pallet on sight for any of these: dark oil stains or wet patches (it carried something chemical), a broken or missing stringer block (the panel will not screw flat), warped deck boards with more than a half-inch of cup, and any pallet with the words "chemical" or a hazard diamond painted on it. A board with a nail still in it is fine — the plan uses the pallet whole, so those nails stay buried in the stringer. Whatever the weather where you build, an uncovered stack stays wetter than the fence ever will, so move the pile under cover before the work starts.
The size to hunt for is the 48-by-40-inch grocery pallet, the most common free pallet in a US city. Laid on its side it becomes a panel 48 inches wide and 40 inches tall, which is exactly what an 8-foot bay wants. A euro pallet at 47 by 31.5 inches is shorter, and you will see the height difference at every joint; use one kind for the whole run. Count two pallets per bay, so a 40-foot fence needs ten, plus one spare for the gate trim.
Free pallets come from curb pickup days, small building-supply yards, and the free box on the marketplaces. Big-box stores will often hand pallets over only with a receipt or a manager sign-off, and pallet brokers sell cleaned HT stock at roughly $4 to $12 each when the free hunt fails. Paying for ten pallets is a $40 to $120 line item, and it is the honest alternative to spending a Saturday driving between warehouses.
Cost: $0–$120 for ten pallets. Time: one morning of sourcing, or one trip to the broker.
2. Lay out the bays, not the fence
A fence fails at the layout more often than at the screw. Three things to settle before the first hole: where the line actually runs, what the local rules allow, and where the utilities are.
Property lines are not the fence you inherited, the hedge, or the crack in the patio. Read the plat in the closing paperwork, or pay for a boundary stake-out before a fence that will later be argued about. Then check the height rule: many US municipalities cap a rear-yard fence at 4 feet without a permit, and a corner lot often carries a 3-foot sight-line rule on the side streets. A 43-inch pallet fence sits under the 4-foot cap in most places, which is one reason this plan stops there. An HOA can be stricter than the city, and it reviews materials — some ban pallet construction outright.
Before any digging, call 811. It is free in every US state, the locators mark public utility lines a few business days out, and it is the difference between a post hole and a struck gas line. Do it even for hand-dug holes; a manual auger in a marked-free strip is fine, and an unmarked strip is not a bet worth taking.
Now the layout math. Run the fence in 8-foot bays measured post-center to post-center. A 4x4 post is 3.5 inches square, so the clear opening between two posts is about 92.5 inches. Two pallets on their sides fill 96 inches, so each bay needs roughly 3.5 inches of total trim — about 1.75 inches off the outer edge of the last pallet in the bay. Trim from the block end, not the deck boards, so the face of the fence keeps a full-width board.
- Snap a chalk line or stretch a string between two batter boards at the ends of the run, and mark every post center on the string, not on the ground.
- Corner and end posts carry more load than an intermediate post, so brace them on two axes, not one.
- Plan the gate as its own bay. A pedestrian gate 3.5 to 4 feet wide opens comfortably; wider than that and it sags into the latch no matter how well you build it.
- Walk the line with a level on the string. A 2-inch dip in the middle of a 40-foot run reads as a crooked fence from the patio, and the panels will show every bit of it.
The plan for a 40-foot run is six posts at 8-foot centers plus two gate posts, so eight in total, with the gate in the second bay from the house. Keep the gate away from the low corner of the yard, because that is where water pools and where the latch will rust.
Cost: $12 for a string line and two sets of batter boards. Time: 45 minutes, and it saves the whole weekend.
3. Set the posts — the part that decides the fence's life
Everything above the stringers is cosmetic. The posts carry the wind load, and a post set shallow racks the whole run in a season. The rule of thumb is one-third of the above-grade height: a 43-inch fence wants a 14-inch minimum, and 18 to 24 inches is the honest number. Where frost reaches 30 inches or more, go below it or accept that the row will lean in spring.
- Hole size: 10 to 12 inches in diameter for a 4x4, which is one pass of a manual auger plus a shovel to widen the base. A post in a hole barely wider than itself cannot be plumbed, and it heaves in frost.
- Base: 4 to 6 inches of 3/4-inch crushed gravel, tamped, so the post sits on drainage rather than in a cup of held water. This is the single cheapest thing that adds years.
- Footer: either a concrete footer filling the gravel up to about 4 inches below grade, or dry-set gravel all the way with a tamp pass every 4 inches. Both work. Full concrete to grade does not — it turns the hole into a planter and the post rots at the waterline.
- Plumb and brace: two boards nailed across the hole as a screed, one on each face, checked with a level on two axes. Wait on the corner posts until the footer sets, then brace the intermediates against the string.
Set the posts in two stages. Pour the corners and the gate posts first, let them cure overnight, then stretch the string against them and set the intermediate posts to the line. If you set all eight in one day without a cured reference, the row wanders by half an inch and the panels will not sit flat.
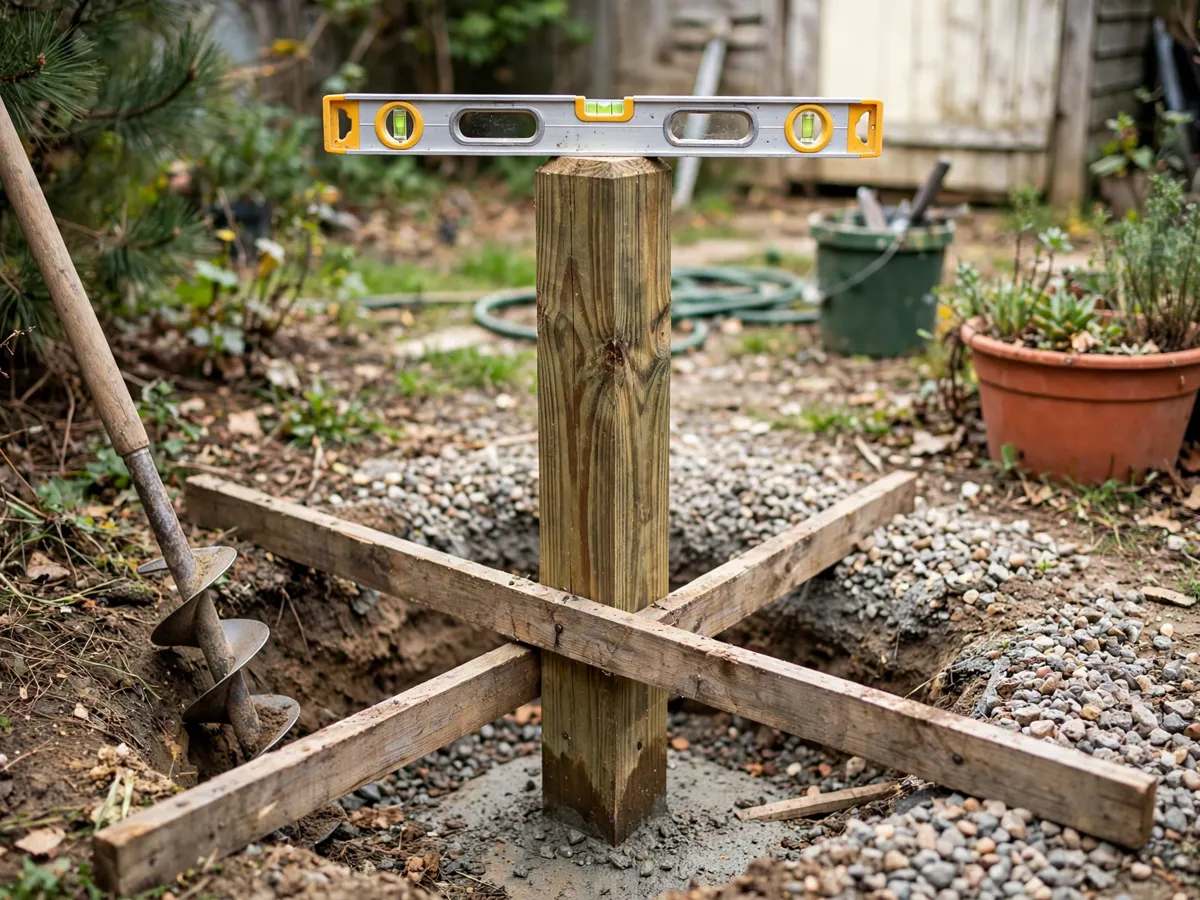
Treat the post before it goes in, not after. Cut ends of pressure-treated lumber are raw wound wood, and a brush of the same preservative on the end grain and the buried 6 inches slows the rot that starts exactly there. The ground line — 2 inches above and 2 below grade — is where a fence post dies, so keep soil, mulch and leaf litter 3 inches clear of it on both faces.
Cost: 8 posts at $22–$35, plus 4 bags of concrete $20–$28 and a gravel bag $5. Time: one full day for a 40-foot run, or two evenings.
4. Stringers and panels: the frame does the work
Two 2x4 pressure-treated stringers run the length of each bay, one low and one high, and the pallet panels screw to them. The bottom stringer sits 2 to 3 inches above grade — enough clearance that splashed rain and grass trimmers miss the boards, not so high that the gap reads as a mistake. The top stringer lands at 40 inches above the bottom one, which puts the fence face at about 43 inches above grade once the pallet is on its side.
- Stringer to post: four 3-inch pressure-treated deck screws per end, two angled from the post face and two through the stringer into the post. Do not notch the posts; a 4x4 notched for a 2x4 loses a third of its bearing and the notch holds water.
- Splices: an 8-foot stringer spans one bay cleanly. Where a bay is short, splice two stringers over a post, never mid-span, and screw both sides of the joint.
- Panel orientation: lay the pallet on its side so the deck boards run vertically. The three stringer blocks then become vertical runners, and they land exactly on the two horizontal stringers — top block, middle block, bottom block.
- Screw count: eight screws per pallet into the stringers (two per block, on both stringers) plus four where the panel touches a post. Call it 16 screws per pallet, so 32 per 8-foot bay.
Stagger the panel joints between bays. If every bay splits its two pallets at the same point, the fence reads as a grid and every seam shows. Alternate which side of the bay carries the trimmed pallet, and the seams walk along the run instead of lining up.
Fasteners have to match the lumber. Pressure-treated wood is acidic when wet and eats plain steel in a season, leaving rust streaks down the face. Use hot-dip galvanized, silicon-bronze, or screws labelled for treated decking. Drive them flush, not countersunk — a dimple in a pallet board collects water and the end grain swells around it.
One more detail that separates a fence from a pile: leave the panel loose at one end. A rigid run of screwed panels has nowhere to expand, and summer humidity pushes the boards outward until the face bows. A 1/8-inch gap at each panel end, filled with nothing, lets the row breathe. It is the same rule that governs any outdoor wood build, and skipping it is why so many DIY fences warp in their second summer.
Cost: 10 stringers (two per bay) at $6–$10, plus two 1-pound boxes of 3-inch treated screws $18–$26. Time: one afternoon per 20 feet once the posts are set.
5. Build the gate so it does not sag
A pallet gate made only of pallet boards will droop within months, because the pallet's own structure has no diagonal resistance. The fix is a frame: two 2x4s as the gate's top and bottom rails, a 2x4 on the latch stile, and one diagonal brace cut from the same stock, with the pallet panel screwed inside that frame rather than being the frame.
- Brace direction: the diagonal runs from the bottom of the hinge stile up to the top of the latch stile. Load then pushes the brace into compression, and the gate cannot rack through it. Reversed, the brace pulls itself loose.
- Hinges: two adjustable outdoor-rated T-strap hinges, the top one carrying most of the weight. Three-inch screws into the post, and only through the strap's own holes — drilling the 4x4 first keeps the post from splitting.
- Clearance: 2 inches above grade at the latch end on a slope, and 1/2 inch at the hinge end. A gate that drags on the ground in July will not latch in January.
- Latch: a simple hook-and-eye or a slide bolt on the latch stile, with the strike plate screwed to the post at the height you actually reach. A self-closing latch is worth the extra $6 if a dog or a child uses the yard.
Hang the gate last, after the stringers on both sides are fixed. A gate hung early becomes the reference for a crooked run, and every later panel gets shimmed to match the mistake. Set the gate with a level across its top rail, adjust both straps until the gap is even, then re-check after a day in the sun — a fresh treated post moves as it dries.
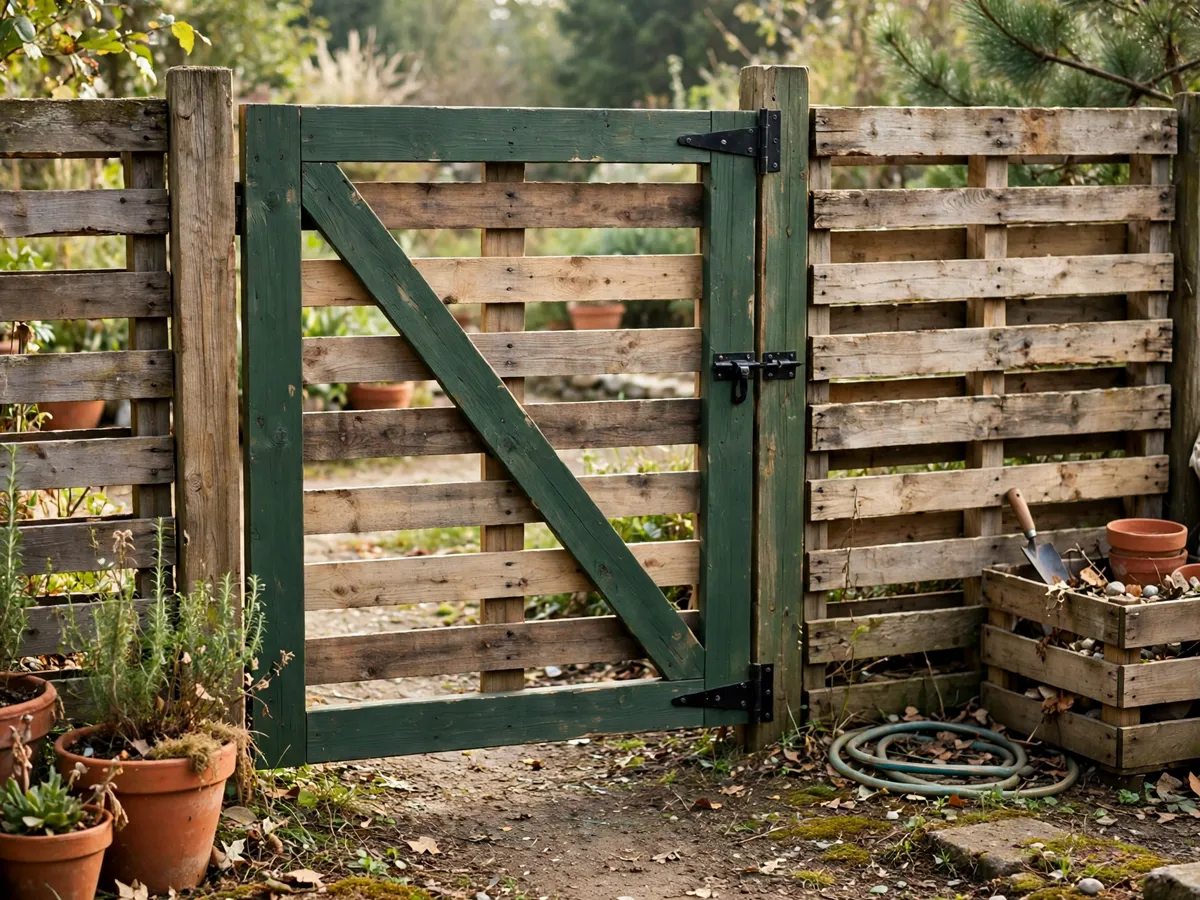
Cost: 3 pieces of 2x4 at $7–$11, two T-strap hinges $14–$24, a latch $8–$16. Time: two hours of framing, one hour of hanging.
6. Weatherproof it, then keep weatherproofing it
Pallet wood is drier and more porous than milled fencing stock, and untreated it greys, checks and softens in three to five seasons. The finish choice is a penetrating stain rather than a film-forming paint: a stain soaks into the end grain and flexes with the board, while paint sits on top and peels from pallet wood faster than from anything else. A solid-color stain is the compromise if the color matters more than the grain.
Sequence matters more than product. Stain after the fence is built but before the panels swell from their first rain, and always on wood that has dried two or three days after a build in damp weather. Brush the end grain twice — the cut ends of the deck boards drink three times what the face does — then the two faces, then the stringers. A pump sprayer covers a 40-foot run in 40 minutes and leaves fewer lap marks than a roller on rough pallet surfaces.
- Year one: stain at build, and again 12 months later once the wood has fully weathered and shed its mill surface.
- Every 2–3 years after: a single coat on the sun-facing side; shade-facing sides often need one every fourth year.
- Annually, in fall: clear leaf litter and soil splash from the ground line, and re-tamp any gravel that washed into a depression. This is the maintenance that actually extends the fence.
- Sprinkler test: run the sprinkler and watch the bottom boards. If they take a soak daily, raise the bottom stringer 2 inches or move the head — that is where the rot starts.
Weather does the rest of the deciding. A fence in a wet, frozen climate fails at the post line; the same fence in a dry climate fails at the sun-facing board faces. Outdoors, wind is the third force: the pallet panels act as sails, so add a third stringer at mid-height on the windward run — the panels then span 20 inches instead of 40 and the row stops flexing.
The outdoor pallet builds in outdoor pallet projects cover the same finish logic for a potting bench and a screen, and the reasoning transfers straight to a fence.
Cost: $28–$45 a gallon of penetrating stain, one gallon per 40-foot run per coat. Time: one day, two people for the second coat.
7. What a 40-foot run really costs
These are big-box prices for a mid-size US market in late 2026 — the shape of the spend rather than a quote. The pallets are the swing item: everything else is close to fixed.
- Posts — $176–$280. Eight 4x4x8 pressure-treated posts at $22–$35. The largest single line, and the one not worth buying used.
- Stringers — $60–$100. Ten 2x4x8 treated, two per bay plus gate frame stock.
- Pallets — $0–$120. Ten to eleven HT pallets, free if the hunt works, $4–$12 each from a broker when it does not.
- Fasteners and footer — $45–$75. Two boxes of treated screws, four concrete bags, two gravel bags, two hinge straps and a latch.
- Finish — $28–$45. One gallon of penetrating stain, enough for the build coat.
Total range: $95 with free pallets and borrowed tools, up to about $210 with bought pallets and a rented auger. A 40-foot run of boxed privacy fencing material alone lands near $600, so the pallet fence wins on price even after paying for the pallets. It loses on height, on privacy and on lifespan — expect 6 to 10 years from this build with the stain schedule kept, against 15 to 20 from a proper cedar fence. Buy the fence you will maintain, not the one that photographs well on the first weekend.
If the pallet hunt is the obstacle rather than the money, the sourcing logic — where the free ones actually are and which ones to refuse — is in the pallet projects for beginners guide, and the same frame thinking builds pallet furniture that holds weight.
Realistic all-in for a first-time builder: $140–$180. Time: two weekends.
The before-you-dig checklist
- Property line confirmed against the plat, not against the old fence or the hedge.
- 811 called and the utilities marked, at least a few business days ahead of the first hole.
- Height rule checked with the municipality, and the HOA's material list read if one applies.
- Ten to eleven HT-stamped pallets in hand, all the same size, with no oil stains and no missing blocks.
- Eight 4x4 posts and ten 2x4 stringers bought, plus treated screws in a 3-inch length — not plain steel.
- Bay layout marked on a stretched string, gate bay chosen away from the low corner.
- Stain on hand and a dry forecast for the two days after the build coat.
- Second person confirmed for post-setting; one holds the level and one tamps, and neither job works alone.
Cost: $0 to check. Time: 20 minutes, and the three items at the top are the ones that cannot be fixed later.
Common questions
How tall does a pallet fence actually end up?
About 43 inches for this plan: a 48-by-40 pallet laid on its side is 40 inches tall, and the bottom stringer sits 2 to 3 inches off the ground. That is a border and a visual screen, not privacy. A taller fence needs a second course of panels and a third stringer at mid-height, which also means deeper posts — the wind load grows faster than the height does.
Do the posts need concrete?
Not all the way up. Gravel tamped in layers works in well-draining soil and lets water drain past the post. Concrete works in loose fill and where frost heaves. What fails in both climates is concrete filled to grade, which holds a collar of water against the post and rots it at the ground line. Use a footer, crown the top, and keep 4 inches of gravel underneath.
Will this keep a dog in the yard?
Treat it as unlikely. Pallet panels leave gaps between the boards, a determined dog pushes through them, and 43 inches clears most medium dogs at a run. The gate is the weaker point either way. If containment is the job, the honest answer is a woven-wire panel between the same posts — the frame in this plan carries it fine, and the pallets then become a decorative face on the outside.
How long does a pallet fence last?
Six to ten years with the stain schedule kept and the ground line cleared each fall. Untreated and unstained, three to five, with the bottom row of boards going first. The posts outlive the panels: pressure-treated 4x4s in gravel last 15 years or more, so budget for a panel swap around year eight rather than a rebuild.
Can I build this without cutting the pallets?
Almost. The plan uses whole panels, and the only cut is the 1.75 inches of trim on the last pallet of each bay so the row fits the clear opening. Take that cut from the block end. The gate frame does need 2x4 cuts, and a hand saw with a speed square covers all of them — the beginner woodworking plans guide explains reading a cut list before the first one.
What kills a pallet fence fastest?
Soil and leaf litter piled against the bottom boards, a sprinkler soaking the same 3 inches every day, and plain steel screws rusting through the pallet blocks. All three are cheap to avoid at build time and expensive to fix later. Everything else — sun, frost, wind — is a maintenance schedule rather than a mistake.
Save these on Pinterest
Pin the before-you-dig checklist and the bay layout numbers — the two pages that decide whether the row is straight on the first evening. This guide and the rest of the DIY project guides live together there.