 Plant As Deco
DIY Home Projects
Pallet Furniture Projects for Beginners: Three Builds That Actually Work
By Plant As Deco · Updated 19 November 2026
Pallet furniture has a reputation problem: most of what gets built from pallets is heavy, splintery, and finished with more paint than woodworking. The honest version is smaller. Three pallet furniture projects genuinely suit a beginner — a coffee table that stacks two pallets and screws them tight, a bench with open storage below the seat, and a tiered plant stand that uses one pallet cut in half. None of them needs a workshop, and all three start with the same question: is this pallet safe to bring indoors?
Weekend-ready: $25–$70 in hardware and finish per build, one afternoon each. The pallets themselves are usually free or close to it.
1. Pick the right pallet before anything else
A pallet is freight hardware, and freight carries chemicals. Read the stamp burned into the corner block before loading it into a car, because the stamp decides whether this furniture project is safe or scrap:
- HT (heat-treated) — the kiln dried the wood hot enough to kill insects. No chemical residue. This is the only stamp you want for indoor furniture.
- MB (methyl bromide) — a fumigant banned for indoor use. Leave it outside at the curb, and ideally leave it for municipal pickup rather than reusing it at all.
- DB (debarked) — a process note, not a treatment. Check for a second stamp next to it.
- No stamp at all — unknown treatment, unknown history. Not worth the risk for a table or a bench.
Beyond the stamp, inspect the pallet like a buyer. Look for oil stains, wet patches with a chemical smell, and food or chemical residue in the board grain — a pallet that carried drums is not furniture stock. Then check the structure: four or more stringers (the thick boards underneath) mean a solid deck; two stringers mean a flimsy one that flexes under load.
Where to source free pallets legally: ask the receiving dock of a store or warehouse that stocks dry goods, and ask before taking anything. Pallets sitting curbside are often marked for disposal and safe to grab, but a pallet behind a fence belongs to someone. Standard size for the builds below is the GMA 48-by-40-inch four-way pallet — the most common shape in US freight, and the one every project here assumes. The pallet projects for beginners guide covers sourcing rules and the first disassembly build in detail.
Cost: $0–$5 per pallet at a reuse yard. Time: 10 minutes to inspect and choose four pallets for all three projects.
2. Prep and sand: the hour that decides the furniture
Every pallet project lives or dies in the prep hour. Freight wood carries splinters, protruding nails, dust from whatever crossed the country on it, and a surface rough enough to snag a hand or upholstery. Skipping prep is how pallet furniture ends up looking like pallet furniture. The sequence takes one afternoon and repeats for every build on this page:
- Clean — brush the deck boards, then wipe with a damp rag and let the pallet dry fully. Never stain or seal wet pallet wood; it warps as it dries under the finish.
- Count the fasteners — drive any nail that protrudes below the surface with a hammer and punch, or pull it. A nail head sticking up through a coffee table top will wreck a tray, a cloth, and eventually an ankle.
- Sand in two grits — start at 80 grit to knock the high fuzz and old stamp ink back, then finish at 120. Sand with the grain on the deck boards; across the grain leaves scratches that raise again when humidity hits. A palm sander cuts the hour to twenty minutes; a sanding block and elbow grease work fine on one pallet.
- Sand the edges last — the board ends are the softest wood on the pallet and the first place splinters form. Two passes at 80, one at 120, and run a palm across every edge to check.
Finish after sanding, not before: a water-based polyurethane or a penetrating oil protects the deck without sealing dust under the grain. Two thin coats, sanded lightly at 220 between them, beats one thick coat that runs. The beginner woodworking plans guide explains reading a finish label so the coat count matches what the can actually promises.
Dust is the step beginners skip and regret. Sanding pallet wood throws fine freight dust — the residue of whatever the pallet carried — and it settles on every surface in the room. Work outdoors where you can, or in a garage with the door up. Wear a mask rated for fine dust, not a cloth bandana, and wipe the pallet down with a tack cloth or a damp rag before the finish goes on. Finish applied over dust bonds to the dust, not the wood, and it peels in sheets within a season.
Cost: $15–$25 in sandpaper, a punch and a can of finish. Time: one hour per pallet, gloves and a mask on.
3. Project one: the stacked pallet coffee table
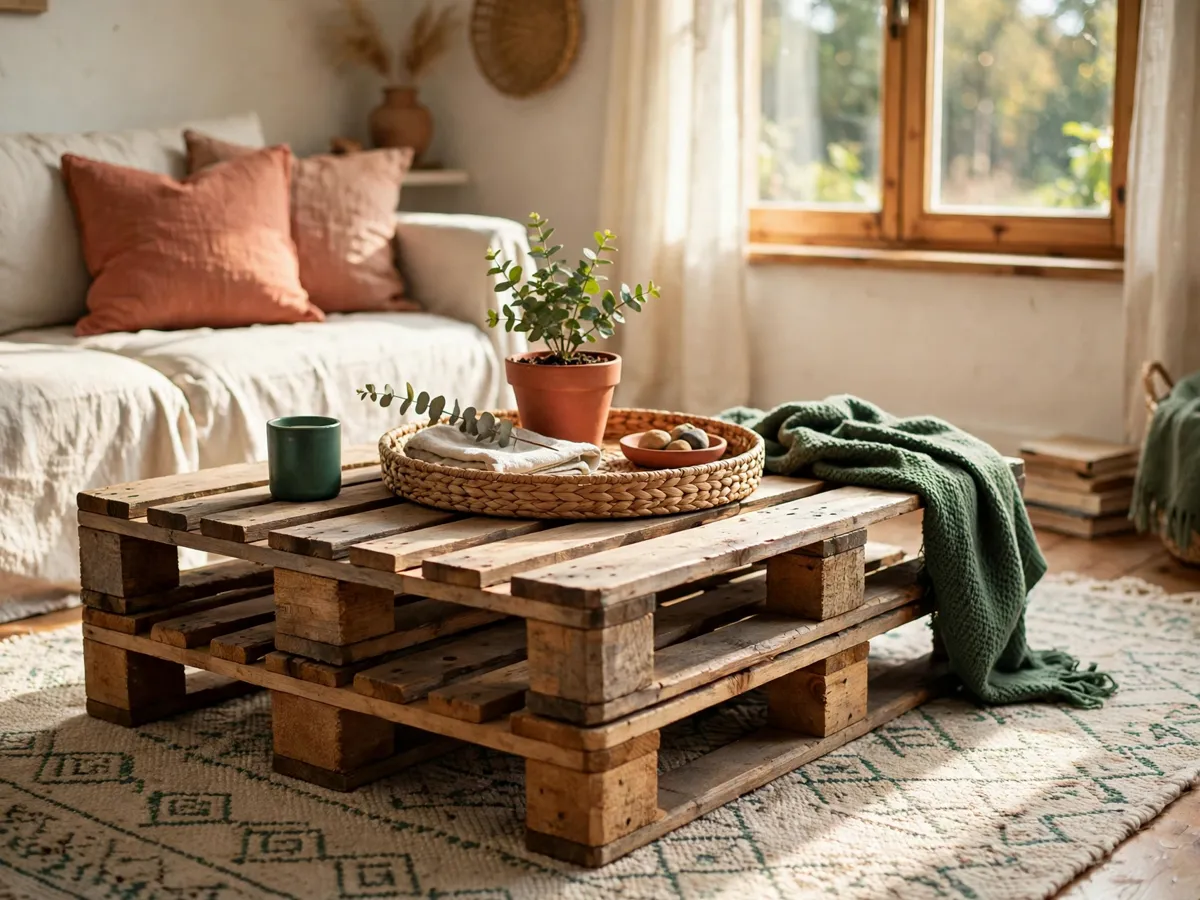
The coffee table is the easiest pallet furniture build because it cuts nothing. Two pallets, prepped and finished, stack one on the other with the stringers crossing at ninety degrees, and four screws through the top pallet into the bottom hold the sandwich together. Height lands at 16 to 18 inches with two pallets — coffee-table height in most living rooms.
The build order:
- Prep and finish both pallets, then let the finish cure a full day before stacking. Wet finish between two pallets bonds them into one board and ruins the seam.
- Flip the bottom pallet upside down on the floor. Its deck becomes the table base, and its stringers point up to receive the top.
- Set the second pallet on top, rotated 90 degrees so its deck runs across the bottom stringers. That cross-grain stacking is what makes the table rigid instead of racking side to side.
- Drive four 3-inch deck screws — two per stringer — down through the top deck boards into the bottom stringers. Countersink each one below the surface and plug the hole with a wood filler dab.
- Flip the whole table upright. Check for rock on a level floor; a rocking table means one corner block is short, and a felt pad under that corner fixes it in a minute.
Options that upgrade the table without changing the build: casters on the base lift it off the rug and make it movable (four locking casters, $20, screwed to the bottom pallet's corners); a woven tray on the deck corrals remotes and coasters; a glass top cut to size saves the finish from drink rings. Skip the glass if the table lives where kids knock into it — the pallet's own weight is a hazard with a glass plate on top.
Cost: two free pallets, $10 in screws, $5 in filler, $0–$20 for casters. Time: the prep hour plus 45 minutes of assembly.
4. Project two: the bench with storage underneath
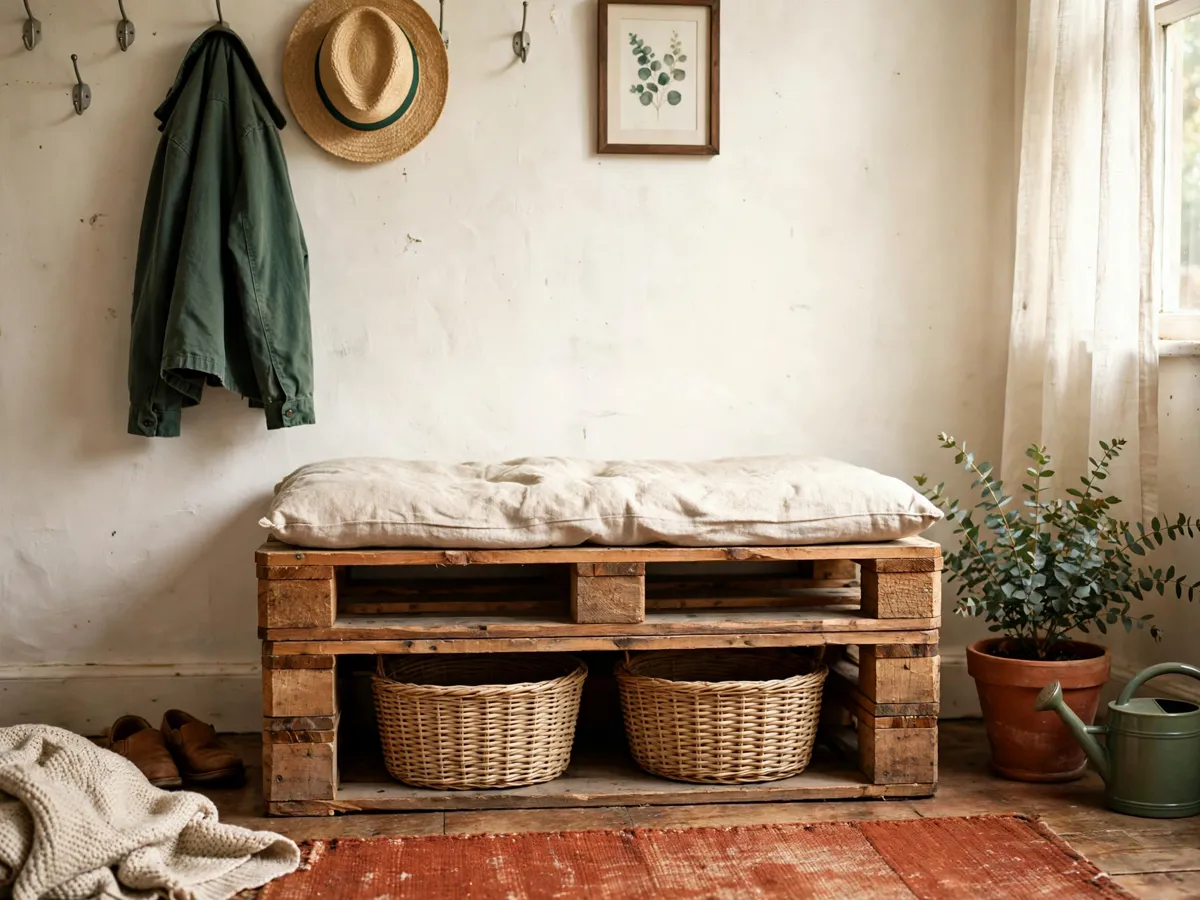
The pallet bench is one pallet stood on its long edge with a second pallet laid across it as the seat, and the gap below the seat becomes an open cubby for baskets. It works in an entryway, at the foot of a bed, or on a covered porch, and it is the only build here that carries a person — so its fastener count is not optional.
The base pallet stands on edge: its deck boards run vertical, and the two stringers become feet. Lay the seat pallet across the top and screw through the seat into both base stringers — six 3-inch deck screws minimum, two per stringer per side, plus two more through the base deck into the seat rail. A bench that takes 180 pounds of person needs more steel than a coffee table does.
Seat height is the detail that decides where the bench works. Two pallets stacked on edge land the seat at 17 to 18 inches — right for an entryway where adults slip shoes off, slightly low at the foot of a bed. One pallet laid flat as the seat on a single upright base drops it to 15 inches, which suits kids and reads lower in the room. Measure the mattress or the door frame before choosing, because a bench that sits six inches under the bed deck collects dust instead of shoes.
Comfort is a cushion away. A bench seat cut from pallet deck boards sits hard and shows every screw plug; a 2-inch foam pad wrapped in outdoor-weight fabric covers the seat completely and ties back with two snaps. Wash the cover monthly — a bench in an entryway collects more dirt than a table ever will.
The cubby below holds two baskets sized to the gap: standard pallet width leaves about 12 inches of depth inside the base, so a 10-by-12 basket slides in without binding. Baskets turn the bench from a seat into entry storage — shoes in one, bags in the other. The shoe storage guide plans the rest of the entry around it.
Cost: two free pallets, $14 in screws, $10–$25 for baskets, $15–$30 for the cushion. Time: the prep hours plus one hour of assembly.
5. Project three: the tiered plant stand
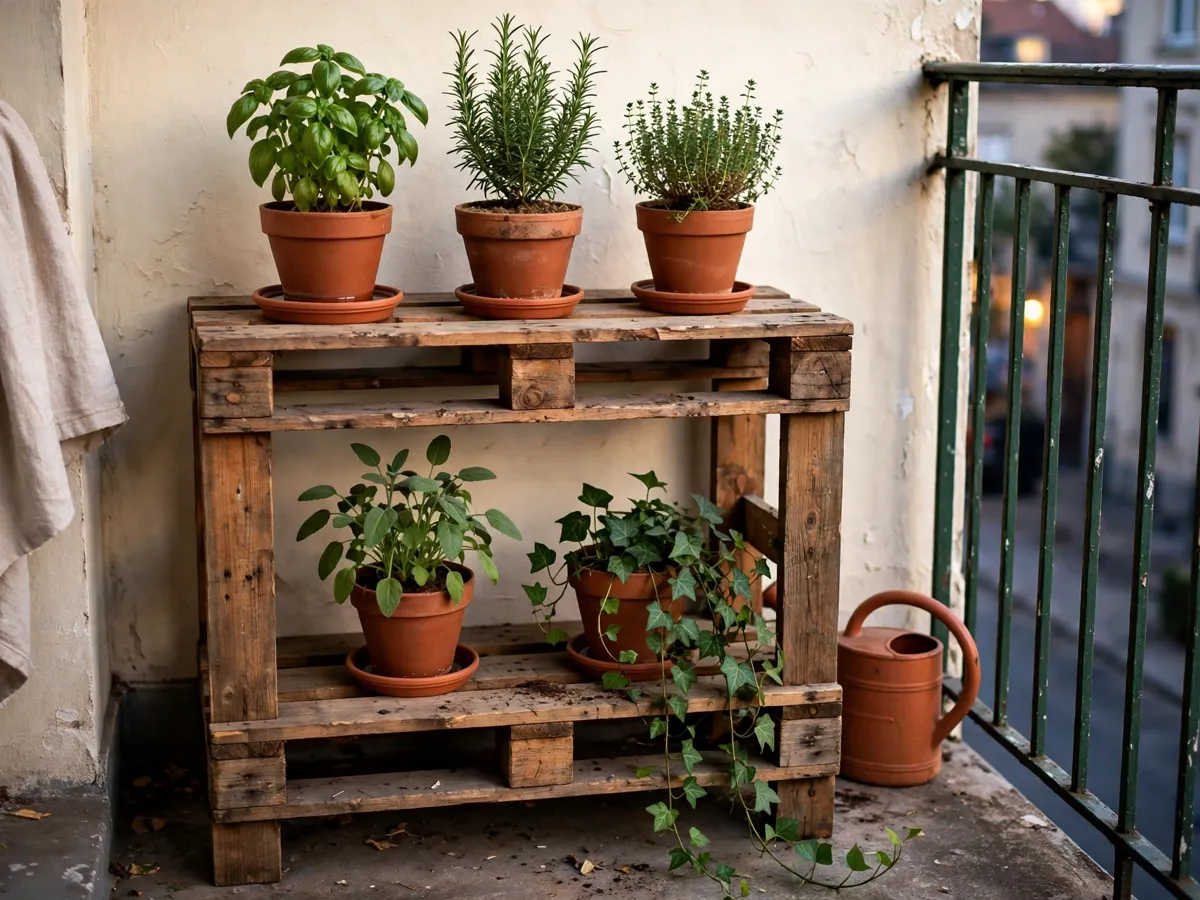
One pallet, cut in half crosswise, makes a two-tier plant stand — the build that introduced pallet furniture to a generation of balconies, and the one that still works because it uses half a pallet and thirty minutes. It is also the project where the planter boxes get real soil and real water, so its finish matters more than the table's.
Size the stand to the planters before the first cut. A six-inch herb pot needs about seven inches of deck per slot; a ten-inch planter needs more, and a halved pallet gives roughly four planter slots on the lower deck and three on the frame's ledges. Count the pots you actually own, add one spare slot, and cut the pallet to that width rather than to a number copied from a photo. A planter that overhangs the deck edge tips when the soil dries out and the pot shrinks loose.
Cut the pallet across its middle stringer with a reciprocating saw — two halves, each about 20 inches long. Stand one half vertical as the back frame; lay the second half horizontal and screw it through the frame's deck boards into the horizontal pallet's stringers. The result is a stepped stand: pots sit on the lower deck, and the vertical frame's own ledges hold the upper row. Four 3-inch screws carry the whole structure; add two more if the stand will hold pots over 15 pounds.
Waterproof the zones that get wet. Every square inch of deck that touches a pot rim gets two coats of an exterior penetrating sealer, and the sealer goes on before assembly so the screw holes seal with the board. A stand that skips this swells, cracks its finish, and rots at the joints within two seasons of watering.
Tray discipline: a shallow plastic tray under each pot catches the runoff that would otherwise sit on the wood. The tray is the difference between a stand that lasts three years and one that lasts ten. For a covered porch, line the stand's deck with a cut piece of landscape fabric under the trays as a second guard. The outdoor pallet projects guide covers sun, rain and rot rules for stands that live outside full time.
Cost: one free pallet, $6 in screws, $8–$15 in sealer and trays. Time: the prep hour plus 30 minutes.
6. What to avoid
- Any pallet stamped MB. Methyl bromide does not sand off, and a bedroom table made from treated freight wood is a chemistry set next to the bed.
- Hidden fasteners in a seat. A bench rests on screws through the seat into the base stringers, never on brad nails or glue alone. Glue joints fail sideways under a shifting person.
- Painting over the stamp. The stamp is the safety record. If a pallet's treatment is unknown because someone painted it, that pallet stays outside.
- Indoor stands without trays. Water finds the wood grain, the grain swells, and the finish pops off in rings exactly where the pot sat.
- Reusing a broken pallet "reinforced." A cracked stringer is a cut chord. No amount of crossed bracing returns it to load duty, and furniture carries people and plants, not decorations only.
Cost: $0 to avoid all five. Time: the two minutes of reading that keeps a bench from folding.
7. What it costs, honestly
The pallets are the cheap part of pallet furniture; the hardware, sandpaper and finish are the bill. At big-box prices for a mid-size US market — treat these as the shape of the spend rather than a quote:
- Coffee table — $25 to $45. Two free pallets, $10 in deck screws and plugs, $10 in sandpaper, $10–$20 in finish. Casters add $20 if the table needs to roll.
- Bench — $35 to $70. Two free pallets, $14 in screws, $12 in sandpaper and finish, $10–$25 for baskets, $15–$30 for a cushion. The seat is the build where cheap screws are the false economy: buy the structural deck screws.
- Plant stand — $20 to $35. One free pallet, $6 in screws, $8–$15 in exterior sealer, $6–$12 in drip trays. Blade replacement for the reciprocating saw runs $8 if the rental shop's blade is already dull.
- Shared kit across all three — $30 to $50. One box of assorted sandpaper, a hammer and punch, a drill or driver, a mask and gloves. The first build carries most of this cost; the second and third borrow it free.
Compare that to furniture-store prices: the same three pieces new run $300–$700. A beginner who builds all three spends under $150 including the shared kit, and owns the tools after. The one-board crate plan is the next build for anyone who decides pallets are too rough and lumber is cleaner work.
Realistic all-in for the coffee table and the plant stand: $50–$85 including shared tools. Time: two afternoons.
The before-you-cut checklist
- Every pallet stamped HT and inspected — oil, moisture, smell and cracked stringers all checked before transport.
- Deck and fasteners counted — four or more stringers per pallet, no missing deck boards on the surfaces the furniture shows.
- Prep done in order — clean, dry, punch the nails, sand 80 then 120, edges last, mask and gloves on.
- Finish cured before assembly — a full day between the last coat and the first screw, so nothing bonds the pallets together.
- Screws sized to the job — 3-inch structural deck screws through deck into stringer, countersunk and plugged; nothing shorter carries a seat.
- Load points tested — table: press every corner; bench: lean full weight on the seat before anyone sits; stand: shake the frame with pots loaded and fix any creak before the soil goes in.
- Wet zones protected — sealer and drip trays on every surface that sees a watered pot.
Cost: $0 to check. Time: 10 minutes before the first cut.
Common questions
Are free pallets safe for indoor furniture?
Only the stamped ones. A heat-treated pallet marked HT was dried with kiln heat and carries no fumigant residue, so it is fine indoors after cleaning and sealing. An MB pallet was fumigated with methyl bromide and belongs outside or in municipal collection. A pallet with no stamp has an unknown history, and unknown is the wrong answer for a coffee table in a living room.
How do I keep pallet furniture from looking cheap?
The prep hour. Sand past 80 grit to 120, punch every nail head below the surface, plug the screw holes, and finish with a matte poly or a penetrating oil instead of opaque paint. One design move helps as much as the sanding: keep the pallet's own deck pattern visible and hide the hardware inside the stringers, so the piece reads as built rather than stacked.
Can a pallet bench hold a person safely?
Yes, with structural screws and a crossed stack. The seat pallet fastens through its deck boards into both base stringers with six 3-inch deck screws minimum, and the base stands on its stringers so the load travels through thick wood, not deck boards. Test it by leaning your full weight on the seat before sitting; a creak means another screw at the joint, not a cushion over the problem.
What tools does a beginner need for these three builds?
A drill or driver, a hammer and punch, a tape measure, sandpaper or a palm sander, and a reciprocating saw for the plant stand cut — that is the whole list, and the saw is the only item most renters lack. A rental blade and a borrowed saw cover it for $15–$25 at a tool library or rental shop. None of the three builds needs a table saw, a miter station or a lathe.
Does pallet furniture work on a covered porch?
Better than indoors, with one condition: exterior sealer on every board and drip trays under every pot. A covered porch keeps rain off the wood but humidity stays in the air, and humidity swells untreated deck. Re-seal the stand once a season and the bench twice a year, and all three builds live outdoors for years. The full outdoor rule set lives in the outdoor pallet projects guide.
Save these on Pinterest
Pin the stamp-reading rules and the before-you-cut checklist — the two things that decide whether a free pallet becomes furniture or firewood. This guide and the rest of the DIY project guides live together there.