 Plant As Deco
DIY Home Projects
DIY Picture Frame: Mitered Pine Build with Mat and Glass
By Plant As Deco · Updated 22 November 2026
A store frame for an 8x10 photo with a mat runs $25 to $60, and the price climbs from there as the opening gets bigger. A mitered pine frame for the same photo costs a fraction of that, and the only skills involved are measuring twice, cutting four 45 degree ends, and gluing corners square. This plan walks through the sizing math for a photo, a mat and the moulding overlap, the cut list that follows from it, the assembly order that keeps corners tight, and the glass question answered honestly for a rental.
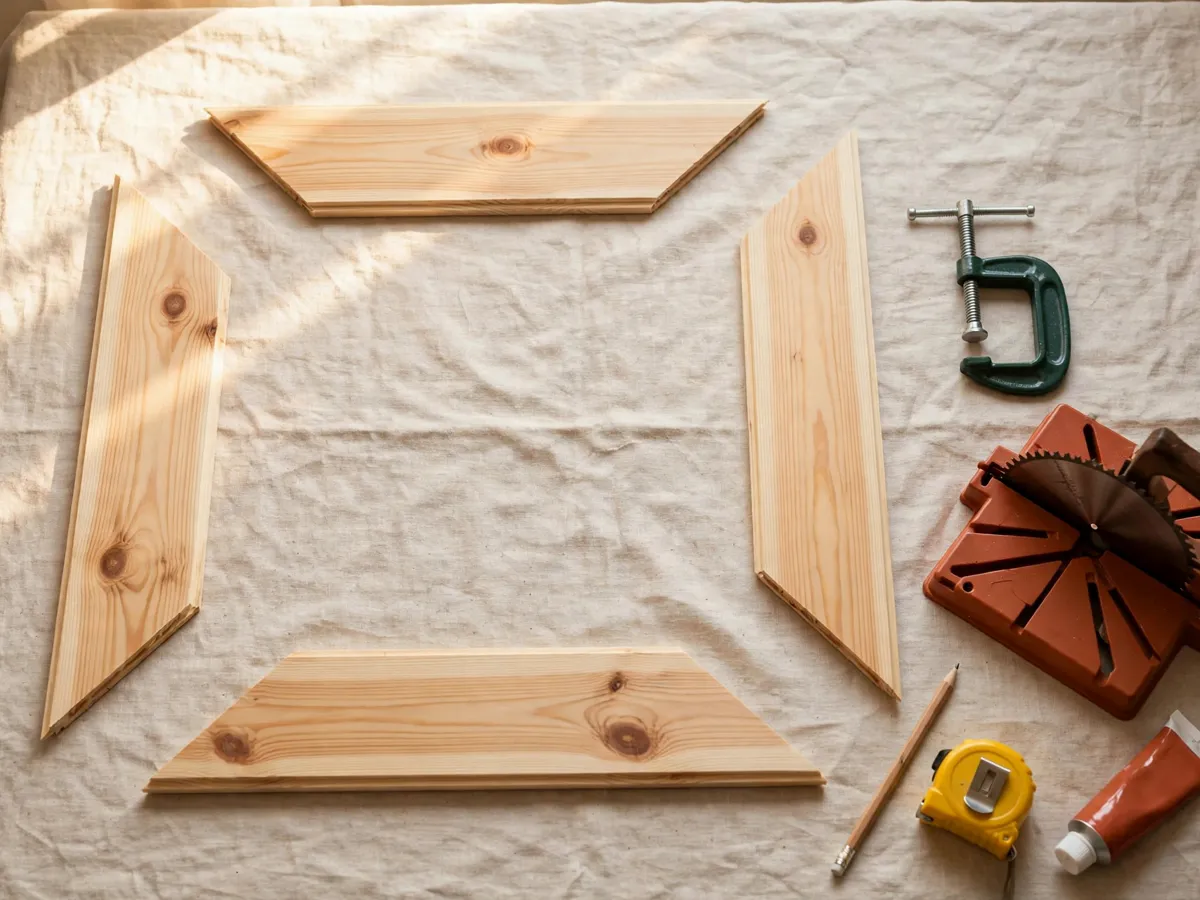
Weekend-ready: $12–$30 per frame, one afternoon. Renter-safe, no wall damage beyond one nail or a pair of adhesive hooks.
1. Why frames cost more than photos, and when DIY wins
Walk any big-box frame aisle with a tape measure and a price scanner and the pattern is hard to miss: an 8x10 frame with a mat starts around $25, an 11x14 with a mat passes $40, and anything described as gallery style runs well past $60. The materials behind those prices are a foot of moulding, a sheet of glass, a backing board and some bends of hardware. What the buyer pays for is the cutting, the joining and the shelf space, all done by someone else, all marked up again at each step between the factory and the shelf.
DIY wins hardest exactly where store prices climb fastest: 8x10 and larger, and any size that is not a standard opening. A 10x13 crop from a photo printer has no cheap store frame waiting for it, but the miter math below does not care whether the photo is a standard size or an odd one, so the odd sizes are where homemade frames pay for themselves first. A batch of frames for a gallery wall is the other clear win, because one afternoon of cutting produces five frames for less than the cost of two store versions.
DIY does not win everywhere, and pretending otherwise wastes weekends. Small 4x6 and 5x7 frames sell for a few dollars, less than the moulding and glass cost to buy separately, so buying those is the honest choice. Metal frames, deep shadow boxes and anything with glass held by spring clips involve tooling a beginner does not own yet. And a first mitered frame takes longer than an hour; the savings are real but they arrive after the learning curve, not during it. For the broader question of which projects earn their weekend first, the beginner woodworking plans guide ranks a first build against the alternatives, and the workbench plans for beginners cover the one upgrade that makes every future build faster: a surface at the right height to miter on.
Cost: $0 to comparison shop with a tape and a phone. Time: 20 minutes in the frame aisle pricing what you would have bought. One caveat: DIY pays at 8x10 and up and at odd sizes, and buying stays cheaper for small standard openings.
2. Size it: the photo, mat and rabbet math, written out
Every dimension in a picture frame comes from three numbers you choose: the photo size, the mat border, and the width of the moulding you bought. Call them W x H for the photo (8 x 10 inches for the build below), B for the mat border on each side, and M for the moulding width. There is a fourth number, R, the rabbet lip depth, and it matters in section 7 but not to the lengths. Here is the arithmetic for an 8x10 photo with a 2 inch mat border in 1-1/2 inch moulding, one number at a time.
- Mat window. The opening cut in the mat equals the photo exactly: 8 x 10. The mat overlaps the photo edge by about 1/4 inch on each side in a store-bought mat, which is why the window is cut to hide that edge rather than to show it.
- Mat outside size. Photo plus two borders: 8 + (2 x 2) = 12 inches wide, 10 + (2 x 2) = 14 inches tall. The mat is 12 x 14.
- Frame inner opening. The hole the mat fills: 12 x 14. A rabbet lip of 3/8 inch wide overlaps the mat on each side, but that overlap is hidden behind the mat, so it changes no visible dimension.
- Frame outer size. Inner plus two moulding widths: 12 + (2 x 1-1/2) = 15 inches wide, 14 + (2 x 1-1/2) = 17 inches tall. The finished frame measures 15 x 17 outside.
- Corner piece lengths. Each side runs the full outer length of its edge: the two horizontal pieces are 15 inches long, the two vertical pieces are 17 inches long, every end cut at 45 degrees. Because the miters interlock, the four pieces add up to the frame perimeter: 2 x 15 + 2 x 17 = 30 + 34 = 64 inches of moulding in the finished frame.
- Total moulding to buy. Add saw kerf, about 1/8 inch per cut across 8 cuts, one inch, and a margin for the two ends that will go wrong on a first frame: 64 + 1 + 5 = 70 inches needed, which rounds up to one 8 foot (96 inch) length. One board covers the frame with 26 inches of spare for mistakes and a second small frame.
The same three formulas work for any photo and any mat you decide on later. Inner opening = photo + 2B. Outer size = inner + 2M. Total moulding = 2 x outer width + 2 x outer height, plus kerf and margin, rounded up to the stock length the store sells. Write the four results on the board itself in pencil before cutting anything, because the numbers are easier to check on the wood than in your head at the saw.
Cost: $0. Time: 10 minutes with a tape, the photo and a pencil. One caveat: measure the actual photo, because a printed 8x10 sometimes trims to 7-7/8 x 10-1/8 and the mat window should match the print, not the label.
3. Tools you own versus tools you will buy
The reason this plan works in an apartment is that a picture frame is four cuts and four joints, and none of the cuts is longer than 17 inches. A hand miter box with a backsaw handles all of them. The miter box is a plastic or wooden trough with slots cut at 45 and 90 degrees that guide the saw blade square to the fence, and a decent one with a 14 inch backsaw costs $15 to $30. That is the only tool in this build a beginner is likely to lack.
- Tape measure and a sharp pencil, ideally mechanical for a thin line. Thin lines matter here, because frame tolerance is tighter than the wine rack tolerance of a shelf build.
- Miter box and backsaw. The slots do the angle work; your job is holding the saw level and letting the teeth cut, not forcing.
- Wood glue, a small bottle of yellow PVA. Glue carries this frame; nails only pin it.
- Corner clamps, two if possible, or a strap clamp that wraps all four corners at once ($10 to $25). Two spring clamps and two flat scraps work as the poor version.
- Sandpaper, 120 and 180 grit, plus a sanding block or a scrap of 2x4 wrapped in paper.
- Hammer and brad nails (1 inch, 18 gauge) if you choose to pin the corners, or a staple gun with 1/2 inch staples for the backing board step.
What you do not need: a miter saw, a table saw, a router, a brad nailer or a biscuit joiner. A power miter saw makes the same four cuts faster and is the tool to buy when frames become a habit, but a miter box holds 45 degrees just as accurately on pine trim, and accuracy is the whole game here. If you would rather not saw at all, most US hardware stores cut trim to a marked list for a small fee per cut; bring the lengths from section 4 and check every piece at the counter, because a miter cut that came out at 44 degrees is only discoverable at home.
Cost: $15–$30 if the miter box and saw must be bought, $0 if the drawer already has them. Time: 20 minutes to gather everything. One caveat: a dull backsaw wanders off the slot line, so replace the blade rather than fighting a cut that opens at the back.
4. The material and cut list, with the totals shown
The stock is pine moulding or pine trim board, the same aisle as the casing carpenters nail around doors. A 1-1/2 inch wide profile with a square face cuts cleanly in a miter box, and pine takes stain, paint or a raw-sanded finish without argument. Check the rabbet before buying: many moulding profiles come with a rabbet already cut along one back edge, and section 7 explains why that lip is the single most important feature on the board.
| Part | Size | Qty | Notes |
|---|---|---|---|
| Horizontal moulding pieces | 15 in long, mitered both ends | 2 | 1-1/2 in pine, 3/8 in rabbet |
| Vertical moulding pieces | 17 in long, mitered both ends | 2 | From the same 8 ft board |
| Glass or acrylic | 12-3/8 x 14-3/8 in | 1 | Cut at the store counter |
| Mat board | 12 x 14 in, 8 x 10 window | 1 | Pre-cut, or cardstock in section 9 |
| Backing board | 12-3/8 x 14-3/8 in | 1 | 1/8 in MDF or heavy cardstock |
| Glazing points or tabs | 1/2 in | 8–12 | Hold the stack in the rabbet |
| Hanging hardware | Sawtooth or 2 D-rings | 1 set | Plus 4 felt pads for the corners |
The moulding total, shown the same way section 2 built it. Two horizontal pieces at 15 inches = 30 inches, two vertical pieces at 17 = 34 inches, so 64 inches of finished frame. Add one inch of saw kerf across the eight miter cuts and about five inches of margin for a mis-cut pair, and the board needs to supply 70 inches. Pine moulding sells in 8 foot lengths of 96 inches, so one board covers the build with 26 inches left over, and that leftover is the spare for the pair of ends a first frame usually ruins. At $4 to $9 for a stick of pine moulding, lumber is the cheapest line on the list.
The glass size needs its own explanation, because it is the one number that is not the mat size. The rabbet lip is 3/8 inch wide, and the pane must slide under the full lip rather than stopping at its edge, so glass and backing are cut to the inner opening plus twice the rabbet width: 12 + (2 x 3/8) = 12-3/8 inches wide, 14 + (2 x 3/8) = 14-3/8 inches tall. Hardware stores cut glass and acrylic to the half inch or finer from the counter; give them 12-3/8 x 14-3/8 and the pane seats into the rabbet with a sixteenth to spare. The backing board gets the same size.
Cost: $12–$30 for moulding, glazing, mat, backing and hardware. Time: 60 minutes of shopping including the counter cuts. One caveat: sight down the moulding stick before it goes in the cart, because a bow that hides in a 96 inch stick turns into a gap at every corner of a 15 inch piece.
5. Cutting the miters: pairs, labels and the long end first
A miter joint is two 45 degree ends meeting to form a 90 degree corner. The cut list calls each piece mitered on both ends, and the habit that keeps the arithmetic honest is cutting in labeled pairs: the two horizontal pieces together, then the two vertical pieces together, each pair cut to identical length with opposite miter directions so they mirror each other in the frame.
- Label first, cut second. Write H1 and H2 on the back of the stock where the horizontal pieces will come from, and V1 and V2 for the verticals. Marks on the back face never show in the finished frame, and the labels stop the classic error of cutting two left-hand pieces and no right-hand ones.
- Decide the rabbet face and keep it consistent. The rabbet (the recessed lip) must face the inside of the frame on all four pieces. Put the rabbet against the miter box fence, face down toward the slot, and keep it that way for every cut; flipping the board mid-cut is how a frame ends up with one lip inward and three outward.
- Cut the long end of each piece first, at 45 degrees with the moulding seated hard against the fence and held so it cannot slide. Measure the piece length from the long point of that first miter (the outer corner of the angled end) to the mark for the second miter. The outer length is the number from section 2: 15 for H1 and H2, 17 for V1 and V2.
- Cut the second end of each piece in the opposite 45 slot. A miter box has paired slots so the saw can drop into the opposite angle without repositioning the work; use the pair, and check that the offcut falls away rather than binding between blade and fence.
- Test the four ends against each other on the bench before any glue: stand H1 and H2 on their miter ends and bring V1 and V2 to them. Four corners should read tight, with daylight visible at none of them. A corner that gaps at the front of the joint means one cut ran slightly off 45; a corner that gaps at the back means a length is off. Both are section 13 problems with cheap fixes while the pieces are still dry.
- Soften every face edge with two light passes of 180 grit before assembly. Corners of a frame are touched as often as any furniture edge in the house, and a crisp miter edge is the splinter that finds a hand first.
Cost: $0 beyond the blade wear. Time: 45 to 60 minutes for eight miter cuts and the dry fit. One caveat: cut from the long end of the stock outward, never start a cut at the very end of a board, because the last inch of moulding is where store handling splits live.
6. Assembly: glue, clamp, and check square with diagonals
A mitered frame is glued on the ends and held square while the glue sets, and the only measurement that matters during assembly is the diagonal check: on a square frame, the distance from one outer corner to the opposite corner reads the same on both diagonals. When the two diagonals differ, the frame is racked into a parallelogram, and no amount of clamping pressure fixes it afterwards; the fix is shifting a corner now, while the glue is still wet.
- Dry-fit the four pieces with the rabbets facing in. Confirm the labels from section 5 are doing their job: two horizontals against two verticals, four miter pairs, no lip pointing outward. Check the diagonals even dry, because the correction that costs nothing now costs a clamp later.
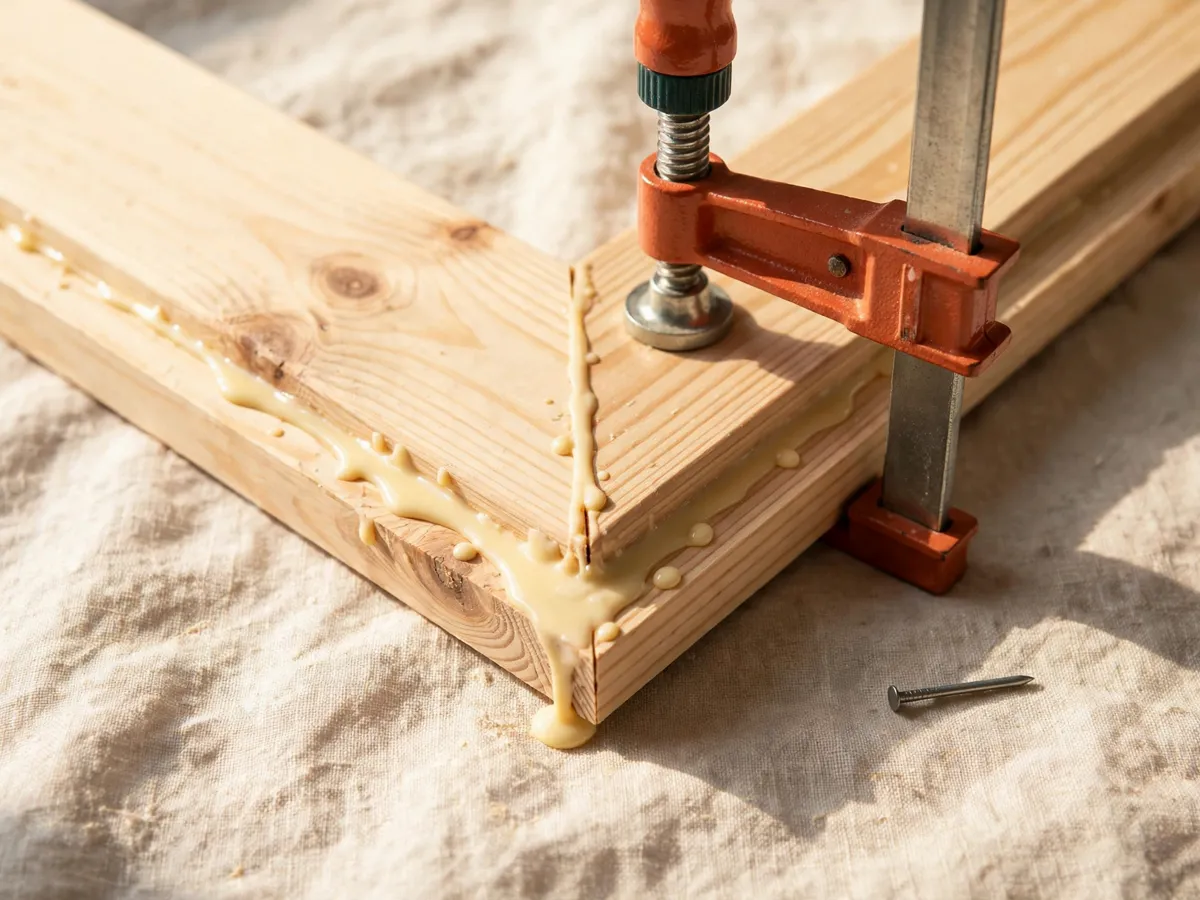
- Glue one pair at a time. Run a thin, even bead of PVA glue along both miter ends of one horizontal piece, spread it with a fingertip so it wets both faces, and bring a vertical piece to it in a corner clamp. Two corners at a time is the manageable rhythm; four at once is how the third corner stops reaching the fourth.
- Close the joints fully. A miter wants the outside corner tips aligned first, because the tips are what show; squeeze until the tips meet, then check the inner edges. Slight squeeze-out at the inner corner is expected and gets wiped now with a damp rag before it skins.
- Add both remaining corners and clamp the whole frame. With a strap clamp, wrap once, bring every miter closed by hand, then tension gradually so no single corner gets dragged. With two corner clamps, work opposite corners, then the other pair.
- Measure both diagonals and adjust while wet. Set the frame face down on a flat surface, measure corner to opposite corner both ways, and nudge the frame toward a rectangle until they match within a sixteenth. Two equal diagonals on a flat surface mean a square frame.
- Pin the corners while the clamp holds, if pinning at all. One 1 inch brad through the face near each outer corner, angled slightly into the joint, adds mechanical hold for a frame that will be moved or leaned. Tap gently; pine splits near a miter tip more easily than anywhere else, and a pre-drilled 1/16 inch pilot takes the risk out near the very tip.
- Leave the clamps for the glue's full set time (an hour minimum, overnight is better) before the rabbet work in section 7.
Cost: $0 beyond the glue already counted. Time: 30 minutes of work plus an hour to overnight of setting. One caveat: glue squeeze-out wiped away after it skins leaves a shiny smudge that stain will not cover, so wipe wet or scrape dry before finishing.
7. The rabbet depth decision: how deep the lip must be
The rabbet is the step cut into the inside back edge of frame moulding, and it is what actually holds a picture: glass, mat, photo and backing all stack into that recess, and the lip keeps them from falling forward out of the frame. Depth is the dimension to check before the first cut, because no amount of careful assembly adds moulding that is not there.
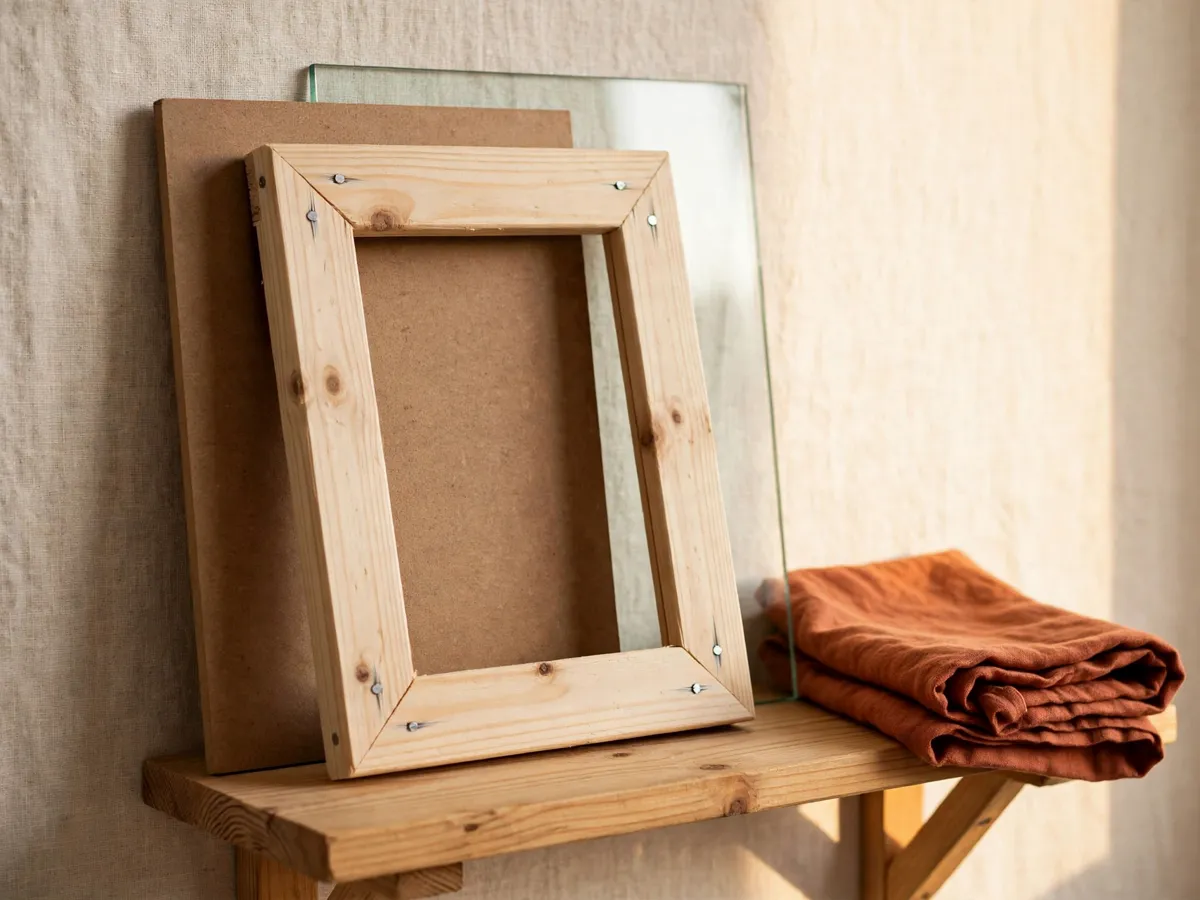
Add the stack for this build and hold it against the rabbet number. Glass or acrylic: 1/8 inch (acrylic in the thin picture grade) or 2 mm glass. Mat board: 1/16 inch (a double-thick mat runs 1/8, and section 9 names when that matters). Photo paper: 1/64 inch, small but real. Backing board: 1/8 inch MDF or heavy cardstock. The total stack is roughly 5/16 inch, and the rabbet needs to hold it with a little slack so the backing never bulges past the back of the frame. A rabbet of 3/8 inch is the comfortable standard for exactly this stack, and the 1/16 inch of slack is what lets a glazing point bite without pushing the glass forward.
When the moulding is too shallow, there are three honest fixes, in the order they cost. First, thin the stack: replace the 1/8 inch backing with heavy cardstock (about 1/16) and use a single mat, and a 1/4 inch rabbet now closes. Second, recess the backing rather than the glass: hold the glass against the lip and let the backing sit proud at the back, then cover the joint with a paper dust cover, which is how store frames with shallow moulding get away with it. Third, buy deeper moulding; a 1/2 inch rabbet profile costs a dollar or two more per stick and removes the entire question, which is the right call for anything bigger than this 12 x 14 opening where glass runs thicker.
Cost: $0 to check with a ruler at the store, $1–$3 more per stick for a deeper profile. Time: 10 minutes to add the stack on paper. One caveat: rabbets stamped on shelf labels are nominal, so hold the actual glass, mat and backing samples against the lip rather than trusting the printed depth.
8. Glass or acrylic: the honest comparison
Both materials work in a frame this size, and the choice is mostly about weight, safety and cost rather than looks. At 12-3/8 x 14-3/8, a pane of 2 mm picture glass weighs about a pound, and the same pane in 0.060 inch acrylic weighs about three ounces. Both look clear on a wall; nobody standing three feet away can tell which is which in a pine frame.
- Glass, 2 mm picture framing glass. $5 to $12 for a pane this size, cut at the hardware counter. It resists scratches for decades, cleans with any cloth, and does not attract dust the way acrylic's static charge does. The costs are weight (a pound is noticeable on a large frame hung on one nail) and breakage: glass cracks when dropped or when a frame falls, and shards on a rug are a real hazard in a rental with a toddler or a dog.
- Acrylic (picture grade, 0.060 inch). $8 to $20 for the same pane, usually sold in sheets the counter shears to size. It weighs almost nothing, it flexes instead of shattering, and it is the safer choice anywhere the frame can be knocked, which in practice means a rental hallway, a kid's room, or any frame hung above a bed or a couch. The costs are scratches (clean it with a soft cloth and plastic-safe cleaner only, never a paper towel dry) and static that pulls dust out of the air, worst in dry winter rooms.
- No glazing at all. Worth naming because frames and photos in a low-touch spot survive fine bare, and skipping the pane removes the cost line entirely. The trade is dust on the print and sun fading within a couple of years in a bright window, so this suits a hallway photo wall more than a print you care about keeping.
The counter cut is the same errand either way. Bring the numbers from section 4 (12-3/8 x 14-3/8 for this build) and ask for a glass cut or an acrylic sheet cut to size; most US hardware stores do one or both and charge little or nothing with a purchase. Check the pane against the frame opening at the counter if the frame is already glued up and dry, because a pane a half inch undersized sits visibly behind the mat.
Cost: $5–$12 glass, $8–$20 acrylic, $0 bare. Time: 20 minutes at the counter. One caveat: acrylic scratches are permanent, so peel the protective film slowly and store the pane film-side down until assembly day.
9. Mat options: pre-cut, none, or cardstock with a straightedge
The mat does three jobs: it separates the print from the glass so condensation and sticking never touch the image, it gives a small photo breathing room inside a bigger frame, and it is the visual frame-within-a-frame that makes an 8x10 read as a gallery piece. Skipping it is legitimate, but the three routes below cover the honest options for keeping one.
- Buy a pre-cut mat. $5 to $12 for an 11x14 mat with an 8x10 window, the exact outer and inner size this build needs, from any craft or frame shop, in white, cream, black or a color. This is the route the plan assumes: the window is cut clean with a bevel by a machine, and the 1/4 inch overlap hides the print edge. Check the two numbers on the package (outer size, window size) against section 2 before it goes in the cart.
- Skip the mat. The photo then sits in a 12-3/8 x 14-3/8 pane with nothing around it, which reads spare and modern, and the frame outer shrinks to photo + 2M: 8 + 3 = 11 by 10 + 3 = 13, so the whole frame is 11 x 13 and every number in sections 2 and 4 shrinks with it. Photographs longer than a couple of years should still get a backing of acid-free cardstock even with no front mat, so nothing yellowing touches the print from behind.
- Make one from cardstock. A sheet of 12 x 14 acid-free cardstock, a steel straightedge and a fresh utility blade cut a serviceable mat: mark the 8 x 10 window centered (2 inches in from each edge), cut the window in two passes with the blade against the straightedge, and accept a square-cut edge rather than a bevel, which reads handmade up close and fine at three feet. This is the cheapest route at $2 to $4 and the only one that produces any color a craft aisle sells, but it is also the route that shows wobble when the straightedge slips, so cut one extra window for practice.
Cost: $2–$12 depending on the route. Time: 5 minutes to buy a pre-cut, 20 to 30 minutes to cut a cardstock one. One caveat: never let a printed photo touch bare glass directly for years, mat or not, because prints stick to glass over time and the image comes away with the pane.
10. Backing and hanging, including the no-drill fallback
Assembly closes with a stack set into the rabbet: glass in front, then mat, then photo, then backing. Glazing points or bendable tabs hold the stack in. Points are small metal triangles pressed into the wood face of the rabbet with pliers (a flexible-point driver makes it one squeeze), and tabs are the bend-up kind that let a frame be reopened without destroying anything. Eight to twelve points around a 12 x 14 opening, roughly one every 4 to 5 inches, is enough; tabs are the right choice if the photos will rotate, because bending ten tabs back takes a minute and preserves the frame.
A paper dust cover on the back is optional and worth ten minutes: a sheet of kraft paper glued over the backing edge-to-edge, trimmed flush, keeps dust and insects out of the stack for years and reads as finished work if the frame is a gift. Trim the corners after the glue sets.
Hanging has three tiers, lightest first. A sawtooth hanger centered on the top rail is the simplest: this 15 x 17 frame with glass and backing weighs about 2 to 3 pounds, well inside a sawtooth's range on a single nail, and it is the hardware that ships in most point-and-hanger kits. Two D-rings with picture wire are the steadier choice: rings set a third of the way down each side rail, wire strung between them with a bit of slack, and the frame hangs level on one nail even when someone brushes the wall. For a lease that forbids holes, two adhesive picture-hanging strips (pairs rated 3 to 6 pounds per set) hold a frame this weight on painted drywall and release without damage at move-out; follow the strip's wall-type limits, because textured or freshly-painted walls are where adhesive strips fail. Four felt pads on the back corners finish every option and stop wall scuffs.
Cost: $3–$10 for points or tabs, hanger and pads. Time: 30 to 40 minutes for the stack, points and hanger. One caveat: set the sawtooth or D-rings into the frame rail, never into the backing board, because a hanger biting MDF tears out with the first bump.
11. Finishing choices: stain, paint, raw pine, or distressed
Finish before assembly or not at all, because stain and paint reach the miter joint poorly once the frame is closed. The four honest routes, with the pine-specific warnings attached. Raw pine, sanded to 180 and left bare, is a legitimate look that suits a natural-gallery wall, and it costs nothing; it darkens gradually over the years, which some households like and others do not. Stain on pine needs pre-stain conditioner first ($5 to $7), or the blotchy, uneven absorption pine is famous for; with conditioner, one coat of warm oak or walnut goes on even and a satin clear coat protects it. Paint is the most forgiving route and the best rescue for a frame with imperfect miters, because an opaque coat hides a hairline joint that clear finish would spotlight; prime first for an even color.
The distressed or shabby finish is the deliberate version of wear, and it works on pine precisely because pine dents and scuffs anyway. Paint the frame in two coats, let it dry fully, then rub the edges and corners of the profile with 120 grit until the underneath shows through in spots a decade of handling would have worn first: outer corners, the edges of each rail, and anywhere a hand would naturally rest. Seal with a matte clear coat so the worn spots stop wearing further. Done deliberately, it reads vintage; done carelessly, it reads damaged, and the difference is restraint in how much top layer comes off.
Cost: $0 raw, $5–$7 conditioner plus $9–$18 stain or $12–$22 paint. Time: 30 to 60 minutes of work over a drying day. One caveat: finish all four pieces before gluing, and tape the miter end faces so glue still bonds wood to wood rather than finish to finish, which is a weaker joint.
12. Variations by skill: five builds from the same plan
Every variation below reuses the same math from section 2 and the same tools from section 3; what changes is the photo size, the number of frames, or what happens to the moulding. Pick the one that matches the afternoon you actually have.
- Polaroid batch, no mat needed. An instant photo's frame is the photo, so these frames skip the mat entirely and size to the print's border: for the common square instant format with a 3.1 x 3.1 image inside a 3.5 x 4.2 border, the frame outer is 3.5 + (2 x M) by 4.2 + (2 x M). With the same 1-1/2 inch moulding that is 6-1/2 x 7-1/4 outside, and one 8 foot stick of moulding yields roughly six of them (6 frames at about 2 x 6.5 + 2 x 7.25 = 27.5 inches each = 165 inches, which a 96 inch board covers twice over, so plan two sticks for six frames with spares). Batch the cuts: set the miter box once per length and cut all pieces of one size before switching, because the repetition is where speed comes from.
- Collage frame. One big frame, several photos. Build the outer frame from section 2 math sized to the arrangement, then back it with a single stiff board and arrange photos on the board rather than in individual openings. A 16 x 20 board holding four 4x6 photos and two 5x7s costs one frame build instead of six, and the same pane of 16-3/8 x 20-3/8 acrylic covers the whole arrangement for one price. This is the cheapest way to fill a large wall in a rental, and it is how most first gallery walls start before splitting into separate frames.
- Seashell or glitter decorated edges. A plain raw or painted frame becomes the base, and decoration goes on after assembly, not before: hot-glue small shells, sea glass or beads along the outer face of each rail, working one rail at a time and butting pieces end to end so the corners land on whole pieces rather than half ones. For glitter, brush a thin coat of decoupage medium on the outer face, sprinkle, dry, and seal with another coat so it stops shedding. Keep the inner edge and the miter joints bare, because decoration at the joints shows every gap and adds thickness that stops the glass seating.
- Crown-moulding style, deep and shadow-box ready.Crown profiles have a compound angle and are the one variation that outgrows the miter box, but picture-frame crown profiles (marketed for building panels and tray ceilings) are square-cut and behave: their extra depth holds objects, so the same build becomes a shadow box for a jersey, dried flowers or a keepsake. Increase the rabbet check in section 7 for the thicker stack, swap glass for acrylic at sizes past 16 x 20 for weight, and note that spacing the frame off the wall with its own depth is part of the look.
- The digital variant: an old tablet in a frame.A retired tablet playing a photo slideshow is the honest answer to the digital photo frame search, and it needs no joinery beyond this plan: build the frame in section 2 math sized to the tablet's screen plus a border (measure the device, not the spec sheet, because cases vary), leave the rabbet shallow, skip the glass so the touchscreen stays touchable, and cut the backing with a notch for the charging cable. A small adhesive clip holds the tablet in, and a $5 right-angle cable keeps the cord flat to the wall. The frame hides the bezel and the mount, which is the whole trick.
Cost: $2–$15 per variation beyond the base plan. Time: 60 minutes for the polaroid batch, an afternoon for the collage or shadow box. One caveat: every variation re-checks section 2 math with its own photo dimensions, because the formulas carry over but the numbers do not.
13. Common failure modes and their fixes
The five that show up on first frames
- Miter gaps at the corners. Daylight at the front of a joint means one cut ran off 45 degrees; daylight that opens toward the back means a length is short. A hairline gap closes with glue alone under clamp pressure. A visible gap gets filled with tinted wood filler matching the finish, sanded flush, and the joint is read from three feet away, not two inches. The prevention is the labeled-pair cutting from section 5 and a sharp backsaw in the miter box slot.
- Frame out of square (racked). The frame sits as a parallelogram and the diagonals disagree. Fix it wet: with the glue still open, push the long diagonal's corners toward each other and re-measure both until they match. Fixed dry, the honest route is re-cutting one piece, because twisting a cured frame back into square cracks miter joints more often than it saves them. The prevention is the diagonal check before the glue sets, every time.
- Rabbet too shallow. The glass-and-mat stack sits proud of the back of the frame and nothing closes flat. Thin the stack per section 7 (cardstock backing, single mat) or let the backing sit proud and cover it with a paper dust cover, which is a legitimate finished look rather than a workaround to hide.
- Glass too tight (or rattling loose). A pane cut exactly to the opening binds under the lip and can crack the glass when points press it; a pane a quarter inch under slides around audibly every time the frame is touched. Either way the fix is a re-cut pane at the counter, sized to inner opening + 2 x rabbet width as section 4 spells out, with a sixteenth of play. Rattling that appears after assembly is missing points: add two more per side.
- Nail splits in pine. A brad driven hard near a miter tip splits the pine because the tips of a miter are end grain with no room for error. Pilot a 1/16 inch hole before every brad near a corner, or skip the brads entirely: a properly glued and clamped miter on pine is stronger than the wood around it, and the nails are belt-and-suspenders for frames that will travel.
Cost: $0–$6 for filler, spare points and a re-cut pane. Time: 10 minutes per fix caught wet, 30 minutes per fix caught dry. One caveat: three of the five failures are prevented in sections 5 and 6 for free, which is why the dry fit and the diagonal check are marked as the steps a first build must not skip.
14. Cost and time, honestly
The headline range, $12 to $30 for one 8x10 frame with mat and glazing, assumes the hand tools from section 3 are already in the house and the frame is pine. Here is the range line by line, so the budget can be trimmed on purpose: moulding $4 to $9; glass or acrylic $5 to $12 (or $8 to $20 for acrylic); pre-cut mat $5 to $12 (or cardstock at $2 to $4); backing board $1 to $3; points or tabs $3 to $5; hanging hardware and pads $3 to $10; glue and sandpaper $0 to $8 depending on what the drawer holds. Buying nothing new but the moulding and glass, with mat, backing and hardware scavenged from an old store frame, brings a build to about $10.
Time is where first frames differ from third frames. Cutting and dry-fitting runs 45 to 60 minutes the first time; assembly and clamping another 30 minutes of work; the glue pause runs an hour minimum and overnight is better; the stack, points and hanger close it out in 30 to 40 minutes. First frame total: about 2.5 to 3 hours of elapsed afternoon including the pause. By the third frame the cutting drops to 25 minutes and the whole build fits a single afternoon with the pause overlapping lunch. A batch of four or five frames for a gallery wall shares every setup step and costs roughly the same clock time as two frames built one at a time.
Cost: $12–$30 per frame all in, about $10 when reusing hardware from an old frame. Time: 2.5 to 3 hours for the first frame, one afternoon for the third. One caveat: the range assumes store counter cuts for glass and acrylic; cutting glazing at home without a glass cutter and practice is how the $5 pane becomes a $12 pane plus a cut finger.
15. Five questions that come up on every frame
What size moulding do I need for a DIY picture frame?
Any pine trim or moulding profile with a flat face 1 to 2 inches wide and a rabbet of 3/8 inch or deeper works for the 8x10 build here; section 2 sizes the frame to whatever width you buy through the photo + 2B + 2M arithmetic. Wider moulding makes a chunkier frame and a longer cut list per side, nothing more, and the rabbet depth check in section 7 matters more than the face width.
Can I make a picture frame without a miter saw?
Yes. A $15 to $30 hand miter box with a backsaw cuts the same 45 degree ends on pine trim, and section 5 walks the cut order. Most US hardware stores will also cut moulding to a marked list for a small fee per cut, so a frame is buildable with a saw borrowed for nothing more than trimming the offcuts square.
How do I calculate the frame size for a photo with a mat?
Photo size W x H, mat border B on every side, moulding width M: the mat window is W x H, the frame inner opening is W + 2B by H + 2B, the outer frame is W + 2B + 2M by H + 2B + 2M, and each mitered side piece is cut to the full outer length of its edge. Section 2 works an 8x10 photo with a 2 inch border in 1-1/2 inch moulding end to end as 15 x 17 outside.
Is glass or acrylic better for a homemade frame?
Glass at 2 mm picture weight costs less, resists scratches, and cleans without worry, which suits frames hung out of harm's way. Acrylic weighs a fraction as much and flexes instead of shattering, which suits rentals, kids' rooms and anywhere a frame can be knocked, at a few dollars more per pane. Section 8 compares both on cost, weight and cleaning, and names when hanging a print bare with no glazing at all is the reasonable third option.
Why are the corners of my frame not closing tight?
A gap at the front of a joint means one of the two miter cuts ran slightly off 45 degrees; a gap opening toward the back means the piece length is off. Section 13 covers the fixes from a clamped glue-up (close it wet and re-check the diagonals) through filler on a hairline gap, and the prevention is cutting in labeled pairs with the moulding seated hard against the miter box fence for every cut.
Save these on Pinterest
Pin the sizing math, the cut list or the failure-mode list and come back to it on a free afternoon with the photo in hand. If you want more builds that share this tool list, the full set of DIY projects runs from shelf plans to workbench builds, and the DIY wine rack plans use the same miter-box accuracy rules on a bigger frame of wood.