 Plant As Deco
Gardening & Planting Tips
Growing Avocado from Seed: The Pit, the Crack, and the Honest Wait
By Plant As Deco · Updated 17 November 2026
Growing avocado from seed is one pit, a glass or a pot, and a wait most people misjudge. Below is what the seed actually does — the swell, the lengthwise crack, the root, then the shoot — which starting method fits what you intend, the failure that kills most attempts, and the honest answer about fruit: an avocado kept indoors is a foliage plant. That is a perfectly good reason to grow one.
Weekend-ready: $0–$15, one hour plus the wait. Renter-safe, windowsill-sized.
1. The honest expectation: this will not fruit indoors
Start with the part every cheerful tutorial buries, because it decides which method you pick in section 4. An avocado is an outdoor tree — in the United States it grows and fruits in roughly zones 9 to 11, and it wants a long, warm season to ripen anything.
Inside an apartment, three things stop it. A tree grown from seed can take many years to flower at all, even planted in the ground. And the flowers are odd: avocado cultivars fall into two groups, Type A and Type B, that release their pollen on opposite schedules, so one tree alone indoors — with nothing carrying pollen between blossoms — is very unlikely to set fruit. A guide that promises avocados from your windowsill is selling you something. What a pit gives you indoors is a fast, bold houseplant: big glossy leaves, a strong upright stem, a height that will eventually argue with your ceiling. If you want fruit, buy it.
Cost: $0. Time: 3 minutes to read. Read this once and you will not spend a year waiting on a plant that was never going to do it.
2. A seed does not grow the avocado you ate
This is true, interesting, and almost never said out loud by the people selling the idea. The pit inside a supermarket avocado is not a packet of that avocado. Orchard trees are grafted: a cutting from a proven variety is joined onto hardy rootstock, so every Hass on the shelf carries the same genetics. A seed is a sexual offspring combining whatever the parent tree was pollinated with — a new plant, usually a worse one, almost never a copy. Grow a Hass pit and you will not get Hass fruit. In a foliage plan that does not matter at all. The one real path to fruit from a seedling is a grafting project outdoors, in a warm climate — not a windowsill job.
Cost: $0. Time: 2 minutes. The practical upshot: pick your pit for the plant, not the fruit, and any pit will do.
3. Which end goes up: reading the pit
Roots first, then leaves — that order holds for every seed and cutting, and the general version, with the node and the water-versus-soil choice for ordinary houseplants, is in the houseplant propagation guide. This page is only about the avocado pit: a large, odd, forgiving thing with two clearly different ends.
The blunt, broad end is the bottom — that is where the taproot pushes out. The pointed end is the top, where the stem comes up. One end is rounded and flat-ish, the other tapers to a tip, so the difference is obvious once you look. Rinse the pit under warm running water and rub off every scrap of green flesh — leftover flesh rots, and that rot is what people mistake for a dead seed. The thin brown skin is optional: peeling does not speed anything up, but a peeled pit shows grey mould days before a skinned one does.
Cost: $0. Time: 5 minutes. Get the orientation right once and you can leave the pit alone for weeks, which is the whole skill.
4. Two ways to start it, and what each one costs you
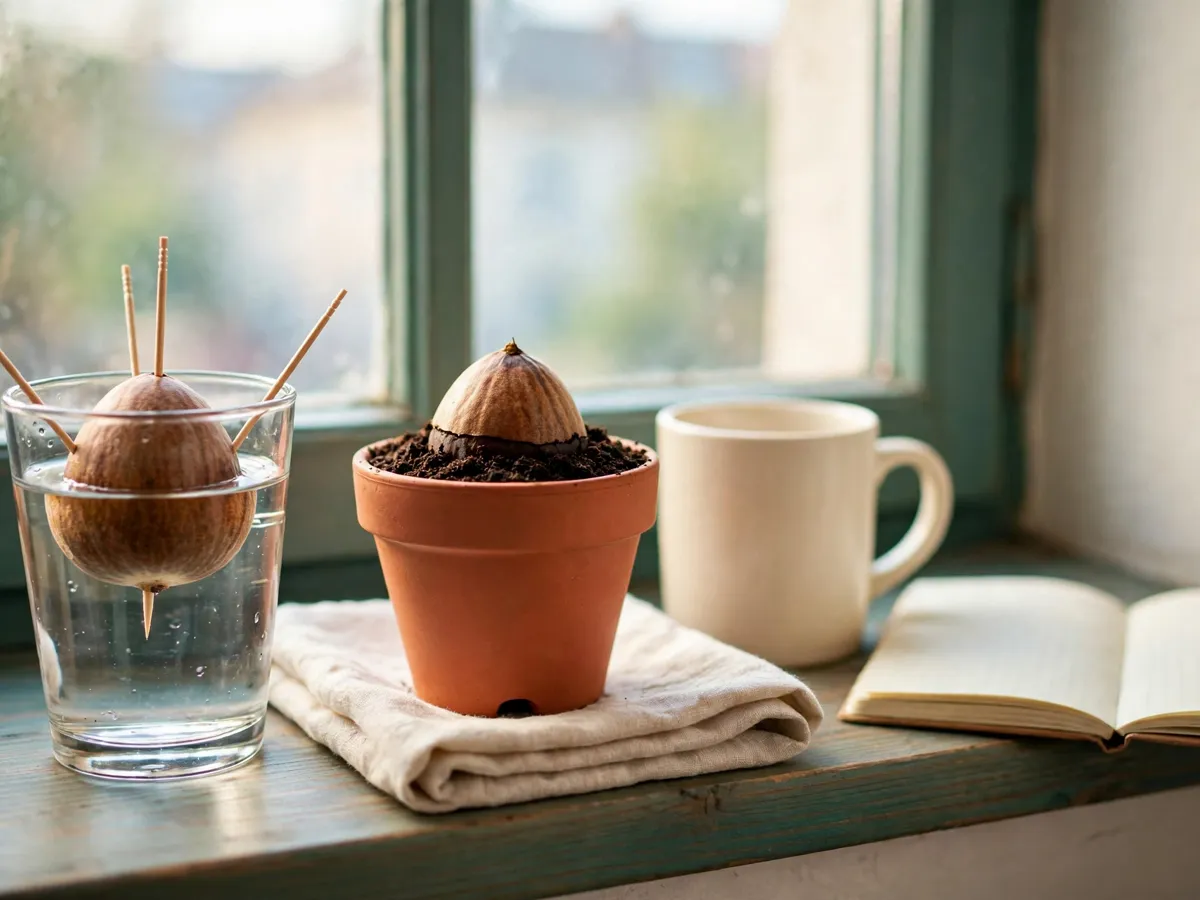
The toothpicks-and-a-glass method is the one everybody remembers from a classroom, and it deserves an honest defence: it is visible. You watch the root come out of the bottom and the shoot out of the top, which is the best way to show a child what germination is. It is also not a requirement. A pit set point-up in potting mix germinates just as reliably, in the same time, and skips the awkward part: suspended in water the pit sends down one long, smooth, brittle taproot with no fine hairs to grip soil, and moving that into a pot without snapping the tip costs you weeks. So the choice is not right versus wrong — a glass for a visible experiment you may well compost afterwards, a pot for a plant you intend to keep.
| The decision | Suspended over a glass of water | Straight into potting mix |
|---|---|---|
| Good for | Watching it happen; a kitchen experiment; showing a kid roots appear | A plant you mean to keep as a houseplant |
| What you need | A glass and three plain toothpicks — $0 | A pot with a drainage hole and bagged potting mix — $8–$15 |
| Ongoing chore | Change the water weekly at minimum — this is where the mould risk lives | Keep the mix damp, never soggy; no routine at all |
| Root you end up with | One long bare taproot, brittle, nothing gripping the soil | Roots already growing in the medium they will live in |
| The hard part | The transplant — move it before the root gets too long, keep the tip intact | Nothing is moved; the wait is the only difficulty |
| Time to germinate | Two weeks to two months | Two weeks to two months — identical |
If you go with the glass: three toothpicks spaced evenly around the pit about a third down from the pointed end, angled slightly downward, so the pit sits stable on the rim with just its blunt end touching the water — two centimetres of submersion is plenty. If you go with the pot: pit point-up with roughly the top third above the mix, firmed so it stands on its own, watered once.
Cost: $0 for the glass, $8–$15 for the pot and mix. Time: 10 minutes. Pick on the finish line, not on the first week.
5. The crack is the germination — not the sprout
Here is the sequence, and the second half of it is where attempts die. The pit swells slightly first. Then it splits lengthwise, from top to bottom, along the seam. Out of the blunt end pushes a thick pale root; out of the pointed end comes a reddish-green shoot that lengthens and only then opens into leaves. Weeks to months pass between the swell and the leaves, and the split happens somewhere in the middle of that.
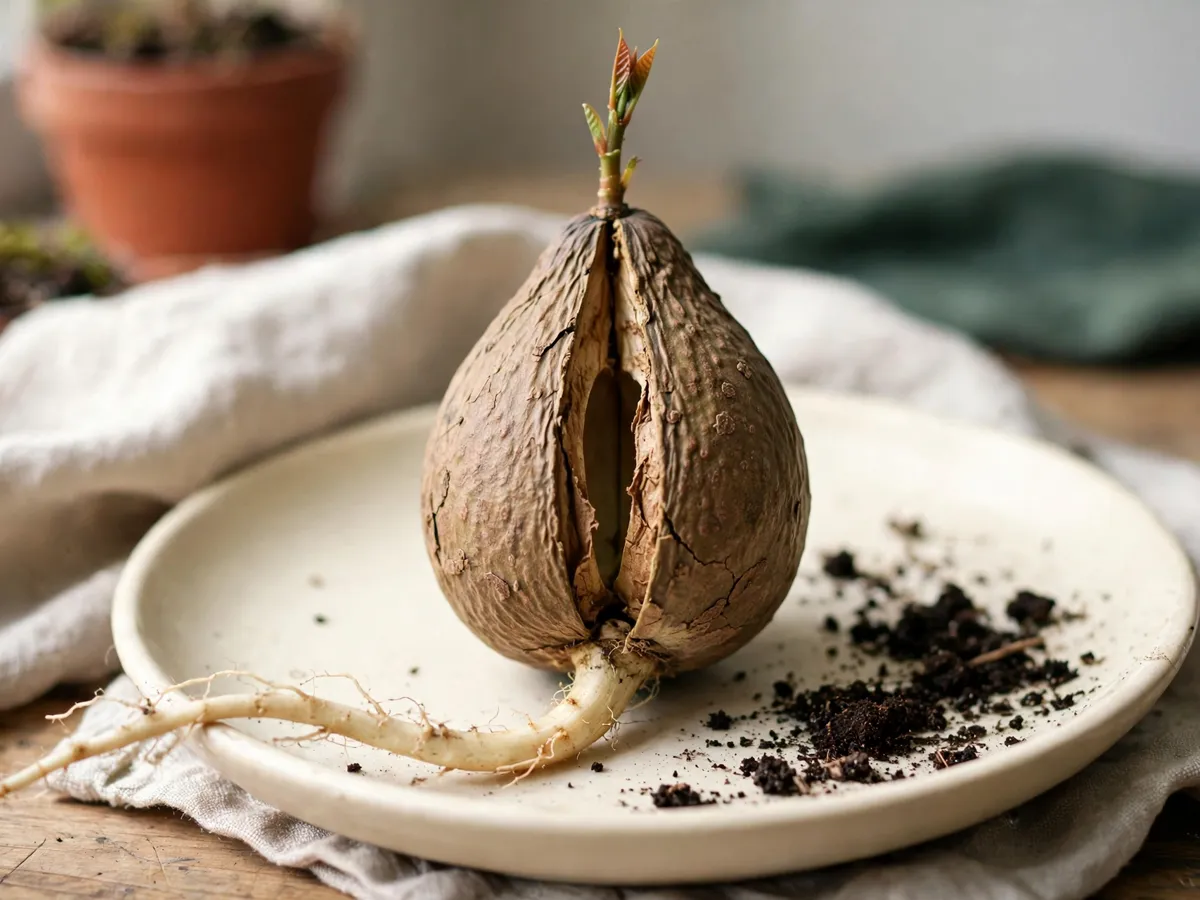
The split is germination. By the time the pit cracks, it has already worked, and the plant is doing the quiet part underneath. The single most common way people kill a pit at this stage is prying the two halves apart to “check on it”. Do not. The halves are not a shell to be opened; they are the seed ’s food supply, still feeding the root and the shoot through the split, and forcing them apart ends the attempt.
Left alone, the halves shrivel, darken and split further as the stem thickens and pushes up between them. It looks alarming and is harmless — once the stem is established, the emptied husk is dead weight that lifts off gently or falls away on its own. Checking is allowed; touching is not. In water you see the root through the glass, in mix the crack and then the shoot are visible above the surface. Digging a pit up to inspect its roots is the prying mistake wearing a different hat.
Cost: $0. Time: one minute a day of looking, and weeks to months of it. The wait is real and it is not a sign of failure.
6. Grey mould, and the other ways it fails
The number one failure is a grey or whitish fuzzy mould on the blunt end, right where the root is supposed to emerge, and the cause is almost always the same: the bottom of the pit sitting in water that nobody has changed. Stale water is not a growing medium, it is a culture. The remedy is boring and it works — change the water every week at minimum, and top it up with fresh water whenever it drops. That one habit is most of the difference between the classroom pit that sprouts and the one that goes mushy. Or skip water entirely and start the pit in mix, where the problem does not exist.
If mould appears: lift the pit, rinse it, rub the fuzz off, clean the glass, refill. Caught early, the pit usually carries on. If the pit itself has gone soft and squishy, it is finished — start a second one rather than nurse a dead seed. Which is the cheapest insurance on this page: buy two avocados and start both pits, because one will fail for a reason you never identify. The other failures, in rough order:
- Root but no shoot, weeks apart. Normal. The root comes first; give it a month past the root before you call it odd.
- No crack after three months. Usually the pit was never viable — a fruit picked too early or held very cold can carry a dead seed. Nothing you did; start a fresh one.
- It dried out. A pit left above the water line, or a potted pit left bone dry, stops mid-way. Damp is the instruction in both methods.
- Sitting in a saucer of water. Once potted, the mix must drain — same stale-culture problem, one floor up.
Cost: $0 to fix the mould, $1–$3 to start a second pit. Time: 5 minutes. Fresh water weekly beats any supplement.
7. Into a pot: drainage before decoration
Drainage is the one non-negotiable here, and it is non-negotiable because of the shape of the root system. An avocado runs one thick, brittle taproot with relatively few fine feeder roots, and a pot that holds water around it will rot it. A hole in the bottom, and a saucer you empty after watering, is the whole requirement.
Because it is a taproot, depth matters more than width — a tall pot beats a shallow wide one — and the container depth numbers plus a well-draining mix for edibles are worked out in the container vegetable guide. Ordinary bagged potting mix is right; garden soil is not — it compacts and drains badly in a pot. Do not start in a huge pot either: a bucket of mix around one pit stays wet long past the point that is good for it. When the plant fills its pot, the next size up and the repotting steps are in the repotting guide.
If you started in water, move it to the pot once the taproot is going and the shoot is showing — not after the root has threaded the whole glass. Wet the mix first, dig a pocket deep enough for the full root, lower it in without bending the tip, and firm gently with the top third of the pit still above the surface. The shelf, light and watering routine for a seedling under a roof are in the indoor seed starting guide — an avocado needs no special version of that rig.
Cost: $8–$15 for the pot and a bag of mix. Time: 15 minutes. A hole in the bottom outranks every other pot feature.
8. The one shape decision: head it back or let it run
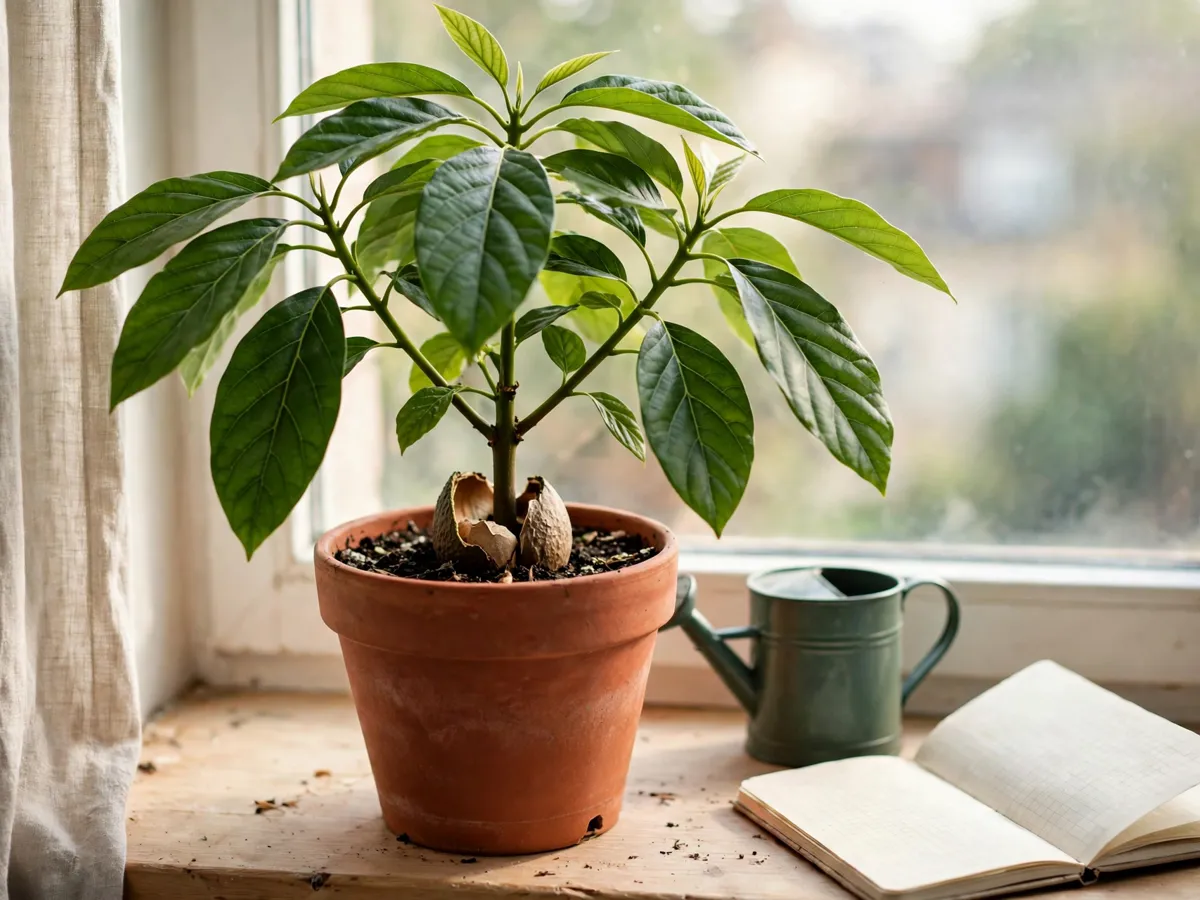
Left alone, an avocado seedling grows as one stem going straight up with a tuft of leaves at the top — tall, thin, and floppy once it passes knee height. There is exactly one decision to make about that, and it is optional.
The heading-back option: when the stem reaches roughly 30 cm (12 in), cut it back to about 15 cm (6 in) with clean scissors, just above where a leaf meets the stem. Within a few weeks the plant pushes side branches from below the cut, and you get a bushier, sturdier plant with leaves at several heights instead of one. The trade-off is honest and it is yours: heading back buys a compact, branched plant and costs you the tall single stem and a few weeks of height. Some people want exactly that tall, sparse, small-tree silhouette, and leaving it unpruned gives it to you. The only real mistake is cutting it hard twice in a row before the first cut has produced branches.
One thing worth knowing before you decide you have failed at shape: the braided avocado plants in garden centres are not one stem trained into a braid. They are three or more separate plants woven together while flexible. From a single pit you get one stem, headed back or not.
Cost: $0 if you own scissors. Time: 2 minutes, plus a few weeks for the branches to show. Do it once, at 12 inches, then leave it alone.
9. Where it lives: brighter than the rest of your houseplants
An avocado wants more light than most of what you probably already own. Give it the brightest window you have — a west- or south-facing one — and it grows faster, holds its leaves closer together and stands up straighter. Deep in a dim corner it survives but stretches, thins and drops the lower leaves. How much light your room actually gets, and what a dim corner rules in or out, is a separate reading we did in the low-light plant guide — use it once, before you commit a windowsill to a plant that will demand it for the next two years.
Two small habits after that: rotate the pot a quarter turn weekly so the stem does not lean permanently into the window, and keep it away from cold drafts in winter. One household note that belongs here: avocado leaves, pit and flesh contain persin, which is harmful to birds and can make dogs and cats sick if they chew the plant. Not a plant for a bird room; a pet that grazes houseplants is a reason for a high shelf.
Cost: $0. Time: 2 minutes to place it, ten seconds a week to turn it. Brighter beats bigger.
10. Apple and pear seeds need a winter; an avocado does not
If you are going to plant something out of the fruit bowl anyway, the usual next candidates are apple and pear — and the reason avocado is the easier first try is exactly the difference between them. Apple and pear seeds need a stretch of cold before they will germinate at all; the seed has to be convinced winter happened before it agrees to spring, which growers meet by keeping the seeds damp and cold for weeks, usually in a fridge. An avocado seed needs none of that: warm, damp, patient, done. Citrus is the other no-cold group — lemon, lime and orange seeds from a grocery fruit sprout readily in a pot of mix, much like an avocado pit. The catch from section 2 applies to all of them: an apple seed does not grow the apple you ate either. Grow these for the plant.
Cost: $0. Time: 5 minutes to set a few seeds in a pot. The avocado is the one that answers fastest.
What we would skip
- The $20 “avocado seed starter” kit. It is a glass and three plastic picks. A drinking glass and three wooden toothpicks do the identical job, and the pit does not know which is holding it.
- Expecting fruit. Skip the year of disappointment by skipping the expectation. Indoor avocado is a foliage plant; say that out loud to anyone who asks what you are growing.
- Prying the crack open to check. The most fatal thing on this page. The halves are the food supply, not a shell.
- Liquid “root stimulators” for a pit. A large seed carries its own programme; fresh water and drainage are the inputs that matter.
- Five pits in one pot. They tangle into one root mass that cannot be transplanted. One pit per pot.
- A decorative pot with no hole. The nursery-pot-inside-a-cachepot trick leaves the taproot sitting in the water it just drained into. If you want the look, empty the outer pot ten minutes after watering, every time.
Cost: $0 to skip, and $20–$25 left in your pocket. Time: 3 minutes to strike them off.
The pit-to-pot checklist
- Decided what this is: a houseplant, not a fruit tree
- Two pits started, not one, because one will fail
- Pit rinsed clean of all green flesh under warm water
- Blunt end identified as the bottom, pointed end as the top
- Method chosen: glass for the show, pot for the plant
- Glass route — three toothpicks, pit steady on the rim, blunt end just in the water, water changed weekly
- Pot route — drainage hole, potting mix, pit point-up with the top third exposed, mix kept damp
- Left alone through the lengthwise crack — not pried, not dug up
- Potted on when the root and shoot are both going
- Brightest window given to it, rotated a quarter turn weekly
- Headed back at 12 inches only if you want it bushy
- Kept out of reach of birds and leaf-chewing pets
Cost: $0–$15. Time: one hour of work, then weeks to months of looking at it.
Questions people ask about avocado seeds
Can I grow an avocado tree indoors that produces fruit?
Not realistically. Avocados are outdoor trees in roughly zones 9 to 11 and need a long warm season; a seed-grown tree can take many years to flower even in the ground; and the blossoms need a compatible Type A or Type B partner plus insects to set anything. Indoors you are growing a foliage plant, and a page that promises fruit is selling you something.
How long does an avocado seed take to sprout?
Two weeks to two months is the usual window, sometimes longer. The order matters more than the date: the pit swells, splits lengthwise, grows the root from the blunt end, then the shoot from the pointed end, then the leaves open. The split is the germination, and the shoot can lag behind it by weeks.
My seed grew a root but no stem. Is it dead?
No, that is the correct order. The taproot goes first and the shoot follows on its own schedule. Give it a month past the root before you call it odd, keep the water fresh or the mix damp, and do not lift it to inspect.
Should I peel the brown skin off the pit?
Optional. Peeling does not speed anything up; the real benefit is visibility, since a bare pit shows grey mould days before a skinned one does. Leaving it on is fine. Do not scrape at the flesh underneath.
Is an avocado plant safe around pets?
Keep it away from birds and from cats or dogs that chew plants. Avocado leaves, pit and flesh contain persin, which is harmful to birds and can make dogs and cats sick. Not a plant for a bird room; a pet that grazes houseplants is a reason for a high shelf.
Save these on Pinterest
Pin the two-method table and the pit-to-pot checklist — those are the two you will want again the next time an avocado goes soft in the fruit bowl. The crack-with-the-root photo is worth saving too, because it is the image that stops you prying a split pit open in month two. The Gardening & Planting Tips collection holds the rest of the beginner growing ideas for small spaces.