 Plant As Deco
Gardening & Planting Tips
Seed Starting Indoors: A Shelf, a Light, a Watering Plan
By Plant As Deco · Updated 16 November 2026
Seed starting indoors fails on three things long before it fails on the seed itself: the shelf, the light and the water. This guide builds the smallest rig that works — a shelf you may already own, one light bar hanging inches above the leaves on a timer, and a watering habit that keeps the surface from staying soaked — then walks the seedlings out the door a week before planting day.
Weekend-ready: $30–$90, one weekend to build, ten minutes a day after. Renter-safe, no drill needed.
1. Where the rig goes
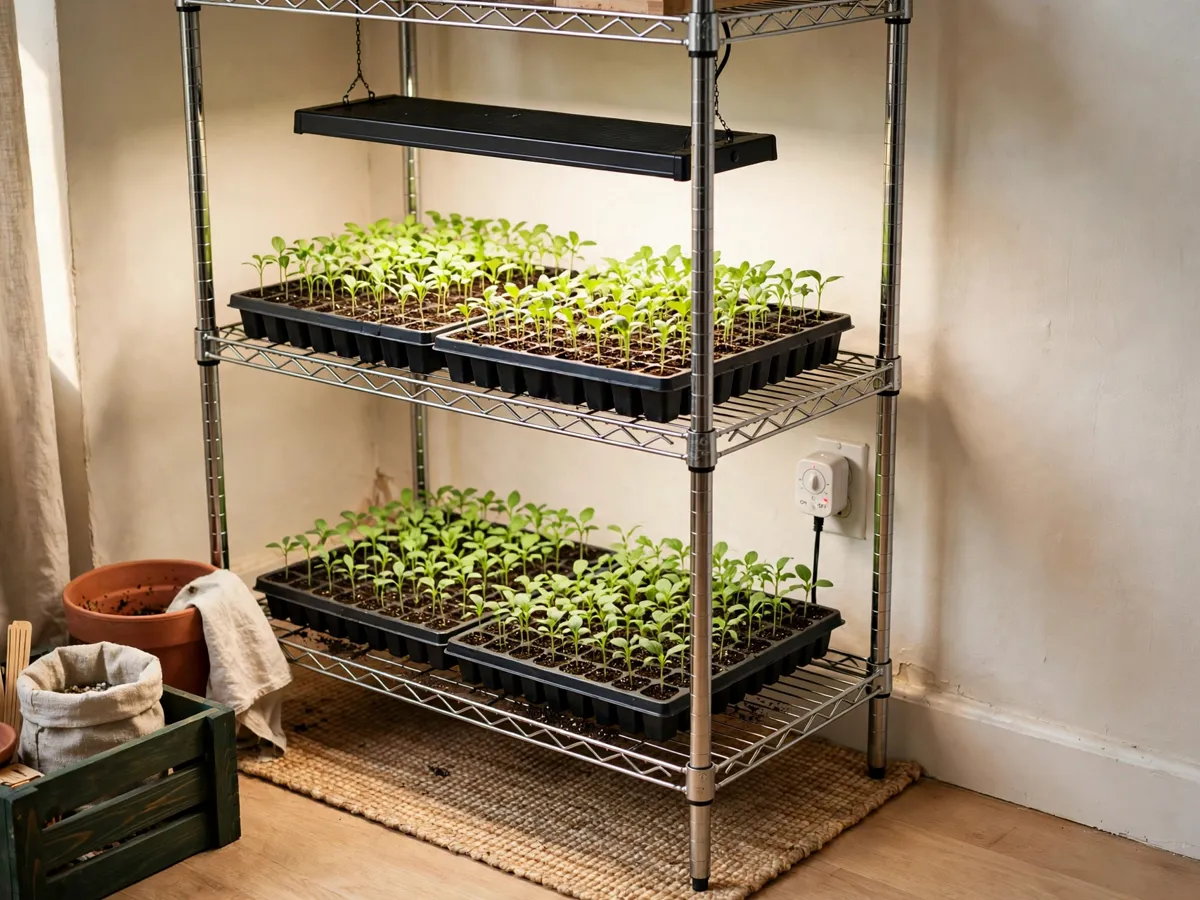
Pick the spot before you buy anything, because the rig is a small piece of furniture for six weeks and it has one hard requirement: an outlet within cord reach. A light bar and a timer both plug in, and a cord stretched across a walkway is the first thing a winter apartment breaks. The second requirement is a wall corner or a strip of floor that nobody walks through on the way to the door.
The third is temperature. Seed trays sprout best in a room that stays comfortably warm through the night — the same rooms you sit in a t-shirt. A stairwell that swings cold, a drafty window bay and the shelf directly above a heating vent are all wrong for different reasons: too cold, too cold, and hot dry air that cooks the surface of the mix. Near a window is fine, against the cold glass is not; leave a hand-width of air between the tray and the pane.
Protect the floor under whatever you choose. Watering fifteen trays indoors for six weeks always ends with a spill, and a $2 boot tray or a folded towel under the shelf keeps that spill a non-event in a rental. Run any cord along the skirting and tape it flat where feet pass — the same rule as any lamp in the apartment.
Measure the spot before the store run. Write down the width, the depth and the height you are willing to give up, because the shelf, the light and the tray all have to fit inside those three numbers, and the light needs headroom above the tallest tray you will ever fill.
Cost: $0–$5 for a boot tray. Time: 10 minutes with a tape measure. Choose for the outlet, not the window.
2. The shelf: buy one level or use the bookshelf
The shelf exists to do two jobs: hold trays level over a catch surface, and put the top tray where your eyes are, so checking the seedlings takes a glance instead of a crouch. A basic wire shelving unit does both for $25–$45 and assembles with no tools beyond the mallet that ships in the box. Its shelves adjust in small steps, which matters more than any other feature — the whole rig works by moving the tray and the light toward each other, and fixed shelves fight that.
The renter version costs nothing: a bookshelf you already own. Any shelf that holds books holds seed trays. Take the books off one level, wipe it down, and set the trays on a boot tray or a baking sheet with a rim to catch the water that drains through. The one honest limit: a painted bookshelf in soft wood will show water rings if the catch tray ever overflows, so the rim matters more here than on the wire unit.
Size the rig to the season you actually plan. One shelf level holds about two standard trays, which is roughly one tray of vegetables and one of herbs or flowers — more than enough for a first season. Two levels doubles it. Anything taller belongs to a grower who already knows what they will do with forty tomato plants, and that grower is not reading a beginner page.
Where the seedlings go after the rig is a decision worth making now, because it sets how many cells you sow. If the answer is pots on a balcony, our container vegetable guide covers the pot sizes each crop needs; if it is a raised bed, the raised bed guide sizes the bed to the yard.
Cost: $25–$45 for a wire unit, $0 for a bookshelf you own. Time: 30 minutes to assemble and level. Adjustable shelves are the feature worth paying for.
3. The light and the height ladder
A windowsill in late winter is not enough light for a tray of seedlings, and the plant tells you so within days by growing tall, pale and leaning — stretching for light that is not there. One light bar fixes it. Buy a full-spectrum LED bar in warm white, the shop-light shape, long enough to run the length of the tray. Warm white reads as a lamp in a living room instead of a laboratory, and a bar lights a whole tray evenly, which a clip-on spot cannot.
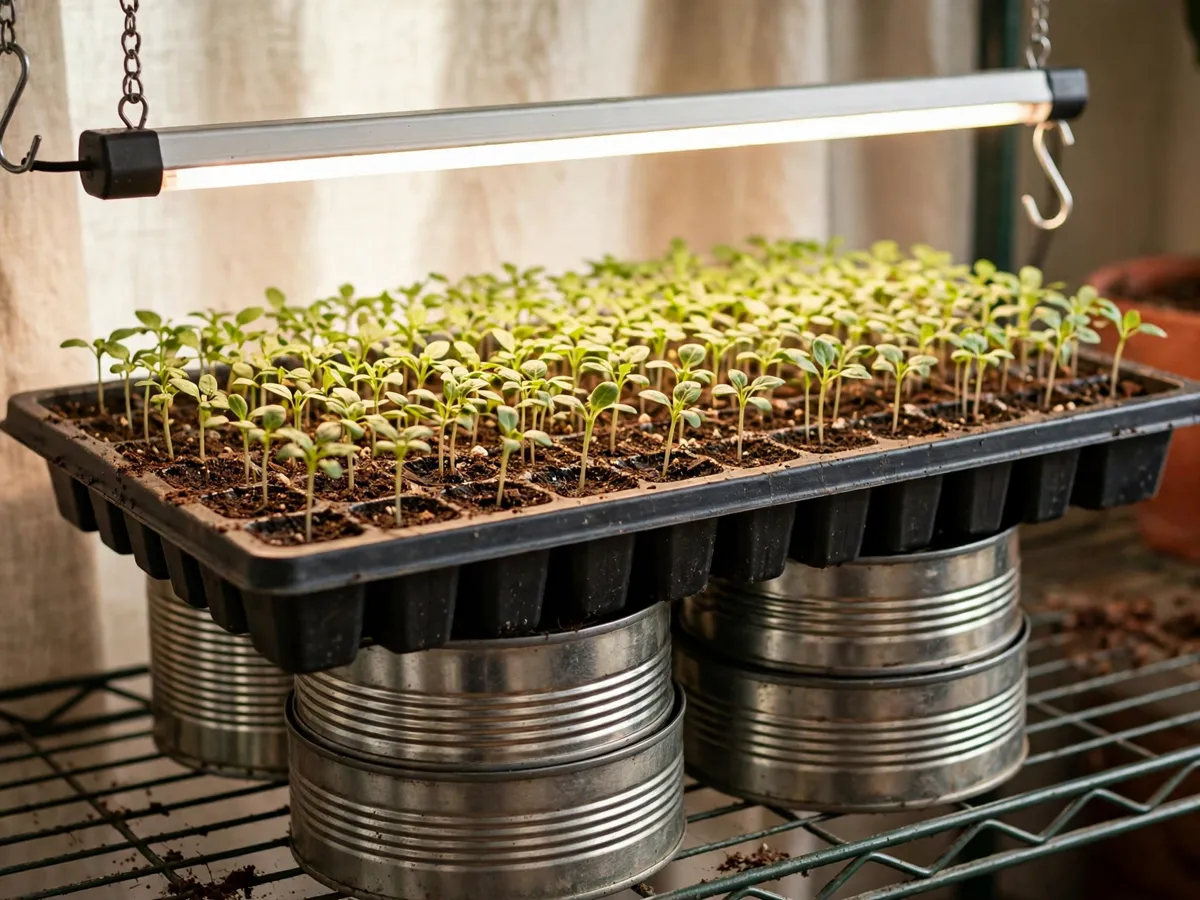
The distance is the whole trick: hang the bar 2 to 3 inches above the tops of the seedlings. That gap is close enough that the leaves stay compact and stocky, and it only works because the next rule follows from it.
The height ladder. Seedlings grow toward the light every single day, so a fixed light is wrong by the end of week one. Build the adjustment in from the start, cheapest first: hang the bar from two chains with S-hooks and move the hook one link at a time; or set the light fixed and lift the tray on bricks, books or cans as the leaves rise; or use the wire shelf itself and move the shelf up a step. Whatever you choose, adjusting it must take under a minute, because a rig that is annoying to adjust is a rig that stops being adjusted — and an unadjusted light means stretched seedlings or scorched top leaves.
The hours matter as much as the inches. Put the light on a plug-in timer set to 14 to 16 hours on and the rest off, at the same hours every day. Seedlings want long steady days; a lamp switched on when someone remembers reads like a string of cloudy afternoons. The timer costs $5–$10 and is the single part of the rig that removes the daily decision.
For keeping houseplants alive in a dim room — a different job from raising seedlings — our grow light guide runs the checks that decide whether a room needs a lamp at all.
Cost: $15–$30 per bar, $5–$10 for the timer. Time: 20 minutes to hang and set. Check the gap weekly — the ladder only works if you climb it.
4. Sowing day: cells, mix and labels
Sow into a seed starting mix, not garden soil and not heavy compost. A seed starting mix is fine, light and holds moisture around a seed without packing into a crust; garden soil from the yard does the opposite indoors, where there is no weather to break it up. A bag runs $8–$12 and fills a season of trays.
Wet the mix before it goes in the cells, not after. Scoop the dry mix into a bucket, add water, and stir with your hand until it holds together when squeezed and releases a few drops — a sponge that is wrung out, not mud. Dry mix poured into a cell repels water and leaves the seed sitting in a pocket of dust.
Containers, from cheapest upward: egg cartons and yogurt cups with drainage holes poked in the bottom, a reusable cell tray, or small pots. The honest hierarchy: free containers work but dry out fast and need a tray beneath them; a cell tray is easier to water from the bottom and pops seedlings out in one piece. Sow two seeds per cell or pot, then thin to the stronger one — the thinning step is planned for, not a surprise.
Sow at the depth printed on the packet. Large seeds go under the surface; tiny seeds rest on top, pressed onto the moist mix so they touch it. Then do the one step everyone skips: label every row at the moment you sow. Masking tape and a pencil on the tray edge will still be readable when the tray has been watered forty times, and a pencil survives wet; a marker on damp tape does not always. Two trays of identical-looking seedlings in April is a real problem that a label written in February solves for free.
What to start is its own decision, and the packet holds the two numbers you need — the sowing depth and the weeks-before- frost count. The mix of crops worth starting in a first season is covered where it belongs, in the pot-by-pot vegetable guide.
Cost: $5–$15 for trays, $8–$12 for mix, $2–$4 per packet. Time: 45 minutes for two trays. Labels written at sowing, never later.
5. Watering without damping off
Damping off is the failure that empties a tray in one morning, and it is worth knowing its face: a seedling that was upright yesterday is flat today, pinched and thin right at the soil line, like a stem snapped by a hair. It happens when the surface of the mix stays wet and the air around it stays still. Nothing fixes a seedling once it has damped off — the work is all in preventing the conditions.
Water from the bottom. Pour water into the catch tray, let the cells drink it up for twenty minutes or so, then pour off whatever the mix has not taken. Bottom watering wets the whole cell evenly, pulls the roots down toward the moisture instead of up, and — the reason it belongs in this section — leaves the surface of the mix drying between waterings, which is the state damping off cannot get started in.
Move the air. A small fan on low, set across the room so it stirs the air above the tray rather than blasting the seedlings, keeps the stems dry and sturdy. Still, humid air over a wet surface is the other half of the damping-off recipe, and the fan removes it for $10.
Two habits finish the job. Water in the morning, so any damp on the leaves and the surface dries through the day rather than sitting overnight. And take any dome or plastic cover off as soon as the first sprouts show — the cover is a germination tool for keeping the surface moist before anything is growing, and once seedlings appear it becomes a humidity chamber with seedlings trapped inside.
Cost: $0–$10 for a small fan. Time: 10 minutes a day. Pour off the water the tray does not take — standing water undoes the whole method.
6. Thinning and potting up
Two seeds per cell means one comes out. Thin with small scissors once the seedlings are about an inch tall, snipping the weaker one at the base and leaving the stronger standing. Pulling it out by hand drags the neighbour’s roots along with it — two losses instead of one — so the scissors are not optional gear, they are the whole technique.
Pot up when the seedling outgrows the cell: roots showing through the drainage hole, or a plant clearly too big for its space. Move it into a small pot of the same mix, one size up, set slightly deeper than it grew, and firm the mix around the stem. A seedling in a cell is a seedling in a hotel; a pot gives it the room to build the root system that will carry it through the summer.
Potting up is also the honest reset button. A tray that got stretched, dry or crowded comes back from a fresh pot of moist mix and a re-set light gap better than you expect, and it is cheaper than sowing again. If the seedlings have simply been on the shelf a long time, a half-strength feed at potting-up is the moment the packet’s dosage rules finally apply — read the label, halve it, and only in moist mix, never onto dry.
Cost: $5–$15 for pots and a bag of mix. Time: 30 minutes for a tray. Thin with scissors, never by pulling.
7. Hardening off before they go out
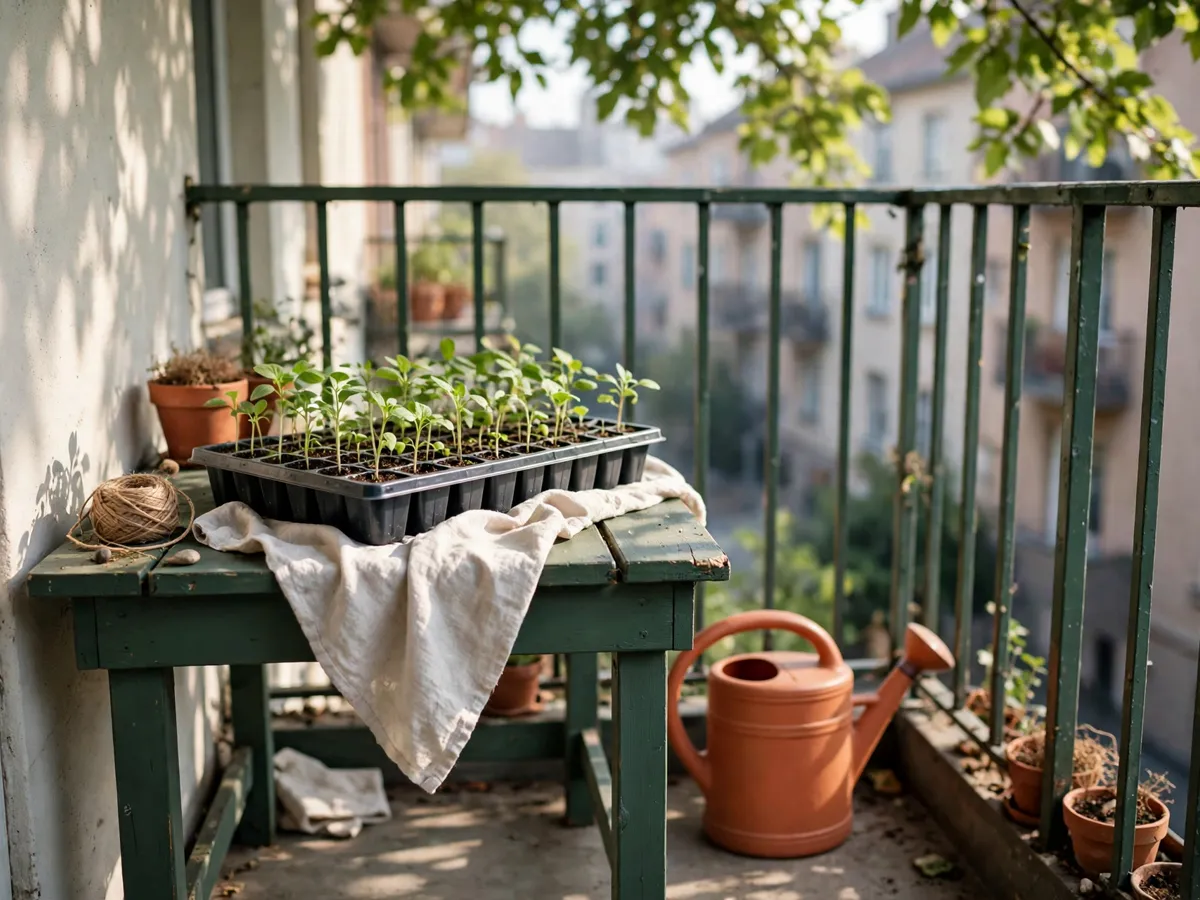
A seedling raised under a light bar is an indoor plant that has never felt full sun, real wind or a cool night, and moving it straight into a May afternoon is how a six-week project dies in an afternoon. Hardening off is the week that bridges it: an hour of outdoor time on day one, in shade, out of the wind, then a little more each day.
The shape of the week: days one and two, one to two hours in shade — beside a wall, under a table, behind a railing — then back inside. Days three and four, a longer stretch with an hour of gentle morning sun. By days five to seven the tray can stay out in full morning light and return inside only for the night, while nights are still cool. Wind is the other teacher: the stems that sway gently outside grow sturdier than any fan indoors can make them, but a gale snaps them, so the first days want the sheltered side of the balcony.
Two small rules keep the week honest. Water the tray before it goes out — wind and sun dry a small cell fast, and a tray that wilts mid-hardening is set back days. And set the week on the calendar counting back from your planting date, because hardening off is the step that quietly disappears when life gets busy, and the sunny-day damage is permanent.
Where they land after the week is up decides the size they should be before they leave: pots on a balcony get one treatment, a raised bed gets another, and the balcony garden guide starts from the containers you already own.
Cost: $0. Time: about a week, minutes a day. Skip the week and the first sunny day does the damage for you.
8. What goes wrong
1. Tall, pale seedlings leaning hard to one side. The light is too far away. Fix: bring the bar down to 2–3 inches above the leaves, and set the adjust-the-gap habit going weekly.
2. Seedlings flat overnight, pinched at the soil line. Damping off. Fix for the rest of the tray: switch to bottom watering and pour off the surplus, get air moving, take any cover off. The fallen seedlings do not come back; the standing ones can.
3. Nothing sprouts. Either the surface dried out during germination or the seed was too old. Fix: keep the mix evenly moist until the first sprout appears — a sheet of plastic over the tray until then works, and check under it daily. Sow fresh packet seed the next round.
4. Roots are growing out of the drainage holes. The seedling has outgrown its cell. Fix: pot it up one size, into the same mix, and firm it in.
5. Seedlings stretch within days of sowing. They need light the moment they sprout, not when they look tall. Fix: the bar goes on the timer the day the first green shows.
Cost: $0. Time: 10 minutes to check. Every failure above is visible a week before it is final.
What we would skip
- The all-in-one seed starting kit — a plain shelf, one light bar and a timer does the same job for less, and the kit usually saves you the one part that matters (the timer).
- The heated germination mat in a warm room. It earns its place in a cold basement, not in the living room you already heat.
- The purple grow panel anywhere a person sits. Warm white lights the tray just as well and does not turn the corner into a laboratory.
- The humidity dome left on after sprouting. It helps seeds sprout; after that it makes damping off more likely.
- Egg cartons with no tray beneath. They dry out fast and drain straight onto the shelf — fine containers, but only with a rim underneath.
- An app-controlled light. A $5 mechanical timer does the same daily job with nothing to set up and nothing to stop working.
Cost: $0 to skip. Time: 5 minutes to strike them off the shopping list.
Weekend checklist
- Spot chosen: outlet in cord reach, walkway clear, warm room
- Shelf assembled or a bookshelf level freed, with a rimmed catch tray
- Light bar hung 2–3 inches above the tray, on a chain, blocks or an adjustable shelf
- Timer set to 14–16 hours, the same hours every day
- Mix moistened in a bucket before filling the cells
- Two seeds per cell, sown at the packet’s depth
- Every row labelled with pencil on tape, written at sowing
- Bottom-watering routine in place, surplus poured off
- Fan positioned across the room, on low
- Hardening-off week written on the calendar, counting back from planting day
Cost: $0 to run. Time: 20 minutes against the list.
Questions beginners ask
Do I really need a grow light?
For a full tray in late winter, yes. A bright window can carry a few pots, but the days are short and the seedlings stretch toward what light there is — tall, pale and leaning within days. One light bar on a timer is the reliable route.
How close should the light be to the seedlings?
2 to 3 inches above the tops of the leaves, raised as they grow. Hang it on a chain, lift the tray on cans, or move the shelf up — whichever ladder you build, adjusting it should take under a minute.
How many hours of light a day?
14 to 16 hours on, the rest off, at the same hours every day — put both on a plug-in timer so the schedule survives the week you forget.
What is damping off?
A seedling that collapses pinched at the soil line, caused by a wet surface and still air. Prevent it by bottom watering and pouring off the surplus, moving the air with a small fan, and taking any cover off once the first sprouts show.
What is hardening off, and do I have to do it?
A week of increasing outdoor time — an hour of shade on day one, a little more each day, back inside at night — before the seedlings are planted out. Yes: a seedling raised under a light bar has never met full sun or wind, and the first sunny afternoon does permanent damage without it.
Save these on Pinterest
Pin the shelf-and-light rig — the 2–3 inch gap and the weekly raise are the two numbers you will want again next season — then the watering rules and the hardening-off week. The Gardening & Planting Tips collection holds the rest of the small-space growing ideas.