 Plant As Deco
Gardening Tips
Raised Bed Garden Ideas: Layouts That Fit Small Yards
By Plant As Deco · Updated 16 November 2026
A raised bed promises a neat rectangle of fresh vegetables in a yard the size of a parking space — and most of them go wrong before a single seed is planted. The bed gets built too wide to reach across, sits where the sun never does, or rots out in three seasons of wet soil. This page settles the four decisions in the order a small yard actually forces on you: how wide the bed is, what it is built from, where it stands, and how it fills. Three layouts at the end fit a single bed, a corner, or a four-bed grid.
Weekend-ready: $75–$250, one weekend. One bed, built and filled — pine, cedar or block — no dig into hard ground.
1. Size it to your reach, not your ambition
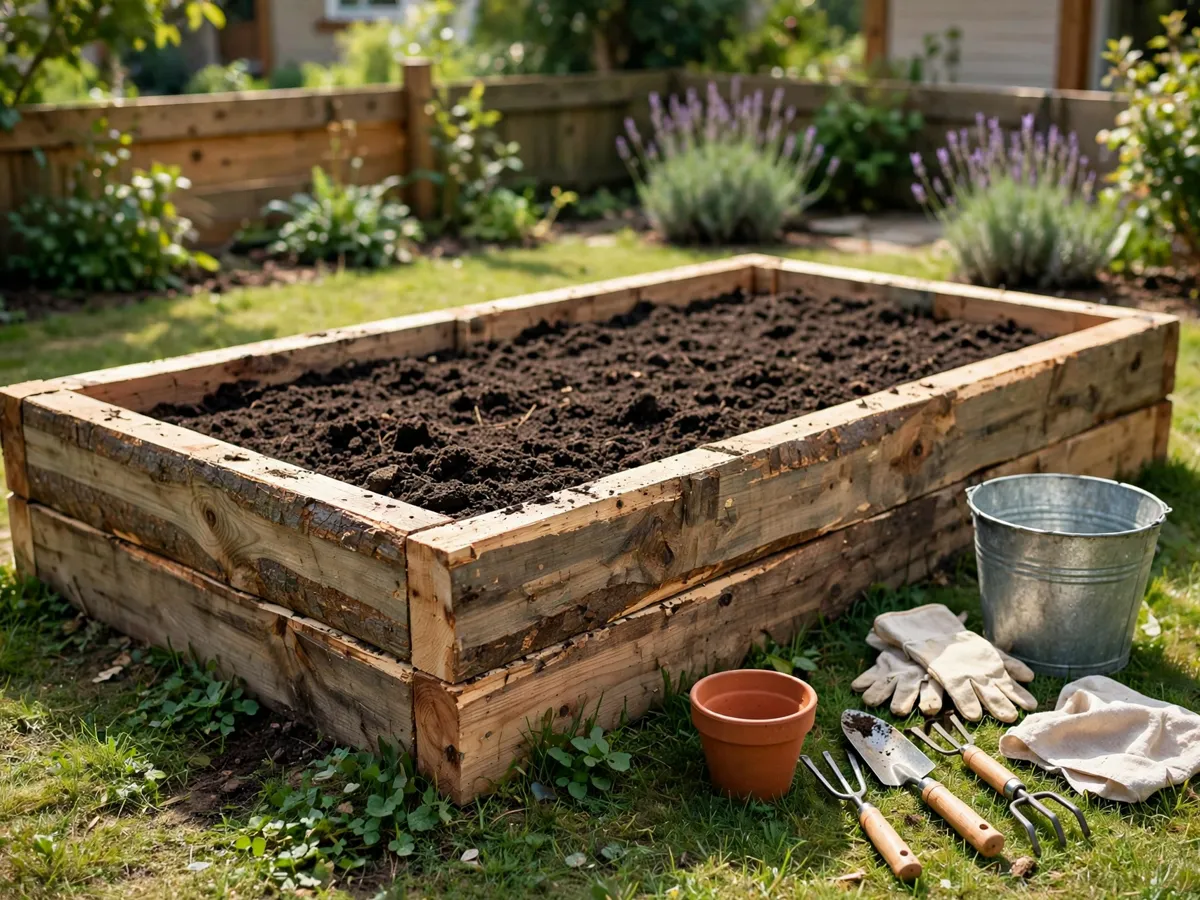
The single most common raised bed mistake is width. A bed you can only work from the sides — not by stepping in — needs to be no wider than your reach doubled. Most adults reach about 2 feet comfortably from a standing lean, so 4 feet is the ceiling: 2 feet of reach from each side, fingers meeting in the middle. Build it 5 or 6 feet wide and the center strip becomes a place you weed by throwing a tool at it. Every rule below bends around that one number.
Length is the flexible dimension — it follows your yard, not your body. Six feet is the honest starting size for a first bed; eight is the usual ceiling, because past that the walk around the bed starts to feel long every single time you carry a full watering can. A 4x6 bed is 24 square feet of planting; that is a real harvest of salad greens, beans and a couple of tomato plants, not a token one.
Depth has two honest tiers. Six to twelve inches grows lettuce, spinach, herbs, radishes, bush beans and other shallow roots — and if the ground under the bed is decent soil, six inches of added depth is genuinely enough, because roots keep going down into the earth below. Twelve to eighteen inches is the tier for tomatoes, peppers and full-length carrots, where the extra room above hard or clay ground matters more. If digging a spade into your yard is a wrestling match, or your knees want the bed higher, 12 to 24 inches of wall height turns the bed into something you can work from a folding stool.
One honest check on depth before you pay for it: the same crop in a container needs less depth than it seems, and the pot depths for each vegetable list the minimums. If a 10-inch pot grows your tomatoes, a 12-inch bed already beats it.
Cost: $0. Time: 10 minutes with a tape measure. Build wider than 4 feet and the middle of the bed is a job for someone with longer arms than yours.
2. Pick materials that match the years you plan
Material is a budget decision made once, and the honest way to make it is to ask how many seasons this bed owes you. Three options cover nearly every small yard, and the price gap between them is the price of years.
- Rough pine, the three-to-five year bed. A 4x8 pine bed, ten inches deep, takes three 2x10x8 boards — two full boards for the long sides, one cut in half for the ends — plus a box of exterior screws and four angle brackets. At $14–$22 a board that is roughly $50–$80 built. Pine in contact with wet soil is a short contract: it serves well for three to five years, then the bottom rail goes soft and you rebuild on the same footprint, a little wiser about drainage.
- Cedar, the decade bed. The same three boards in cedar run $38–$55 each, so the bed lands around $125–$185 — real money, but cedar resists rot in damp ground for roughly ten to fifteen years. If the bed is going somewhere permanent and you would rather build once, that is the trade. How to read a beginner build plan covers the cut list, board sizes and tool checklist this build uses.
- Concrete block, the no-rot bed. Blocks need no fasteners, no cutting and no woodworking — you set them on level ground and stack two courses. A 4x8 bed is a 24-foot perimeter, about 18 blocks per course, 36 for two, at $2–$3 each: roughly $75–$110, and the block outlasts any wood you could buy. The look is chunkier and the corners are square; the holes planted with herbs or marigolds soften it nicely.
One material to refuse near food: old pressure-treated lumber from a previous project or a teardown. Older treated wood carries preservation chemicals that can move into soil over the years, and whether that matters at garden scale is debated — so the cautious rule is simple: keep it away from beds growing vegetables and use it for paths, compost bins or edging instead. New lumber marked for ground contact, pine and cedar all keep you clear of the question.
Cost: $50–$80 pine, $125–$185 cedar, $75–$110 block. Time: 60–90 minutes to assemble either wood bed, 30 for block. Buy the material for the years you will actually be at this address.
3. Place it for six hours of sun
Sun decides the harvest more than anything you build. Most vegetables want six or more hours of direct light — unobstructed, shade-tree-and-neighbor-fence included — and the only honest way to find that spot is to watch a yard on a day off. Note where sun lands at 9, at noon and at 4 in the growing season, and mark the patch that is lit through all of it. A bed in five hours of sun grows disappointment with leaves on it; the same bed moved ten feet grows food.
Two placement rules finish the decision. First, wind: in a yard with a cold prevailing wind, run the bed's long side east-west so the whole row faces south, the sun's path, and the bed's own back edge takes the wind instead of the plants. Second, paths: leave at least 2 feet on every working side — enough for a bucket, a kneeling pad and your own knees — and 3 feet anywhere a wheelbarrow has to pass. Skimp on the path and you will be side-shuffling past your own bed all summer.
Keep the water source in the placement math too. A bed within one hose length of the spigot gets watered on the evenings you are tired; a bed two hoses away gets improvised, badly. If the only sunny patch is paved, a bed on legs or a row of deep containers is the honest answer instead — the balcony garden guide walks that version.
Cost: $0. Time: one day off spent mostly doing other things. Do not trust a single sunny afternoon in spring — the neighbor's maple leafs out and rewrites the map.
4. Three layouts for small yards
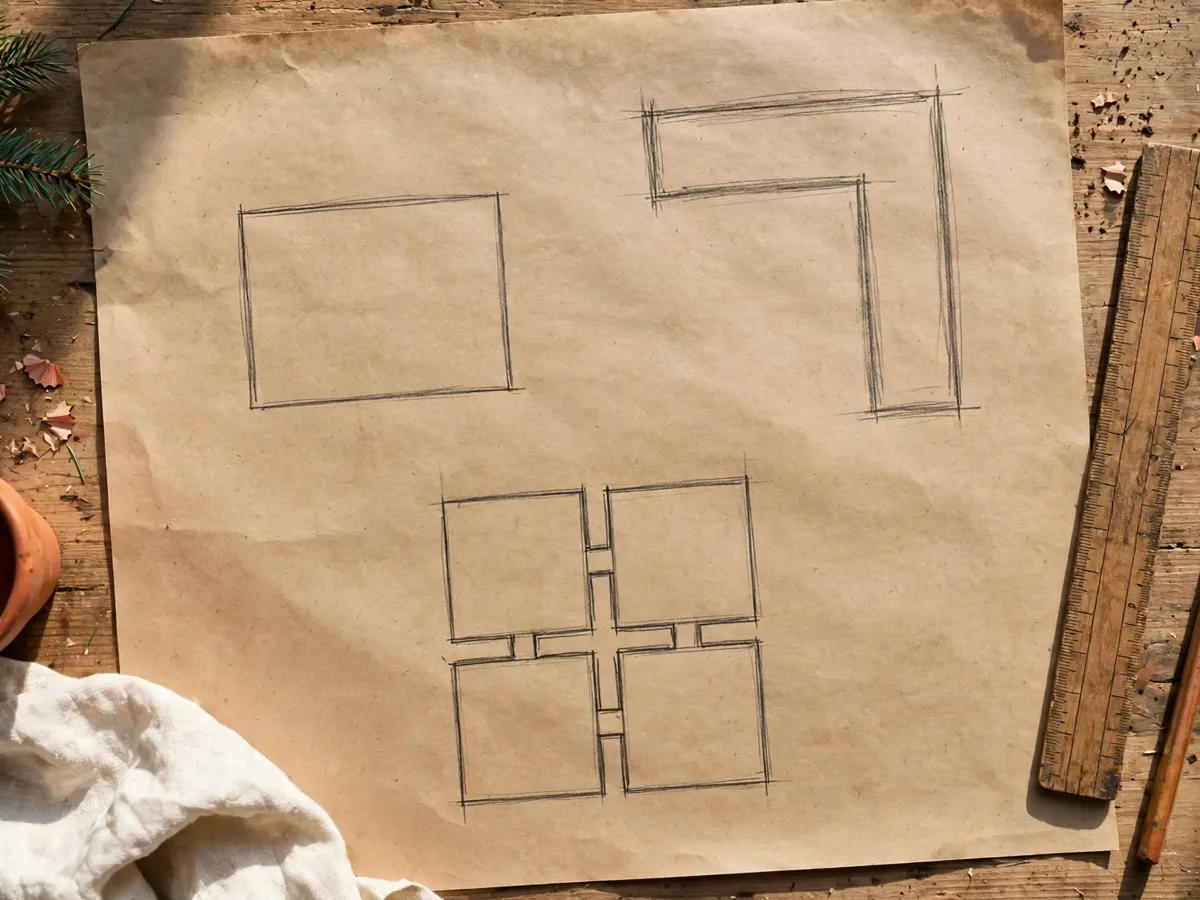
Every small-yard raised bed plan is one of three shapes, and the right one falls out of your sun map and your paths. Sketch it before shopping: three lines on paper cost nothing, and the layouts below are drawn for reach from the sides only.
The single bed, 4x6. The beginner's build: one rectangle along a fence or the sunny side wall, 24 square feet, all four sides open for 2-foot paths. Everything in this guide — pine, block, layered fill — is sized for exactly this bed. Build one, run it for a season, and you will know whether you want three more.
The L-shape, around a corner. Two beds set at right angles in a yard corner — say a 4x6 along the fence and a 4x4 returning along the side wall. The corner that was the least usable patch of lawn becomes the deepest planting block, and both beds keep two open faces for reach. It is the best-looking layout for a small yard because it reads as a designed garden edge, not a box in the middle of grass.
The grid, 2x2. Four 4x4 beds with 2-foot paths between them — a 10x10-foot block once the paths are counted. Four equal beds is the layout that earns its keep in year two: you move each plant family to a different bed every spring, so tomatoes are not grown behind tomatoes, and the 4x4 size keeps every square foot within the reach rule. What shares each bed is the what-to-plant-beside-what question, which small beds answer the same way containers do.
Cost: $0 to plan. Time: 30 minutes with paper. A layout that blocks the trash cans or the mower lane is a layout you will be rescuing in June.
5. Fill it right: the layered budget mix
Filling a raised bed with bagged soil alone is the most quietly expensive step in the project — a 4x8 bed ten inches deep wants about a cubic yard, and a cubic yard of bags adds up fast. The honest fix is to fill the bottom half with things your yard already produces for free, and spend your money only on the top half, where the roots actually live.
- Bottom third: small logs, branches and prunings, laid in loose — the layer that takes up space for free and settles slowly over the seasons.
- Middle: fallen leaves, grass clippings and spent plants from the yard, watered in as you go.
- Top half: compost mixed with topsoil, finishing 4–6 inches deep and level, ready to plant.
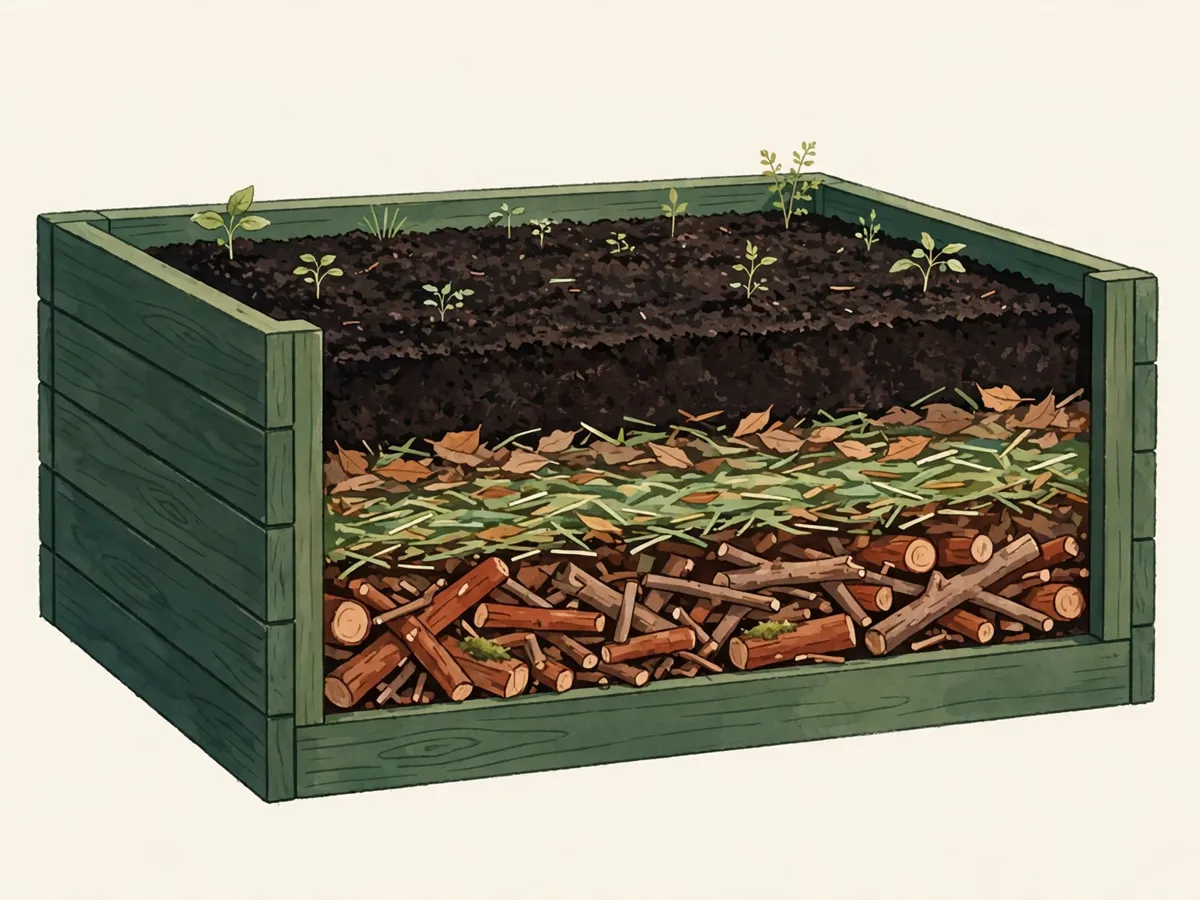
The bought layers of one 4x8 bed — about half a cubic yard of compost and topsoil — run $40–$80 in bags, less in bulk if a landscape yard delivers, and delivery only beats the bag price once you are filling three beds or more. Expect the layered bed to settle an inch or two in its first season; that is the free layers packing down, and top-dressing with compost in spring is the whole maintenance routine.
Cost: $40–$80 per bed for the bought layers. Time: 60 minutes, wheelbarrow optional. The bed full of nothing but purchased soil grows the same plants for twice the money.
What we would skip
Skip any bed wider than 4 feet — the middle will be unreachable and the whole point of a raised bed is working it from the sides. Skip old treated lumber around vegetables; give it the path edging job instead. Skip paying for 18 inches of purchased soil when your crops and ground only need 6 — buy depth when the plants or your knees ask for it. Skip the one-bed-fits-all kits with fabric bottoms on wet ground, which puddle at the seams. And skip the four-bed grid on your first weekend; one good 4x6 bed, run for a season, is how you learn which of the three layouts your yard is really asking for.
Cost: $0 to skip. Time: two minutes of reading that saves a season of reaching and a stack of receipts.
The before-you-build checklist
- Width set at 4 feet or less — reach tested with your own arms before any board is cut
- Length chosen to the yard: 6 feet first bed, 8 the usual ceiling
- Depth picked by crop: 6–12 inches for greens, herbs and beans; 12–18 for tomatoes, peppers and full carrots; taller walls only for clay ground or sore knees
- Material picked by years: pine $50–$80 for three to five, cedar $125–$185 for ten to fifteen, block $75–$110 to outlast both
- Sun patch confirmed at 6+ direct hours on a watched day off, not guessed
- Cold-wind yard: long side running east-west, rows facing south
- Paths marked: 2 feet minimum on working sides, 3 where a wheelbarrow passes
- Water within one hose length, and a fill plan of free bottom layers under bought compost
Cost: $0 to check. Time: 10 minutes with a tape measure before anything is ordered.
Common questions
What size raised bed is best for a beginner?
A 4x6 bed. Four feet is the width your reach can work from both sides, six feet fits a small yard along one sunny wall, and 24 square feet is enough for a first real season of greens, beans and a couple of tomato plants. Build one well before adding more.
What is the cheapest material for a raised bed?
Rough pine boards — about $50–$80 for a 4x8 bed in three 2x10 boards, screws and brackets — with concrete block close behind at $75–$110 for two courses. Pine serves three to five seasons; block simply outlasts wood. Whatever the budget, keep old treated lumber away from beds growing vegetables.
How deep should a raised bed be for tomatoes?
Twelve to eighteen inches. That tier also suits peppers and full-length carrots. Lettuce, spinach, herbs, radishes and bush beans are content with six to twelve — and where the ground soil under the bed is decent, the shallower bed works because roots continue below the frame.
Where should a raised bed go in a small yard?
On the patch your yard-watch shows getting six or more hours of direct sun, with 2-foot paths on every working side and the spigot within one hose length. In a windy yard, run the bed's long side east-west so the plants face south and the back edge takes the wind.
Save these on Pinterest
Pin the three numbers that carry the whole build — 4 feet wide, six hours of sun, 2-foot paths — so next spring starts with a sketch instead of a stack of guesses. The layouts, the materials by budget and the layered fill all survive a move to a new yard, and the rest of our beginner garden guides live in the gardening tips collection.