 Plant As Deco
Gardening Tips
Vertical Garden Wall Ideas for Balconies and Small Yards
By Plant As Deco · Updated 16 November 2026
A vertical garden wall is a small-space idea with three decisions hiding inside it: how the plants stack, what holds them up, and how water moves. This page walks all three — one wall built from three plant layers, three mounts sorted by your right to drill, light read by the direction the wall faces, and a watering order that treats the top and the bottom as different jobs.
Weekend-ready: $40–$220, one weekend to mount and plant. No-drill mounts included — renter-safe.
1. Three layers make a wall read as one
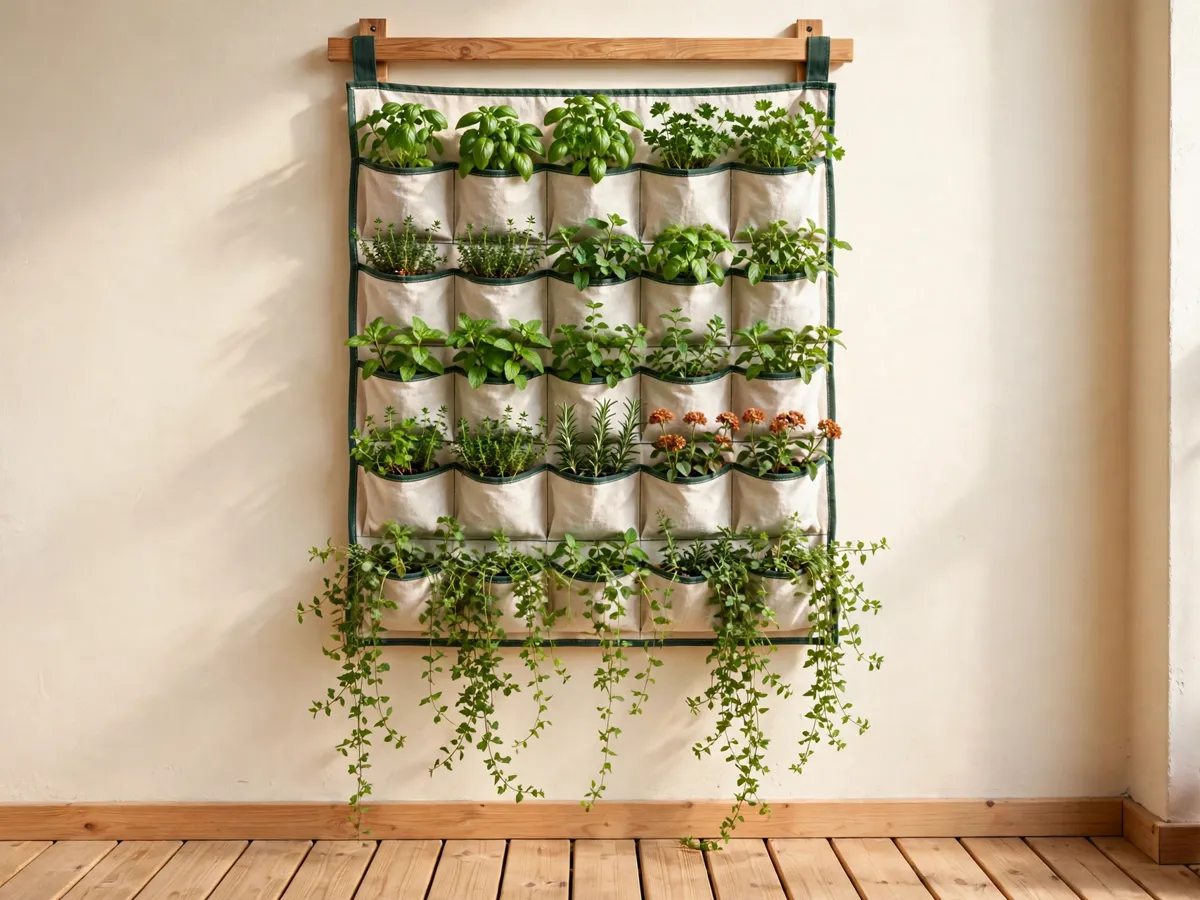
Most beginner walls fail the same way: a grid of identical pockets, each holding one plant of the same height. The result reads as shelving with plants on it, not as a wall of green. The fix is to think in three layers — a climber band in the middle for height, a filler band on top for structure, and a spiller band at the bottom to hide the hardware. Every layer has a job, and the wall only reads as one piece when all three do theirs.
Middle — the climbers. This is the layer that makes the wall tall. Sweet pea, mandevilla and clematis climb instead of bushing out, so they earn height on a small footprint by growing up the frame, the wires or the rungs rather than around them. Plant climbers at the middle band of the wall, not the top — they grow upward into the space above them, and that upward run is what carries the eye from the pot to the top of the wall. Two or three climbers is plenty for a first wall; more than that and the middle band turns into a tangle you cannot reach into.
Top — the fillers. These are the upright-but- short plants: herbs, lettuce, calibrachoa. They hold their own shape without support, sit at the top of the stack where light is best, and fill the visual gap between the climbers below them and the top rail of the frame. Herbs and lettuce earn the top spots twice — they grow in the brightest band, and they are the plants you reach for most, so the harvesting hand thanks you. Calibrachoa fills the same band when you want flowers instead of food.
Bottom — the spillers. Trailing petunia, ivy and sweet potato vine grow down, not up, and that is exactly why they sit at the bottom: they cover the feet of the wall — the bottom rail, the lowest pockets, the gap where the mount meets the floor or the railing. A wall without spillers shows its hardware; a wall with them shows only leaf.
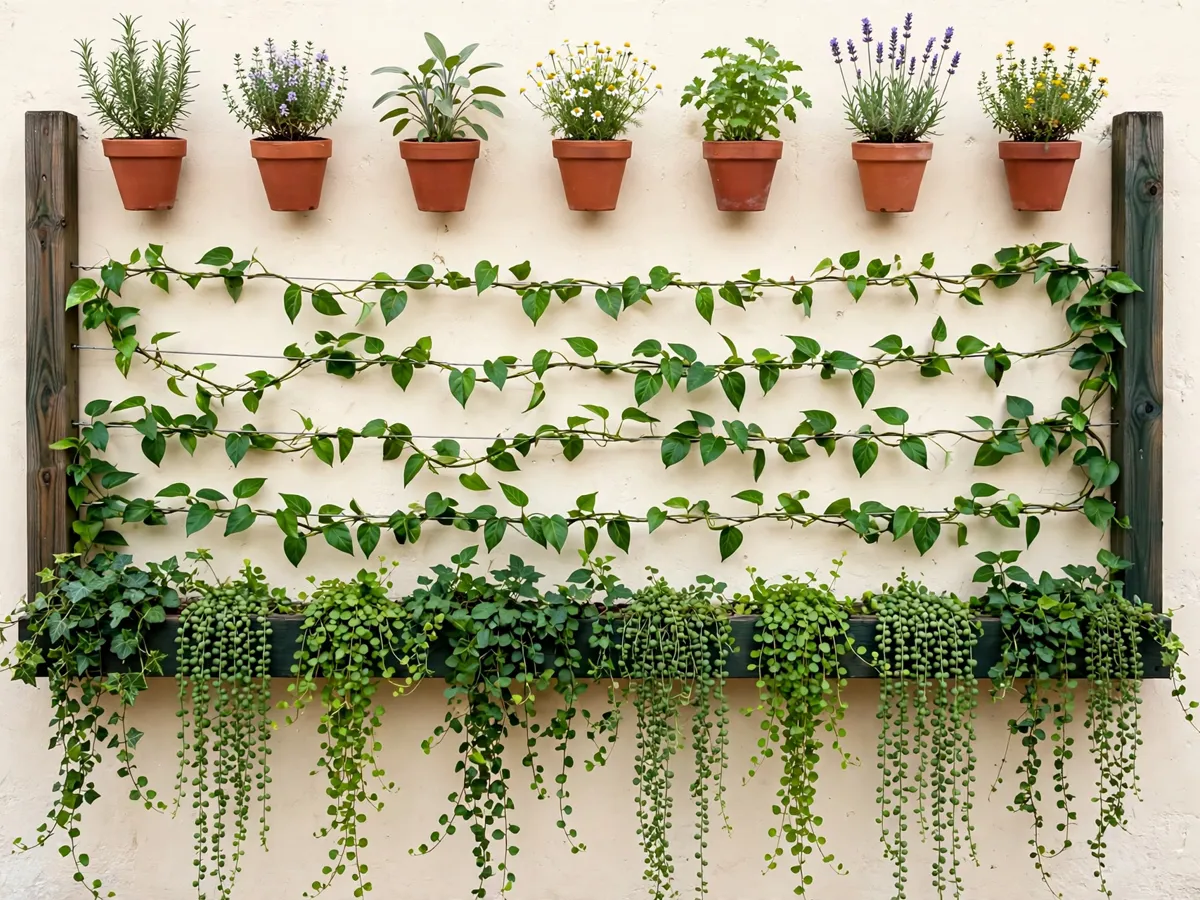
One rule ties the three layers together, and it is the difference between a wall that reads as one and a wall that reads as three shelves: the tallest spiller must reach the bottom edge of the layer above it. When the trailing band touches the fillers or climbers above, the eye travels down the wall in one unbroken run of leaf. When a gap opens between bands, the wall breaks into pieces and the hardware shows through the seams. So a good starter stack for a five-pocket column, top to bottom: calibrachoa or lettuce in the top pocket, one clematis or mandevilla in each of the two middle pockets, and trailing petunia in the two bottom pockets, planted close enough to the pocket edge that its first stems already hang past the seam.
Cost: $30–$120 in plants for a 5-pocket wall, $60–$220 for a full 6 by 3 foot wall. Time: 2 hours to plant. Buy the climbers small — they grow into the frame faster than they fill a pot.
2. Pick the mount your lease allows
Before any plant is bought, answer one question: are you allowed to drill? Everything about the wall — cost, weight, what it can hold, how it comes down when you move — follows from that answer. Three mounts cover every situation between a small yard you own and a balcony you rent.
Trellis freestanding — when you can drill or stake freely. Two 2 by 2 posts six feet tall, set two to three feet apart, joined by horizontal hanging wires or garden twine run between them every 12 inches up the frame — a 6 by 3 foot climbing wall on its own legs, standing a few inches off the wall or fence behind it so air moves and the climbers have something to grip. In a yard, the posts sit in the ground or in two heavy pots; on a drill-allowed balcony, they can anchor to the deck. This is the cheapest mount and the strongest for heavy climbers. Materials: two 8-foot 2 by 2s, a length of wire or twine, screws, and either two 16-inch pots or two post bases — $40 to $80. It carries the true climbers best because clematis and sweet pea grip a wire or a thin rung far better than fabric.
Pocket planter — the no-drill renter wall. A fabric pocket planter with three to five rows of pockets, hung from a horizontal bar that stands on its own feet or leans against the wall on standoffs — no drilling, no fasteners in the wall, and it moves with you. A tension pole between floor and ceiling holds the same planter indoors between two window jambs. Each pocket holds 4 to 6 inches of potting mix: enough for herbs, lettuce, calibrachoa, petunias and ivy, not enough for a hungry climber, so on a pocket wall the climbing band is usually a light twiner like sweet pea grown through the pocket into a wire above, or replaced with more fillers. Budget $50 to $150 depending on rows and fabric weight, plus a bar or stand if the planter does not come with one.
Shelf ladder — no drill, no floor space to give up. A wooden ladder leaned against the wall, four rungs, with pots sitting on the rungs and turned so the growth faces the room. It drills nothing, needs no free-standing footprint beyond its own lean, and holds real pots with real drainage — the only mount of the three that takes standard nursery pots, which is why it carries the thirstiest plants best, and the one where a wall can double as a kitchen garden: the pot depth each vegetable needs is the number that decides which rung a plant gets, and a decorative ladder runs $60 to $120. Turn the pots a quarter rotation every week or two so no side of the plant grows permanently into the wall.
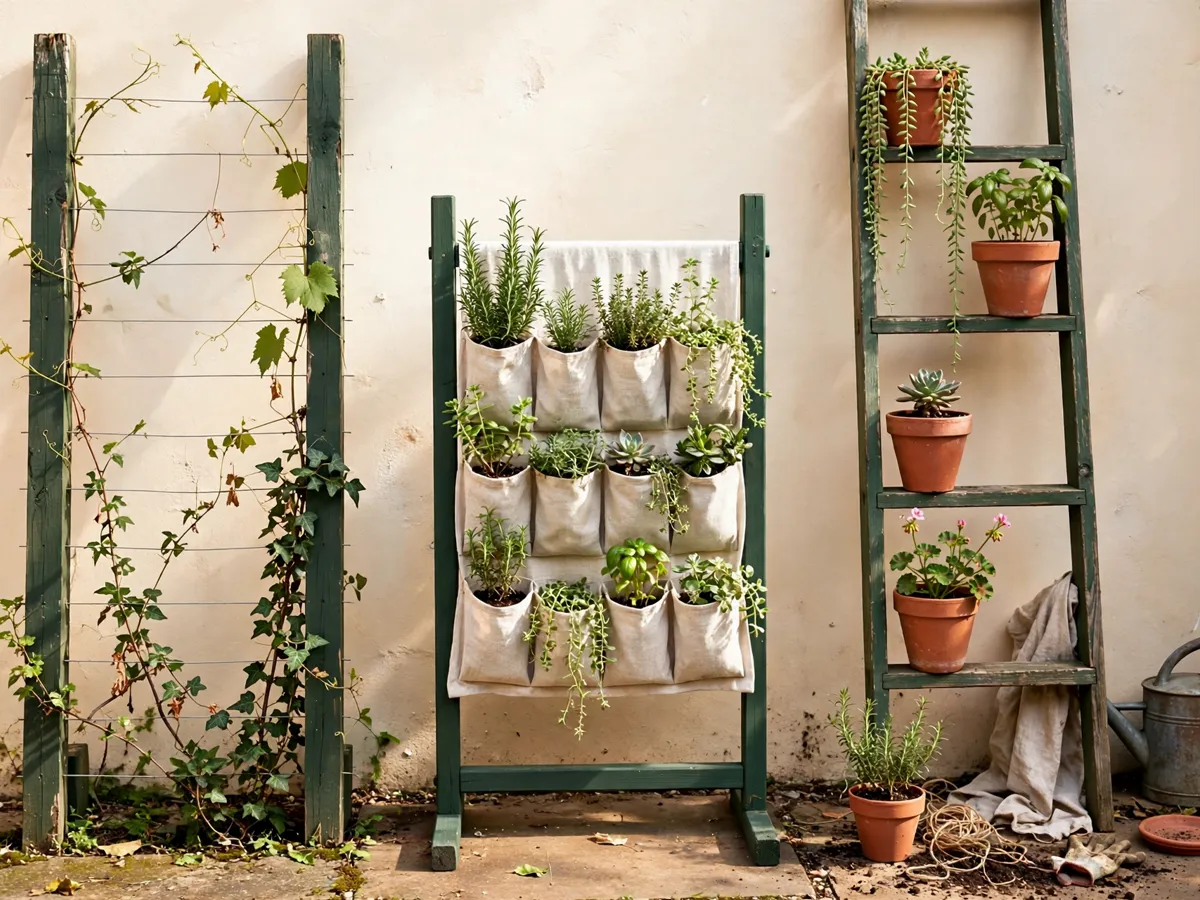
The three mounts also differ in what they hide. A trellis hides nothing — its beauty is the visible frame and the climbers clothing it, so it belongs where the wall itself is fine to show. A pocket planter hides its own hardware behind the planted face and is the one that reads most like a green wall. A ladder shows everything and owns that — the pots are part of the look. Match the mount to the wall you actually have, and the whole build falls out of that single choice.
Cost: $40–$220 across the three mounts, trellis cheapest, ladder priciest per plant. Time: 2 to 4 hours to build or hang and plant. Pick the mount before buying plants — the mount sets the pot size, and the pot size sets the plant list.
3. Read the wall's light before you plant
A vertical wall is the one garden where the direction a surface faces decides the planting, because the plants grow on that surface rather than near it. Two directions cause most beginner failures, and both have a practical answer. This is working guidance about where plants sit — the plants you pick for a spot, not promises about how any plant will perform.
A west-facing wall gets the afternoon sun, and that heat stacks. The wall itself warms through late afternoon and radiates that heat back into the plants hung inches away from it — the heat bounce, and it is a real effect on a small balcony where the plants sit close to the wall. Two moves handle it: stand the mount 12 to 18 inches off the wall so air moves between plant and wall and the bounce has somewhere to go, and plant the sun-tolerant group in every pocket — lantana, portulaca, sedum, rosemary, lavender. The freestanding trellis and the ladder both earn their keep here, because standing off the wall is what they already do.
A north-facing wall gets low, gentle light. No afternoon baking, but no strong hours either — so plant the part-shade-tolerant group and keep it close to the wall, where the pocket planter and its stand belong: coleus, impatiens, ferns, mint, parsley, lettuce. Lettuce and parsley actually prefer the gentle light; they are the plants that bolt or scorch when a wall bakes. This is also where the low-light houseplant group crosses over — the indoor picks and their reading are in what holds up in a dim corner, and several of them spend summer on a north wall.
East and south walls sit between the two and read as the all-rounders — morning light east, the longest hours south — and almost any plant from the starter stack handles either. The honest way to confirm a wall before spending money: watch it across one weekend, note which hours the sun lands on the wall itself, and buy plants for what you saw, not for what the compass says. A balcony railing, an overhang or the building next door can change a compass direction into something else entirely, and the plants answer to the light that arrives, not the label on the wall. That same one-weekend light watch is the first habit in the balcony garden beginner guide — a vertical wall is simply the same read, made upright.
Cost: $0. Time: one weekend of watching, 10 minutes at a time. Planting for the light you actually saw beats planting for the direction the map promised.
4. Water top-down, check bottom-first
A vertical wall is a stack, and water in a stack moves down. Whatever runs out of the top pockets drains into — or past — the pockets below them. Used well, that is free irrigation: the top layer gets watered first, the middle catches the run-off, the bottom layer stays wet longest. Used blindly, it drowns the bottom of the wall and starves the top. So the watering order and the checking order are opposites: water starts at the top, the check starts at the bottom.
The check rule: press one finger an inch into the soil of the bottom-most pocket before watering the whole wall. If that inch is still damp, the bottom half does not need more water — water only the top row and let the run-off do the middle. If it is dry, water the whole wall from the top down. The bottom pocket is the driest-looking and the wettest-acting spot on the wall, because it receives its own water plus everything above it; the top pocket is the opposite, and in summer heat the top row can need water every day while the bottom row waits three or four.
Height changes the tool, not the rule. Once the top of the wall is above head height — anything over six feet — a watering can aimed up spills more than it delivers, so use a long wand on a hose or a watering can with a long spout and water the top row from a step rather than stretching. And on any balcony with a neighbor below, plan for the run-off before it happens: a drip tray under the bottom row, or the whole mount stood a hand-width in from the balcony edge, keeps the drain water on your floor instead of theirs.
Containers this small also dry out faster than any garden bed — a 4 to 6 inch pocket is closer to a windowsill pot than a planter — so the planting-day habits that keep herbs alive indoors apply to a pocket wall at full strength. The watering rhythm for small containers is covered from the reader's side in the kitchen herb setup, and the same thirsty-group and dry-group split works on a wall: rosemary and lavender at the top where it driest, parsley and mint lower where the run-off collects.
Cost: $0 to $25 for a wand or a drip tray. Time: 5 minutes a day in midsummer, less in spring. Water a wall from the bottom up and the top row dies of thirst while the bottom row rots.
What we would skip
- A pre-planted “living wall” panel shipped by mail — the pockets arrive shallow-rooted and the first week of shipping heat does most of them in. Plant your own wall from nursery six-packs; the plants establish where they will live.
- Hydroponic wall kits for a first vertical garden — they add a pump, a reservoir and a power cord to a problem that a watering can already solves at this size.
- Full-sun flowers on a north wall and ferns on a west wall — no mount or watering schedule rescues a plant matched to the wrong light. Read the wall first; the plant list follows.
- A drip irrigation timer for a wall under six feet tall — one finger into the bottom pocket is a better sensor than a timer on a schedule, and it costs nothing.
- Sphagnum moss “art” frames — they look like a wall for a month, then read as a moss patch drying from the top down. Pockets and rungs hold real soil and real roots.
Cost: $0 to skip. Time: 2 minutes of reading that keeps a first wall under $150 instead of past $400.
The before-you-plant checklist
- Mount picked by the lease — trellis if drilling is allowed, pocket planter if it is not, ladder where a lean beats a footprint
- Wall watched across a weekend and its light written down — west stands 12 to 18 inches off, north sits close and takes the shade group
- Three layers assigned before any purchase: climbers in the middle, fillers on top, spillers at the bottom, tallest spiller reaching the bottom edge of the layer above
- Pocket depth checked — 4 to 6 inches of mix for fillers and spillers; true climbers given a wire or rung, not a pocket
- Run-off planned on a balcony with a neighbor below: drip tray under the bottom row, or the mount stood in from the edge
- Watering reach planned — wand or long-spout can for any wall over six feet, a step stored nearby
- Budget written down before the store run: mount $40–$220, plants $30–$120, tray and wand optional
- One weekend reserved, mounting first, planting second
Cost: $0 to check. Time: 15 minutes with this list before the store run.
Common questions
What plants go in a vertical garden wall?
Three layers: climbers in the middle for height — sweet pea, mandevilla, clematis — upright-but-short fillers on top, like herbs, lettuce and calibrachoa, and trailing spillers at the bottom, like trailing petunia, ivy and sweet potato vine, to cover the mount. Plant the tallest spiller so it reaches the bottom edge of the layer above it.
Can I build a vertical garden without drilling?
Yes — two of the three mounts need no drill. A fabric pocket planter hangs from a freestanding bar or leans on standoffs, and a wooden shelf ladder leans against the wall with pots on its rungs. The freestanding trellis is the one that asks for ground or deck anchoring. On a rented balcony, the pocket planter and the ladder both come down with you when the lease ends.
How far should a vertical garden sit from the wall?
12 to 18 inches on a west-facing wall, where the afternoon sun heats the wall and bounces that heat back into the plants hung close to it. The stand-off lets air move between plant and wall. On a north wall, keep plants close — the light is gentle and there is no heat to escape.
How often should I water a vertical garden wall?
Check before you water: press a finger an inch into the bottom-most pocket. Damp means water only the top row; dry means water the whole wall from the top down. In midsummer heat the top row can need water daily while the bottom row waits three or four days, because water runs down through every layer above it.
Save these on Pinterest
Pin the three decisions that carry the whole wall — the three-layer stack, the mount your lease allows, the top-down-water-bottom-first check — so the next balcony or side yard starts with a plan instead of a pocket of guesswork. This guide lives in the gardening tips collection with the rest of the planting guides.