 Plant As Deco
DIY Home Projects
Mortise and Tenon Joint: A Beginner Guide with Chisel and Drill
By Plant As Deco · Updated 22 November 2026
A mortise and tenon is two parts: a slot cut in one board, and a tongue on the end of another that fills it. It is the joint in old doors, old chairs and most solid wood furniture that outlived the person who built it. This guide cuts one with a drill, a chisel and a clamp, on two pine boards, and says plainly when a screw is the better answer.
Weekend-ready: $13–$95 to practice, a few hours per joint for the first pair and about 40 minutes for every one after. $13–$29 of that is boards and bits; the rest is a chisel and a clamp if the house has neither.
1. What a mortise and tenon joint is
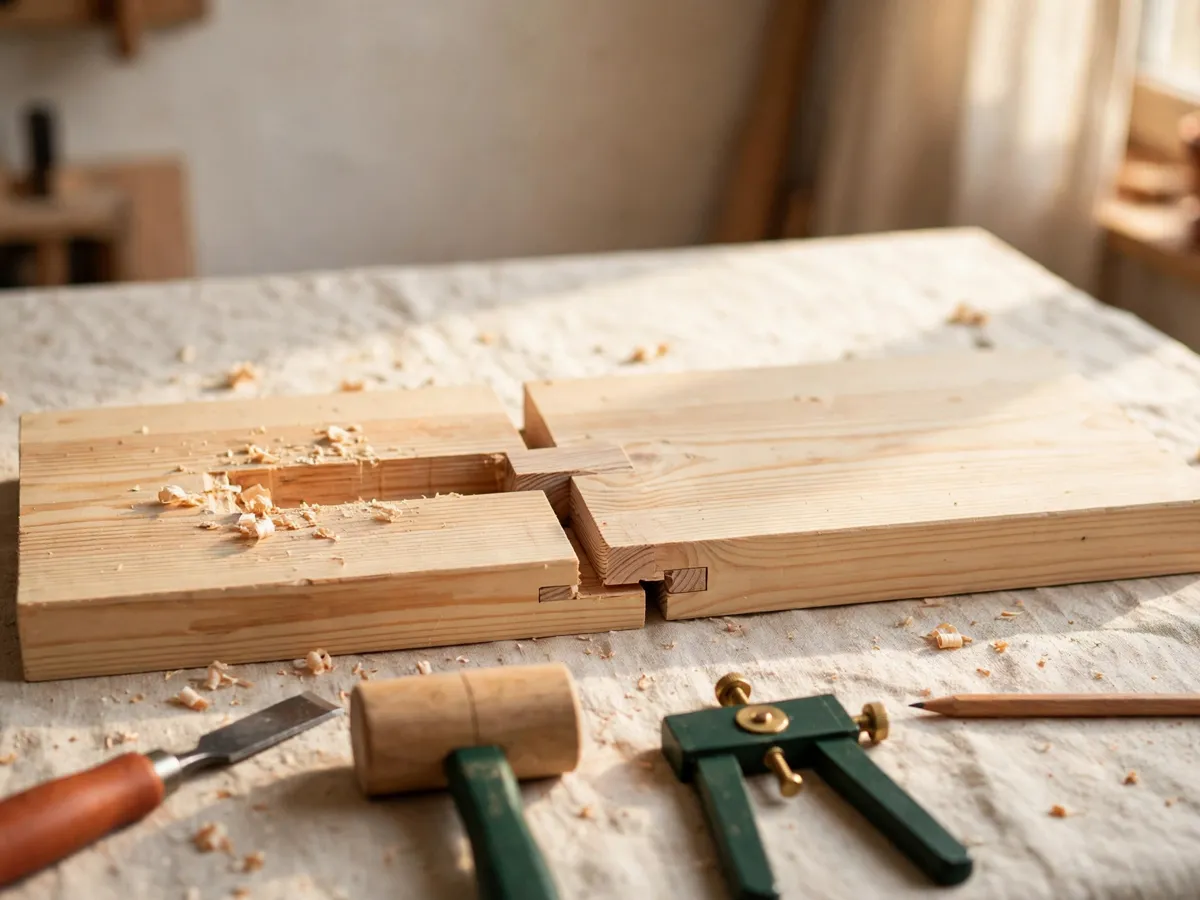
The mortise is the hole. The tenon is the tongue that fits inside it. One board is cut away to leave a rectangular slot, the other is cut away at its end to leave a matching rectangular projection, and the two go together so the end grain of one is buried inside the other. That is the whole joint. Everything else in this guide is how to reach it with cheap tools.
Three names are worth learning, because the steps below use them. The shoulders are the two faces that butt against the outside of the mortised board. The cheeks are the wide flat sides of the tenon, the ones parallel to the board. The tails (sometimes called the edges) are the two narrow sides. Only the shoulders show in the finished piece. The cheeks, the tails and the end of the tenon disappear inside the mortise, which is exactly why the joint looks built rather than assembled.
What it does that a screw does not: a screw clamps two surfaces together, and the strength of that joint is the strength of the glue line between them plus the shear strength of the screw. A tenon is a mechanical key. It cannot slide sideways past the wall of its mortise, so a frame racked sideways, the push you get every time you lean on a chair or bump a bench, is carried by wood bearing on wood before the glue does any of the work.
It also carries more glue. On the practice piece in section 4 the tenon is 1-1/8 inches long, 2 inches wide and 3/8 inch thick, so its two cheeks glue to the mortise walls over 2 x 1-1/8 = 2-1/4 square inches each, and its two tails add 3/8 x 1-1/8 = 27/64 square inches each. That is 4-1/2 + 27/32, about 5-1/3 square inches of glue surface buried in the joint. A butt joint made from the same board glues over 3/4 x 3-1/2 = 2-5/8 square inches. The tenon carries a little over twice the glue area, in a slot that protects it, which is the whole argument for the joint.
Cost: $0. Time: five minutes to read and to trace the three names on a board with a pencil. One caveat: a tenon is only as good as its fit, so the extra glue area in this section is a promise about a snug joint, not about any joint you can push together.
2. When to bother, and when a screw is simply better
Most weekend builds do not need this joint, and saying so is the honest part of a beginner guide. Cutting one takes 40 minutes to an hour once you have practiced. A screw takes four seconds. The question is not which is stronger in a laboratory, it is which failure you are willing to live with.
Bother with the mortise and tenon when the piece will be pushed sideways and the joint will be seen. That is a stool you sit on and scoot, a bench you lean against, a chair, a door or window frame, a headboard, a table whose apron you knock with your knee. Sideways load is where a screwed butt joint creeps: the screw holds, the glue line slowly creep-breaks, and a year later the frame is a parallelogram. It is also where the joint shows. A screwed corner needs a pocket hole, a plug, or a screw head on the outside of something you intended to look like furniture.
Reach for screws, including pocket screws, when the load is straight down or straight out, when the piece is flat-packed or rented-apartment temporary, when you are building a jig, a crate, a shelf box or a cabinet carcass, and when the build has more than eight joints in it. A pocket screw in a carcass you will never see is a reasonable, durable, honest choice, and a first attempt at twelve mortises is how a weekend project becomes a month of frustration. The beginner woodworking plans index is full of builds that are correctly screwed, and the right first project is one of those.
The middle option worth knowing: a screwed butt joint with a splined corner, or a dowelled joint. Both are faster than a mortise and stronger than a plain screw. Learn this joint anyway, because it teaches marking, sawing and paring to a line, and those three skills make every other joint you cut afterwards better. That is the real reason a beginner bothers with a mortise on a $9 pair of boards.
Cost: $0. Time: five minutes to decide, before you buy anything. One caveat: count the joints in the build first, because a piece with four of them is a weekend and a piece with sixteen is a different commitment.
3. The tools: a drill, a chisel and a clamp
Three tools cut this joint, and two of them most people already own. Nothing else on the list is required.
- A drill, and a 3/8 inch bit. The drill removes about 80 percent of the waste in two minutes. A spade bit is the cheapest at $2 to $6 and cuts a clean enough hole; an ordinary twist bit works too; a Forstner bit leaves the flattest bottom and costs a little more. What the drill cannot do is square a corner, which is why the next tool exists.
- A 3/4 inch bench chisel. This squares the walls, pares to the knife line and flattens the bottom of the mortise. A bevel-edge bench chisel, $12 to $30 new, is the one purchase this joint genuinely needs if the house has none. It must be sharp enough to pare end grain without a mallet blow, which a $14 chisel out of the box is not: budget ten minutes on a sharpening stone or a piece of 220 grit glass.
- One clamp, 12 inches. A bar clamp at $8 to $18, or two spring clamps if the board is thin. Its job is not to hold the joint, it is to stop the board moving while the chisel is bearing against it. A board braced against a knee or a wall can substitute, and it is slower and less accurate.
The rest is marking and measuring, and most of it is already in a kitchen drawer: a tape measure, a pencil, a combination square or a speed square, and a sharp knife for the marking line. A marking gauge, $6 to $18, is the one item that makes the mortise lines fast and repeatable, and it is the item worth buying second.
What to skip buying, because none of it is needed for one joint: a mortiser, which is a $150 to $400 machine for a task a $14 chisel does; a drill-press mortising attachment; a router table with a straight bit; an oscillating multi-tool, which cuts a mortise but not to a knife line; and a set of five chisels, when the job uses one width. If the wider question is what a first woodworking kit should contain, the DIY tool kit checklist covers it at the same budget.
Cost: $0 if a drill, a chisel and a clamp are already home; $26–$66 for the three items you may still need, plus $2–$6 for the bit. Time: 15 minutes to gather it all and sharpen the chisel. One caveat: the chisel is the tool that decides the quality, so a dull one is not a budget saving.
4. The practice piece: two boards, all dimensions stated
Do not practice on the project. Practice on two boards that cost less than lunch, cut one joint, pull it apart, and cut another in the same board. The piece below is a corner of a frame, the same shape a door, a headboard or a bench apron uses, and every number in it comes from the board you buy.
| Part | Dimension | Where it comes from |
|---|---|---|
| Both boards | Pine 1x4, actual 3/4 x 3-1/2 in, cut 8 in long | The nominal name is 1x4; the measured face is what the joint is sized from |
| Tenon thickness | 3/8 in | Half the 3/4 in stock: 3/16 + 3/8 + 3/16 = 3/4 |
| Tenon width | 2 in | 3-1/2 in width minus two 3/4 in shoulders: 3/4 + 2 + 3/4 = 3-1/2 |
| Mortise depth | 1-1/4 in | About a third of the 3-1/2 in board, leaving 2-1/4 in of solid beyond |
| Tenon length | 1-1/8 in | Mortise depth minus 1/8 in of glue space: 1-1/4 - 1-1/8 = 1/8 |
| Mortise opening | 3/8 in x 2 in | Matches the tenon exactly, cut in the 3/4 in edge of the board |
| Face walls | 3/16 in each | (3/4 - 3/8) divided by 2. Thin, and the reason section 10 exists |
Buy two 8 foot 1x4 pine boards at $3 to $7 each. One board is plenty for a session: ten 8 inch pieces come off 96 inches with room to spare, since 10 x 8 = 80 inches plus nine cuts at 1/8 inch of kerf is 81-1/8 inches, and the 15 inches left over is offcuts for a second chisel practice. The second board is your insurance, because the first attempt will ruin one piece and you will want to start again the same afternoon rather than the same week.
Sight down each board before you cut. A 1x4 that bows, twists or cups will hand you a tenon that is square to its own board and crooked relative to the mortise, and no amount of care in the marking fixes that. Pick the two flattest boards on the rack. It is free, and it is the single cheapest quality decision in this guide.
Cost: $13–$29 all in, being two boards at $6–$14, a 3/8 inch bit at $2–$6, a small bottle of yellow glue at $3–$5 and 120 and 180 grit paper at $2–$4. Time: 20 minutes to cut the pieces and sight them. One caveat: measure the face of the board in the aisle, because a 1x4 has been planed down from its name and every dimension above assumes 3/4 by 3-1/2.
5. Marking out the mortise
Marking is the step a beginner rushes and the step that decides everything after it. A pencil line is a smudge a quarter inch wide; a knife line is a cut the chisel can register against. Use a knife for the four walls of the mortise and a pencil only for the waste.
- Set the marking gauge to 3/16 inch from the edge of the board and run it down the 3/4 inch edge face, twice, once from each edge. The two scribed lines sit 3/8 inch apart, centered through the thickness, and they are the top and bottom walls of the mortise. Check the arithmetic once: 3/16 + 3/8 + 3/16 = 3/4.
- Square two lines across the edge face, 2 inches apart, using the combination square against the board's edge. Place the pair where you want the joint. Centered on an 8 inch board means 1 inch of clear board, then the 2 inch mortise, then 5 inches. Any position works as long as the ends are at least 3/4 inch from the board's end.
- Mark the depth. Set the square or a gauge to 1-1/4 inch and scribe that line on both broad faces of the board, running past the edge face so it is visible from the front. This is the floor of the mortise, and it is the line the chisel stops at.
- Hatch the waste. Pencil the area inside all four lines so that which side of a line you cut on is obvious at a glance, even after the drill has eaten most of it.
Two rules to hold for the rest of your woodworking life, both of which come out of this step. Cut to the waste side of the line and leave the line standing; a line destroyed is a dimension forgotten, and you cannot re-mark a wall that has already been pared. And mark every dimension from the same reference face, in this case the board's broad face, never from the last line you drew. Drift is what happens when a second measurement is taken off a first measurement.
If you have no gauge, the substitute is the square and the knife: set the square to 3/16, scribe a short mark at each end of the mortise on both edges, and connect them with the straight edge of the square held against the board. Slower, accurate enough for practice.
Cost: $0 with a knife and a square you own, $6–$18 for a marking gauge if you want it repeatable. Time: 15 minutes the first joint, five the third. One caveat: go light on the knife and go over the line twice, because a deep gouge in soft pine widens the mortise before you have cut a single chip.
6. Drilling out the waste
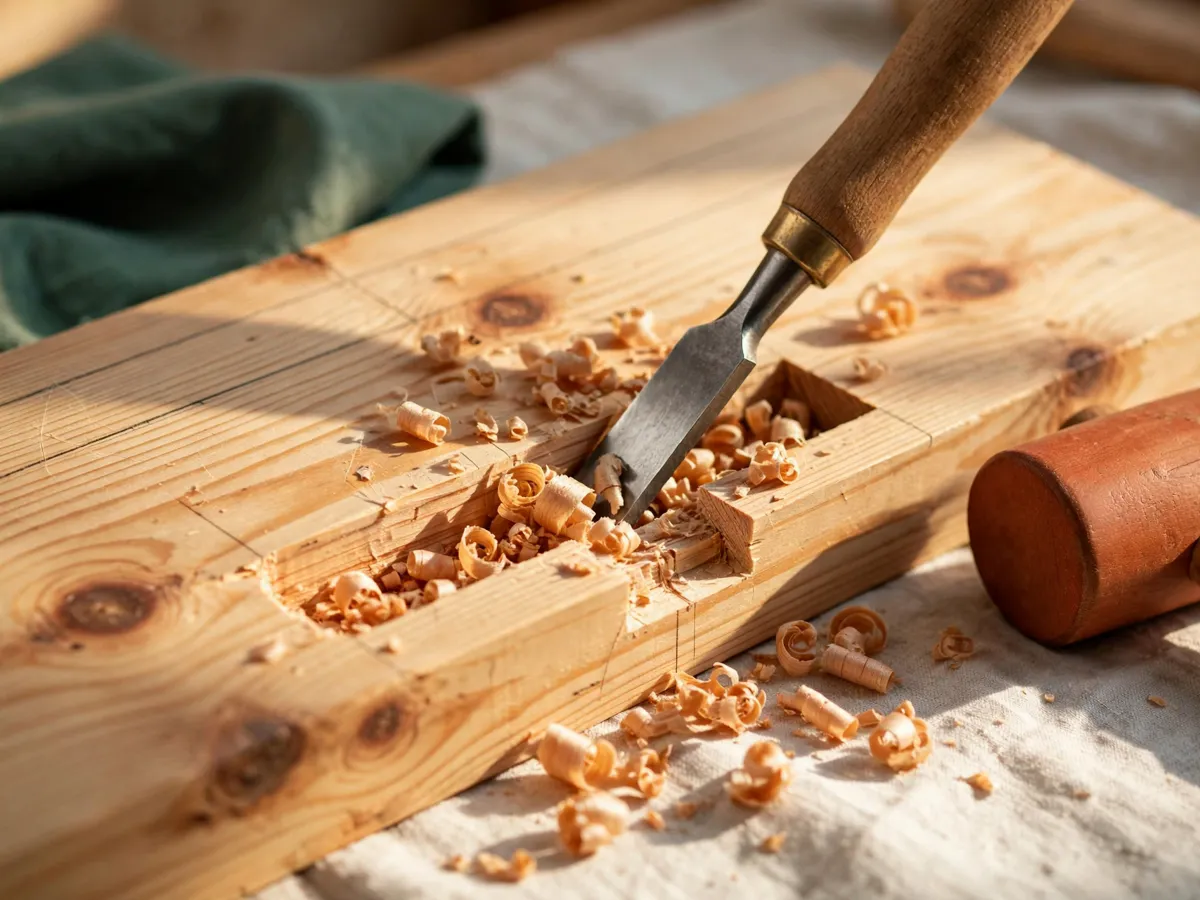
The drill does the rough work and the chisel does the fine work, and this division is the reason the joint is achievable without a workshop. Fit the 3/8 inch bit: it matches the mortise width exactly, so a hole drilled on the centerline between the two scribed lines kisses both of them and leaves nothing between the holes but a thin web of pine.
Set the depth before you cut anything. Wrap a band of masking tape on the bit at 1-1/8 inch from the cutting spur, which is 1/8 inch shy of the 1-1/4 inch floor line you scribed in section 5. Drilling short is deliberate: the bit's conical tip leaves a high ridge in the bottom of the hole, and the chisel will flatten that wall to the real line in one paring pass. Drilling to the full depth and then discovering the ridge means you have cut past your floor line into the 2-1/4 inch of solid beyond, and the mortise is now too shallow to fix.
Drill seven holes on the centerline, 1/4 inch apart on center, the first and the last a quarter inch inside each end mark. The span adds up: 1/4 inch of end margin, six gaps of 1/4 inch between seven centers, and 1/4 inch at the far end, which is 1/4 + 6/4 + 1/4 = 2 inches, the mortise length exactly. Backing the board with a scrap of the same pine, held flush against the edge face, keeps the walls from chipping out where the bit breaks through the far side of each hole.
Check the first two holes with the square from two directions: once down the length of the board and once across its thickness. A bit that wanders 5 degrees at the first hole produces a mortise whose floor is angled, and an angled floor turns a snug tenon into a joint that pulls the frame out of square as soon as you clamp it. Two seconds with the square here saves the whole board later.
Cost: $2–$6 for the 3/8 inch bit if the drawer has none. Time: 20 minutes for the first mortise, most of it stopping to check the square; five minutes once the spacing is in your hands. One caveat: drill in short, clean bites and clear the flutes often, because a spade bit packed with pine flour will wander whether the board is clamped or not.
7. Chiseling to the line
Now the joint stops being a drill job. The chisel has to reach four surfaces: two long walls, two end walls and the floor. Orient the 3/4 inch blade so its width runs along the 2 inch dimension of the mortise, never across the 3/8 inch one, and it fits.
- The end walls first. Bevel facing the waste, register the edge against the knife line, and take short chips with the mallet or with hand pressure. Work each end wall from both faces toward the middle rather than pushing it out in one direction, which is how the far corner blows out.
- Then the two long walls. These are the 3/16 inch pine faces above and below the slot. Pare, do not chop: a shaving at a time, bevel toward the waste, checking that the wall stays flat. A wall hollowed between the drill holes shows as a groove you can feel with a fingernail, and the tenon will ride on the high spots only.
- Then the floor. Bevel down, flat of the blade against the floor, paring toward the mouth until the 1-1/4 inch scribed line is met all the way across. The masking-tape ridge from the bit goes here, and it should take one or two passes.
- Square the corners last. Four corners, each a small triangle of un-drilled pine. Tip the chisel in at an angle and lift, twice per corner, then check that the corner is a right angle rather than a scoop.
Stop early. The mortise is finished when the knife lines are standing, the walls are flat and the corners are square, and it is deliberately left a hair undersized. The tenon you cut in section 8 is the gauge, and the mortise takes the last paring. That order is not a preference: the mortise is buried in the board and cannot be made bigger without ruining it, while the tenon is a protrusion you can shave in ten seconds. When two parts must agree, adjust the one you can still shrink.
Test as you go with the chisel blade itself. Held flat against the wall, a sharp 3/4 inch blade will not slide into the 3/8 inch slot more than a fraction of its thickness; if it drops in to half the blade, the wall has been pared past the line and the joint is already loose on that side.
Cost: $12–$30 for the chisel if the house has none, plus about $8 for a stone or a sheet of 220 grit on glass. Time: 30 to 45 minutes for the first mortise, 12 to 15 for the fifth. One caveat: if the chisel is tearing rather than slicing the pine, stop and sharpen it, because you cannot pare to a line with a tool that pushes the wood ahead of it.
8. Cutting the tenon
On the second board, the tenon is the same four lines read from the other side: 2 inches wide across the face, 3/8 inch thick through the edge, 1-1/8 inches long, with the shoulders square around the whole end. Cut them in this order, because the order is what keeps the tenon from twisting.
- Mark, then saw the shoulders. Scribe the 1-1/8 inch shoulder line all the way around the board's end with the knife, checked square with the combination square on all four faces. Saw it to the line on the two broad faces and the two edges. The shoulder is the face that will show, so it is the one line you do not adjust later.
- Scribe the cheek lines. Set the gauge to 3/16 from the face and run it down both broad faces of the board's end, marking the tenon's 3/8 inch thickness. Then mark the 2 inch width on both edges, 3/4 inch in from each face.
- Saw the cheeks, leaving waste. A fine-tooth backsaw, a tenon saw or a Japanese ryoba all work; a coarse panel saw makes the paring longer, not harder. Saw down to the cheek line on both broad faces and knock out the waste between them with the chisel. Do not try to cut the finished cheek in one saw pass.
- Saw the tails. Down to the 2 inch lines on both edges, again leaving the waste between for the chisel.
- Pare to the lines. Chisel, bevel toward the waste, a shaving at a time, alternating faces. Cheek, then the opposite cheek. Tail, then the opposite tail. Alternating is what keeps the tenon centered instead of drifting to one side, which is the twist that ruins a first attempt.
Sneak up on the fit. Leave the tenon 1/16 inch proud of every line and try it in the mortise. Mark where it binds, usually the shoulders or the entry corners, pare that, and try again. Three or four passes is normal. A tenon cut to the line in one pass and then found to be 1/32 inch too fat is a tenon with 1/32 inch less shoulder, and the shoulder cannot be rebuilt.
Keep the offcut from this board. It is now a 3/8 inch by 2 inch sample of the exact mortise cross-section, and it is the fastest way to check a second mortise before you commit the tenon to it. Practice pieces make good gauges, which is one more reason to buy the second board in section 4.
Cost: $0 beyond the boards, or $14–$26 for a fine-tooth backsaw if the house has only a panel saw. Time: 40 to 60 minutes for the first tenon, 15 to 20 for the fourth. One caveat: saw the shoulder line before the cheeks, because a cheek cut made first leaves the shoulder line unsupported and the saw will walk along the grain instead of across it.
9. Fit, glue and clamp
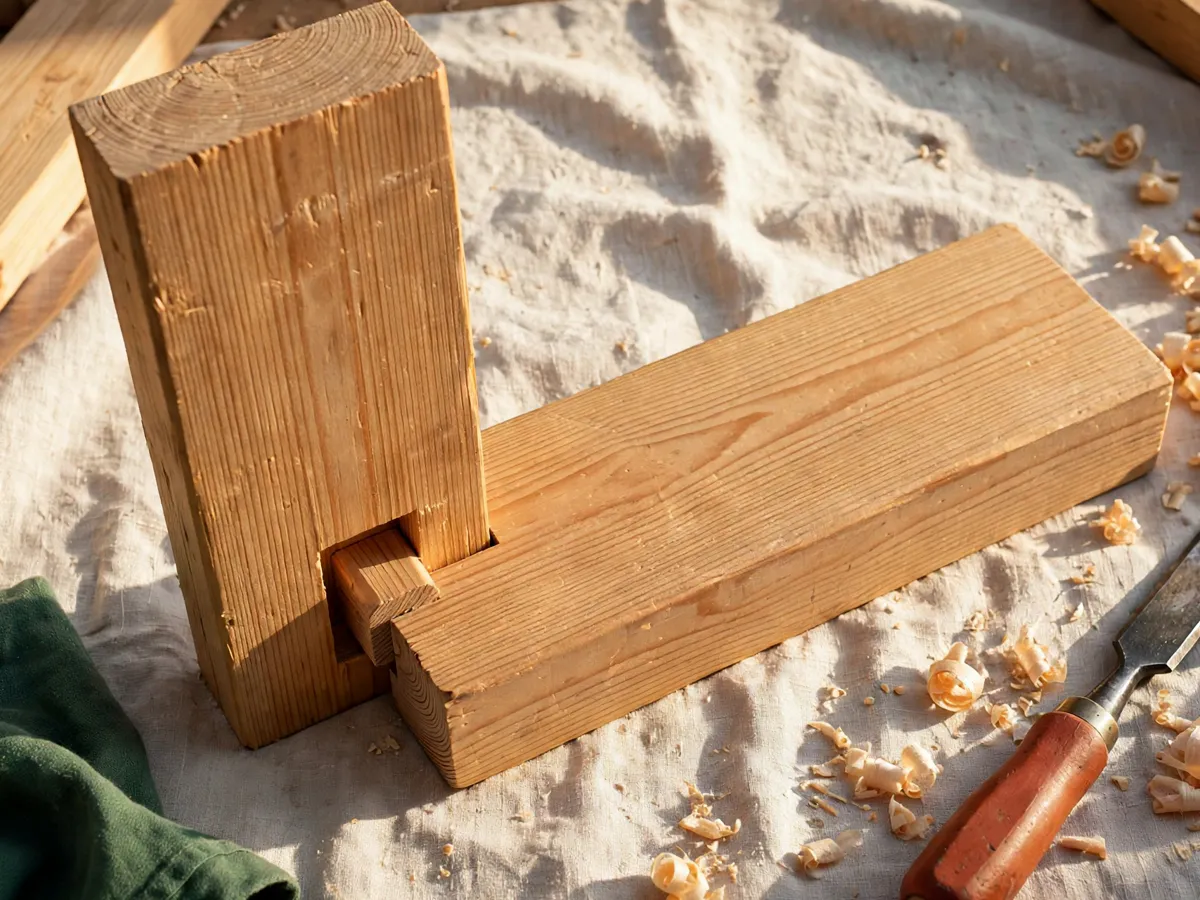
Dry-fit before anything else, and take the dry-fit seriously rather than as a formality. Push the tenon into the mortise by hand, with the joint square, and note three things. Does it go in with palm pressure? Do the shoulders meet all the way around with no light showing? Does it stop 1/8 inch short of the floor, as it must, since the mortise is 1-1/4 inch deep and the tenon is 1-1/8 inch long?
Dry versus snug, and the difference matters. Dryis a joint that rattles: the tenon slides side to side in the mortise, and no amount of glue fills that. Snug is a joint that resists the palm, seats with a soft thud, shows no light at the shoulders, and has a little play along its length because the floor is 1/8 inch deeper than the tenon. Play along the length is correct. Play across it is not, and it means a cheek was pared past the line.
The light test is the honest referee. Hold the dry joint up to a window or a lamp and look at the shoulder line. A sliver of light at one corner says that corner of the shoulder is high, and the fix is a paring pass on the shoulder face, not more clamp pressure. A clamp will close a gap that the wood has not agreed to, and the joint will open again within a season.
Glue it in the order that avoids a dry spot. A thin bead of yellow PVA on the mortise walls, drawn around with a fingertip, rather than a fillet smeared on the tenon: the mortise walls are long-grain and take the glue, the tenon's end grain is buried at the floor and drinks, and a tenon end coated in glue does nothing. Assemble, check square by measuring the two diagonals of the frame corner, and clamp across the joint, one bar clamp pulling along the tenon's axis so the shoulders are drawn together. Put a pad under each jaw so the clamp cannot mar the pine, and tighten until snug, then stop.
Squeeze-out is handled twice, never once. Wait 15 to 20 minutes until the bead turns rubbery, then shave it off with the chisel held flat and bevel-down, which lifts it in a curl instead of smearing it. A wet rag at that stage pushes glue into the pine and leaves a pale streak that refuses stain eight sections later. Let the clamp stay on for an hour and the joint cure overnight before it is stressed.
Cost: $3–$5 of glue per session, $8–$18 for the clamp if you own none. Time: 15 minutes of fitting and clamping, one hour under clamp, overnight before use. One caveat: a joint that needed a mallet in the dry fit will hold the tenon proud of the shoulder permanently, and you will find that out only after the glue has set.
10. Common failure modes, and the fix for each
The five ways a first mortise and tenon goes wrong
- Gappy shoulders. One corner of the joint stands proud and the gap shows once the glue sets. Cause: the shoulder line was sawn to the pencil rather than the knife, or the tenon was cut shorter than 1-1/8 inch and the saw kerf ate the shoulder. Fix: scribe with the knife, saw to the line on all four faces before the cheeks, and never shorten the tenon to fix a binding fit, because that moves the shoulder instead of the cheek.
- A twisted tenon. The joint assembles, but the two boards are not in the same plane. Cause: the two cheeks were sawn from different reference faces, or one cheek was pared without alternating to its opposite. Fix: mark both cheeks from the same broad face, then pare cheek, opposite cheek, tail, opposite tail, in that rotation, checking flatness against the square after every third pass.
- A loose fit. The tenon slides in the mortise. Cause: the chisel went past the knife line on a wall, or the bit wandered and the corner was scooped rather than squared. Fix before glue: stop at the line, and re-cut the mortise in a fresh position on the same board. Fix after glue, for a real project only: a small pine wedge with glue driven into the corner of the joint, cut across the grain of the tenon. On a practice piece, the honest fix is another practice piece.
- Split walls. The 3/16 inch face of the mortised board cracks, usually at one end. Cause: the chisel was pushed out through the end rather than worked from both ends inward, or the clamp was cranked on a board whose walls were already undercut. Fix: back the board with a scrap while drilling, pare each end wall from both faces toward the middle, and stop tightening the moment the shoulders meet.
- An angled floor. The joint pulls the frame out of square as it clamps. Cause: the drill entered off-square and the mortise floor is tilted through the board's thickness. Fix: check the first two holes with the square from two directions, and confirm the floor against the scribed 1-1/4 inch line on both broad faces before the tenon is cut.
Practice checklist, run before every joint
- Board sighted flat, and the reference face chosen and marked
- Chisel sharp enough to pare end grain without a mallet
- Gauge set to 3/16, and 3/16 + 3/8 + 3/16 = 3/4 checked once
- Four mortise lines scribed with a knife, waste hatched in pencil
- Depth stop at 1-1/8, floor line at 1-1/4, tenon at 1-1/8
- Seven hole centers spaced 1/4 inch, 1/4 + 6/4 + 1/4 = 2 checked
- Scrap backing board cut to the same thickness and clamped in place
- Board clamped before the first cut, not held with the other hand
- Dry fit done with the palm, light test at the shoulders, diagonals measured
- Offcut from the tenon board kept as a gauge for the next mortise
Cost: $0 to read this section; a ruined pair costs $3–$7 in boards, which is why the second board in section 4 is called insurance. Time: 10 minutes on the first read, under 2 minutes once it is a habit. One caveat: every failure above is cheap to avoid during the marking and expensive to avoid after the chisel has cut.
11. Where this joint earns its place
The practice corner above is the same shape as four real pieces, and once the joint is repeatable, those are the builds where it pays for the forty minutes it takes.
- Stool and bench legs to their stretchers. A seat is scooted, leaned on and kicked. The stretcher is racked sideways every time, and a tenon into the leg is the difference between a stool that is tight in year three and one that is slowly becoming a parallelogram.
- Door and window frames. This is the joint doors are made of, and the reason is not nostalgia. A door swings, so its rails are racked on every single use, and the frame has to stay square while it does. The 3/16 inch wall in the practice piece is the same thin wall a real door stile has, which is why the paring discipline here transfers directly.
- Table aprons to legs, and chair rails. Same argument, larger scale. An apron tied to four legs with tenons is what stops a table racking when someone leans on one end.
- A headboard or bed frame rail. Something you push against every morning and night, in a piece you would rather not see screw heads on.
Where it does not earn it: boxes, crates, shelving, jigs, and anything you will take down before moving. The one-board crate plan is screwed on purpose, because a crate is a container and not a frame, and eight mortises would double the build for no gain a single time.
One practical note before you cut tenons on real furniture: the joint wants a flat, square surface to be marked against. If the house has no bench, the beginner workbench plans cover a build that is itself mostly screwed, and gives you the top and the vise holes this technique is more comfortable in. Two joints a weekend is a realistic cadence for someone learning, and the second one is always quicker than the first.
Cost: $0. Time: five minutes to pick the piece you will build once the joint is repeatable. One caveat: cut the practice corner at least four times before it goes into anything you intend to keep.
12. Five questions this guide already answers
Can I cut a mortise without a chisel?
No. The drill removes the waste but cannot square a corner, and a round-bottomed hole with a round tenon is not this joint. One 3/4 inch bench chisel, $12 to $30, is the single required purchase, and it has to be sharp enough to pare rather than chop.
How deep should a mortise be?
About a third to a half of the member it is cut into, and never through unless you want the joint to show. On the 3-1/2 inch practice board that range is 1-1/6 to 1-3/4 inches, and this guide uses 1-1/4 inches, which leaves 2-1/4 inches of solid beyond the floor.
Is a mortise and tenon stronger than a pocket screw?
Under sideways, racking load, yes, and the reason is stated in section 1: the tenon is a key that bears on the walls of its mortise and carries about 5-1/3 square inches of glue against a butt joint's 2-5/8. Pulled straight apart, a good screw joint is competitive, which is why section 2 sends straight-out loads to the screw.
Should the tenon be a tight fit?
Snug, not tight. It should resist the palm and seat with a soft thud, show no light at the shoulders, and still have 1/8 inch of air at the floor for glue. If a mallet is needed in the dry fit, something is high and the joint will be held proud of the shoulder permanently.
What wood should a beginner practice on?
Soft pine 1x4, at $3 to $7 a board, cut 8 inches long. It pares cleanly, it is cheap enough to ruin, and its 3/4 by 3-1/2 inch measured face gives the exact proportions a frame in the same thickness uses. Sight the board flat before committing, and keep the offcut as a gauge.
Save these on Pinterest
Pin the practice-piece dimension table and the failure-modes list. Those are the two things you will want open on the bench, one to set the gauge and one to tell you what went wrong when the joint does not seat. The rest of the DIY home projects collection sits alongside it, with tool checklists and plan-led builds that use the same three tools.