 Plant As Deco
Organization & Storage
Fridge Organization Ideas: The Zone System for Small Fridges
By Plant As Deco · Updated 16 November 2026
A small fridge has one failure mode: the back row. Containers slide behind containers, the milk hides behind the juice jug, and something with no date and no memory slowly turns the whole shelf into a guess. This plan is for renters and small-home cooks with one modest fridge — top-freezer, bottom-freezer or side-by-side — and it replaces the guesswork with a zone system. Five shelves, five jobs, one row deep. A single dated tray for leftovers that checks itself at the end of every week, so nothing in the box is ever older than two weekends. And the door gets the sauces, never the milk — a door swings warm and cool every time it opens, and daily milk deserves the stiller air of a shelf.
Weekend-ready: $10–$60, one afternoon. Nothing sticks, drills or screws — renter-safe throughout.
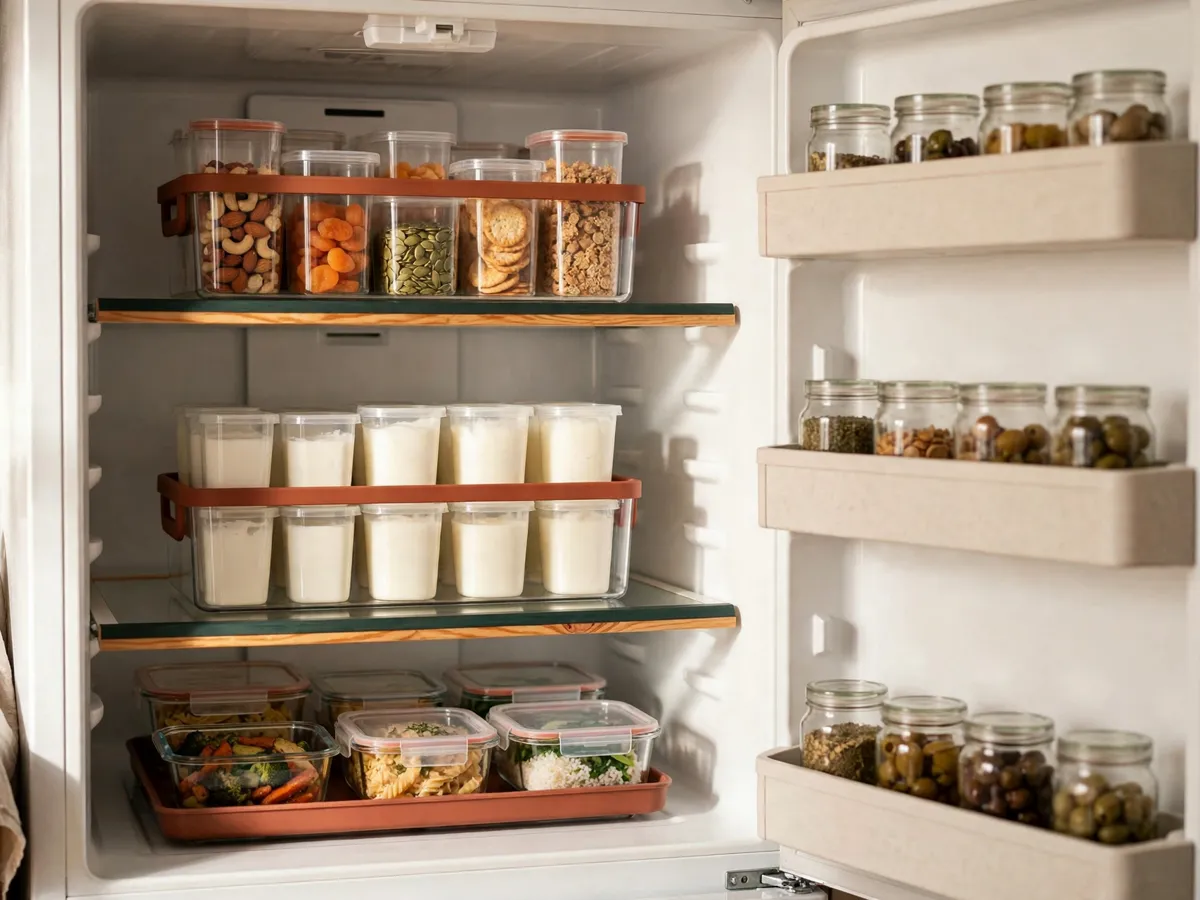
1. Zone map: five shelves, five jobs
Fridge organization fails the same way every time: food gets arranged by shape — tall jars at the back, short things in front — instead of by job. The fix is a zone map, and it starts with an empty fridge. Take everything out onto the counter, shelf by shelf, and let the expired bottles and the unidentifiable container leave for the bin while you can still see them. Wipe each shelf while it is bare; it will not be this easy again until the next reset. Then give every shelf one job, top to bottom, and put nothing back that does not belong to the shelf's job. It is the same one-job-per-shelf thinking that runs a pantry — the pantry zone guide applies it shelf by shelf. The kit is small:
- Two to four clear, low-sided bins
- One low tray for leftovers
- A roll of masking tape and a marker
- One shelf riser per deep shelf, side-by-side models only
The top shelf is the eat-now shelf. It is the first thing your eye meets when the door opens, so it takes the food that needs to disappear first: the half sandwich from lunch, the cut fruit, the open hummus, tonight's dessert. Anything that should be eaten within a day or two lives at eye level, where forgetting it is nearly impossible. The middle shelves are the daily zone — milk, yogurt, eggs, cheese, the tofu and the deli meat for the week. One clear bin holds the small dairy and protein items together, labels facing out, so deciding breakfast is a glance, not a dig.
The drawers are the produce zone, and the two drawers in most fridges split it naturally: one for the things that like damp air — leafy greens, herbs, the bagged salad — and one for the things that like it dry — whole fruit, carrots, peppers, anything with a skin that keeps. Keep the split honest and the drawers stop being a graveyard of soft bags. The door is the sauce zone: condiments, hot sauce, the jam collection, dressings, the butter if you use it daily. These are the survivors — small jars, strong flavors, opened often — and none of them mind the swing of air that comes with every opening. Milk does. The door warms and cools each time it swings, so the milk, the cream and anything you drink every day stand on a shelf instead, where the air sits stiller. The bottom shelf is the lowest flat plain in the box — wide, level, the steadiest floor in the fridge — and it gets the two heaviest jobs: the dated leftovers tray from section three lives here, and anything sealed that could drip stands below the food it could drip onto. Gravity is the whole argument.
- Empty the fridge onto the counter and bin the expired and the unidentifiable.
- Wipe the shelves and drawers while they are bare.
- Assign the five jobs top to bottom — eat now, daily, produce, sauces, leftovers — and put food back one shelf at a time, bins first, labels out.
- Leave the back of each shelf empty on purpose: that gap is the pull-out lane the next section builds on.
Where the fridge sits inside the wider small-kitchen plan — shelves by height, the counter rule, the nightly tidy — is the kitchen storage checklist.
Cost: $0–$20 for two to four clear bins. Time: 45 minutes, empty to loaded. Assign the jobs before anything goes back in — food arranged by shape is how the mess returns.
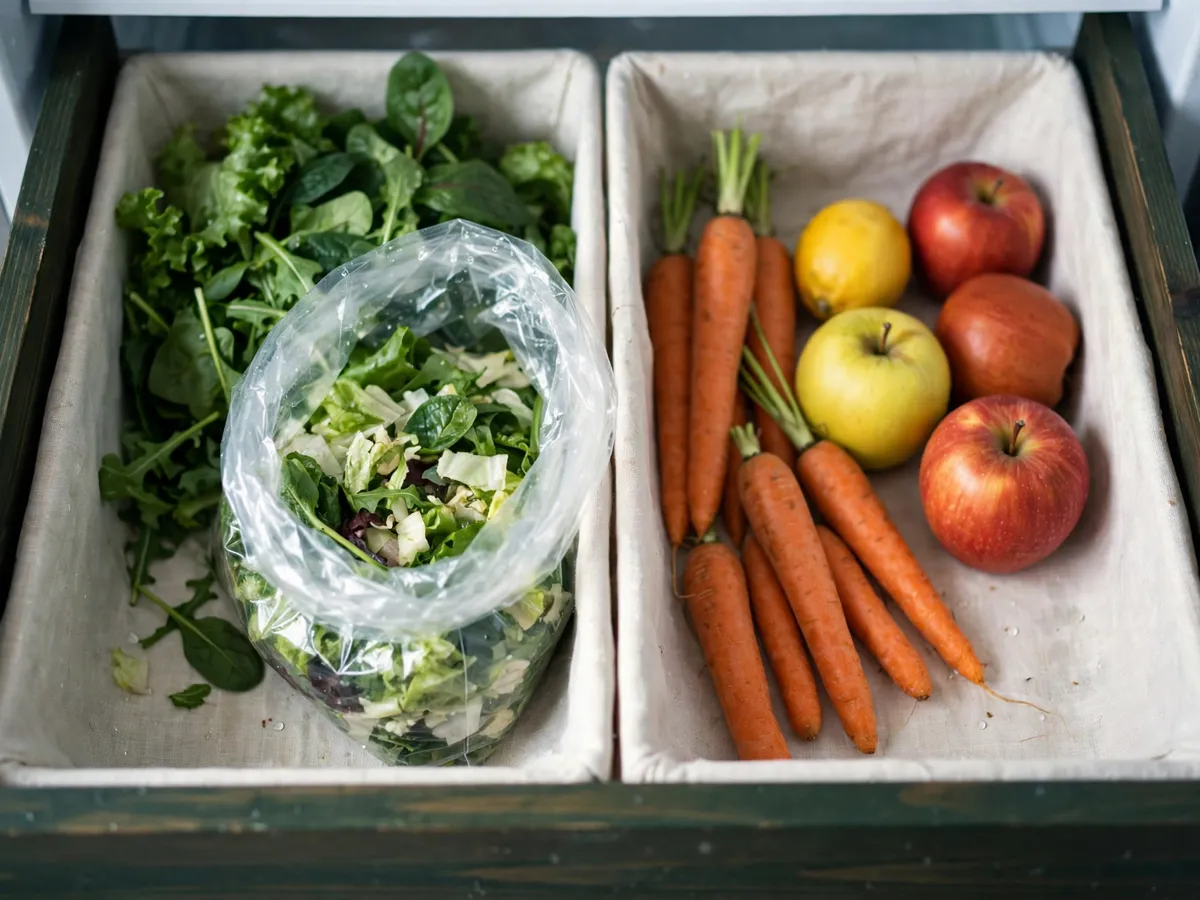
2. One row deep, label out
The zone map says where things live. This rule says how: one row deep, every front label facing out, nothing sitting behind anything else. A container in a second row is invisible, and invisible food is future waste — you will not cook the half bag of spinach you cannot see, and you will buy another one instead. So each shelf holds one row. The bin depth is the shelf depth, and the space at the back of the shelf stays empty on purpose: that gap is not wasted, it is the pull-out lane that lets a bin slide forward without lifting anything.
Buy bins shallow and wide, never deep. A deep bin is a drawer with no view — the broccoli vanishes under the cheese and the bottom layer becomes archaeology. Low-sided clear bins let you read the whole shelf in one glance: clear, because the label and the contents both show; low-sided, because you lift nothing to take the one thing you want. Labels face the front, and a bin goes back the same way round every time. The pass that holds it all together is two minutes after every grocery run: pull the bins forward, refill, push them back — pull-forward, push-back, done. It is the same habit that keeps a closet rod honest, and it is the difference between a system and a reorganization that fades in three weeks.
Three ways this fails, all cheap to avoid. A bin that fills the shelf edge to edge cannot be pulled past the shelf lip, so leave a finger of slide room when you measure. Tall jars parked in front of short ones rebuild the hidden row at half height — sort within the row instead, tall jars at one end and short at the other, so no jar masks the one beside it. And the overfill after a big shop wants a second layer; give the overflow a home outside the fridge — the counter bowl for fruit that is ripening, the pantry shelf for the unopened backup — and the cold box stays one row deep.
Cost: $0 if you use bins you already own. Time: 20 minutes once, then two minutes after every shop. The test: if you lift one thing to reach another, a second row is hiding.
3. The dated leftovers tray
Leftovers are not a storage problem, they are a memory problem — the container is fine, the date is missing. So the whole system is one tray and one rule. The tray sits on the bottom shelf, low and level. The rule: only containers with a date ride the tray. The day something goes in, a strip of masking tape goes on the lid and the marker writes the date — six seconds of effort that decides whether the food gets eaten or excavated. Undated containers do not ride the tray; they get a date or a bin.
The tray checks itself. At the end of every week — Sunday evening works, because that is when the next week's cooking starts — pull the tray and deal with what is left: eat it that night, freeze what is worth keeping, bin what is not. Nothing on the tray survives a second weekend, which means nothing anywhere in the fridge is more than two weeks old. The reset takes about five minutes, and it is the single habit that separates a fridge you trust from a fridge you open defensively.
Empty tray, one more minute: wipe the shelf under it. A tray catches the drips a shelf would wear, and a weekly minute with a cloth keeps the bottom shelf the cleanest surface in the kitchen instead of the scariest. The weekly wipe slots straight into the short nightly and weekly plan in the small-apartment cleaning routine.
Cost: $5–$15 for one low tray, tape and a marker. Time: 15 minutes to set up, five minutes at the end of every week. The tray carries only dated containers — no date, no ride.
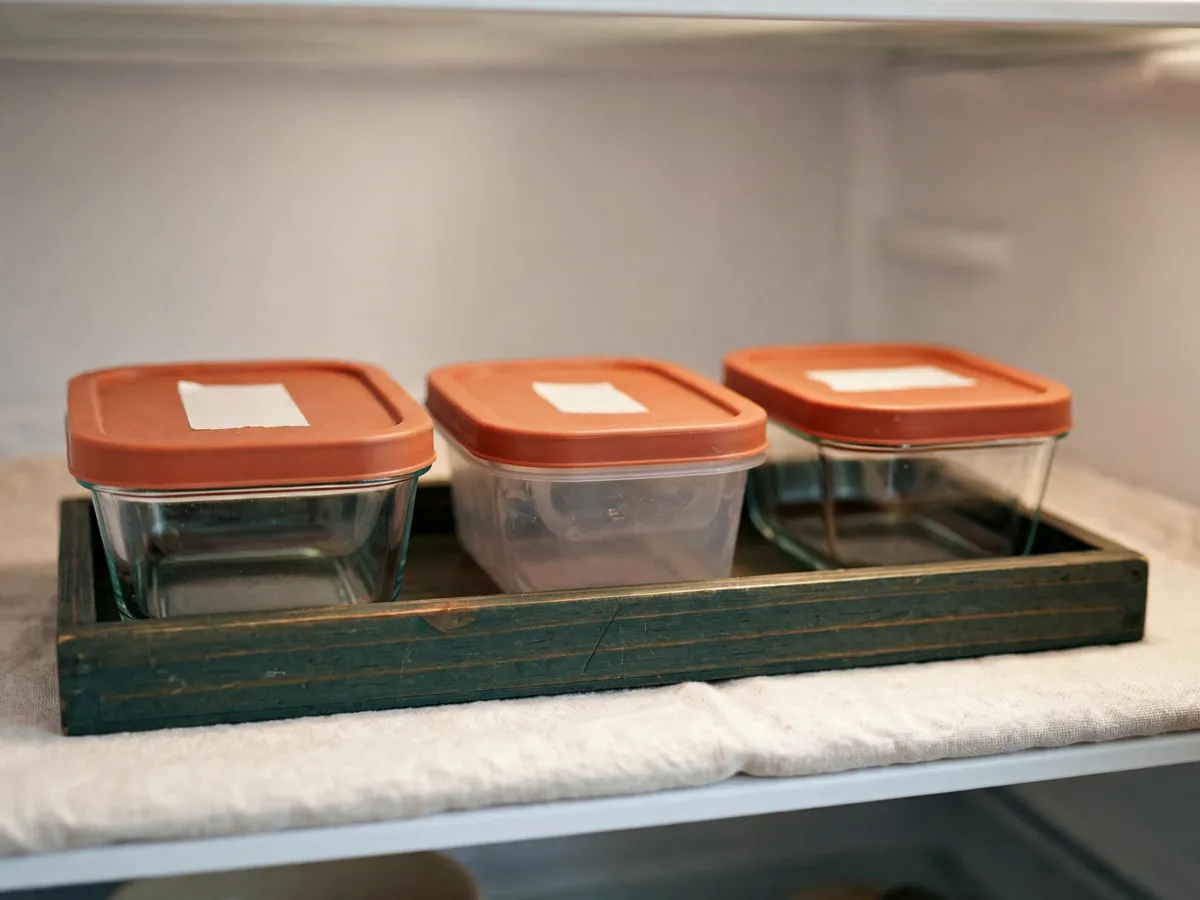
4. The small-fridge version
A mini fridge, a dorm bar fridge or a narrow top-freezer under the counter cannot carry five zones — it has two or three shelves and one drawer, and forcing the full map onto it just means every zone is too small to matter. So drop the map and keep the parts that do the work: two zones and one tray. Zone one is the daily bin — one clear bin on the middle shelf holding everything you reach for every day: the milk, the yogurt, the sauce packets, the butter. Front and center, because in a small fridge the front row is half the usable space. Zone two is the produce drawer: the single crisper carries all of it, damp things loosely bagged, dry things loose, nothing stuffed. The tray is the same dated tray from section three, smaller if it has to be, on whichever shelf sits level.
The door of a mini fridge is narrow and often holds nothing but a butter shelf — sauces and the daily drinks stand on the door racks if there are any, and the milk still lives on a shelf. Small fridges get opened for everything, which means their doors swing the most, and a jug riding that swing fares worse than a jar of hot sauce. The last habit is buying: a small fridge has no room for backup stock, so the honest strategy is small quantities and more frequent shops. What does not fit does not come home.
Cost: $5–$20 for one or two small bins and a tray. Time: 30 minutes. A small fridge is a two-bin project — resist the full set.
5. The side-by-side version
A side-by-side fridge has different geometry: two tall, narrow towers, with shelves that are deep but slim. The trap is the deep shelf — half of it is a back row you cannot see and will not use, and the freezer column eats width so the shelves never get wider. The fix is a shelf riser on each deep shelf: a step-style riser across the back half lifts the back row into sight, short jars standing raised where you can read them over the front row. It turns the hidden row into a visible one — the one-row rule bends here, but every container still shows its face.
Split the towers by rhythm, not by food group. One column becomes the daily tower: the shelves at hand height carry the daily bin and the dairy, and the produce drawers live under it. The other becomes the storage tower — the dated leftovers tray on its level shelf, the backup jars, the drinks. The door columns of a side-by-side are narrow and vertical, which suits the sauce zone perfectly: rows of small jars climbing the door, nothing tall, nothing daily. And when the whole kitchen is pulled apart for an afternoon anyway, the cabinet under the sink is the natural next box — the pipe-first plan in the under-sink cabinet guide starts with the same empty-and-measure move this page did.
Cost: $10–$25 for one riser per deep shelf. Time: 45 minutes. Measure the height between shelves before buying — the riser has to fit under the shelf above with its jars on it.
What we would skip
Skip the suction-cup and clip-on door pockets. Fridge doors flex, the air inside is damp, and a loaded pocket lets go at the worst possible moment — the door racks the fridge already has do this job permanently. Skip the stackable egg containers that hold three dozen: eggs arrive in their own carton, and the carton is already the organizer — a second one is plastic you wash. Skip the full matching glass container set bought for the reset: the fridge is not a display shelf, the door hides most of your work anyway, and clear low bins plus one tray do the whole job for a fraction of the set's price. Skip the label maker — masking tape and a marker are faster to write, faster to peel, and never need charging. The one spend worth making: low, clear bins with square corners, because square corners use the footprint that round ones waste, and the clear side is what lets one glance read the whole shelf.
Cost: $0 to skip. Time: the decisions that keep the fridge honest every week.
Before you shop: copy this
- Depth and width of each shelf measured, inside the lip — a bin has to clear the lip to slide
- Clear, low-sided bins with square corners, one per zone
- One low tray for the leftovers shelf, plus masking tape and a marker
- Milk planned for a shelf, door planned for sauces only
- Risers only for a side-by-side, measured shelf height to shelf height
- A shopping list that fits the fridge — no backup stock in a small box
Cost: $0 to check. Time: 10 minutes, before the order goes through.
Questions renters ask
What belongs on each shelf of the fridge?
Top shelf takes the eat-now food — the first thing you see when the door opens. Middle shelves hold dairy and daily protein in one bin, drawers split produce into damp and dry, the door carries sauces and jars only, and the bottom shelf is the level home of the dated leftovers tray. Every shelf keeps one job, one row deep.
Why shouldn't milk go in the fridge door?
A door warms and cools with every opening, and it is the most-opened part of the fridge. Milk, cream and anything you drink daily stand on a shelf, where the air sits stiller — the door is for condiments, sauces and jars that get used a little at a time.
How do I organize a small or mini fridge?
Drop the five-zone map and keep two zones plus a tray: one clear daily bin on the middle shelf for everything you reach for every day, the produce drawer for greens and fruit, and the small dated leftovers tray on the shelf that sits level. Buy small and shop more often — a small fridge has no room for backup stock.
How do I stop forgetting leftovers?
One tray, one rule: only dated containers ride it. Write the date on masking tape the day a container goes in, and pull the tray at the end of every week — eat, freeze or bin what is left, so nothing sits in the fridge longer than two weekends. Wipe the shelf while the tray is empty.
Save these on Pinterest
Pin the zone map — five shelves, five jobs, milk on a shelf and the door for sauces — because that one picture is what keeps the fridge honest long after the bins stop feeling new. The kitchen, pantry, under-sink and cleaning plans this page borrows from are collected with the rest of our small-home plans in the organization and storage guides.