 Plant As Deco
Organization & Storage
Garage Ceiling Storage: Reclaim the Air Over Your Car
By Plant As Deco · Updated 19 November 2026
A garage runs out of wall long before it runs out of room. The floor fills with the things you touch twice a year — holiday boxes, camping gear, the winter bin — and every one of them stands on the footprint a car needs. Above the hood, the air between the vehicle roof and the ceiling joists is the cheapest storage a garage has, and this page plans it on numbers first.
Weekend-ready: $90–$260, one weekend. Renters: skip — this one drills into framing, so nothing on the page is renter-friendly.
1. Read the ceiling before you buy anything
Garage ceilings sit higher than the rooms inside the house. A finished living space is usually 8 feet; a garage commonly runs 8 to 9 feet and more where the roof pitch is left open. Measure floor to ceiling in three spots and write down the smallest number — the low corner sets your rack height, never the high one.
Then find the framing. Garage ceilings are almost always 2-by dimensional lumber — 2x6 or 2x8 joists running the short way across the building, commonly 16 inches on center. Common is not a law: older buildings run 12 or 24, and a truss puts a member wherever the engineer wanted one. A stud finder locates the joists; confirm each by driving a thin finish nail at the edge it reports — the nail bites, that is wood; it crumbles, you found the gap.
Depth decides how much bolt is really in wood: a 2x6 measures about 5.5 inches, a 2x8 about 7.25, so a 3-inch lag bolt in a 2x6 leaves roughly two and a half inches of thread past the washer. Every anchor figure below assumes that depth.
A concrete or block ceiling is the edge of this guide — it needs specialty anchors and a different load conversation — and a truss web you cannot see into is a pro job. The honest version starts with a phone call rather than a run to the lumber aisle.
Cost: $0, or about $20 if you need a stud finder. Time: 30 minutes. Nothing else here is worth doing until these numbers sit on one card.
2. What belongs up there, decided by frequency
The filter for overhead storage is one question: how often do your hands reach for this — not what it cost, not how big it is. Sort the garage onto a tarp into three bands and the ceiling writes its own storage inventory:
The declutter checklist guide runs the same sort room by room indoors.
- Two or three times a year — the seasonal ceiling layer. Holiday decor, camping and beach gear, the seasonal clothing bin, spare bedding, the extra chair. Decorations drop in January, the camping bin drops for a July trip, the summer seasonal gear swaps for the winter one. Off-season clothing has its own compact method in the off-season clothing guide.
- Monthly — the wall. Cleaning supplies, car care, garden tools in season, the project box. That belongs at arm height on a rack or inside a closed cabinet, never overhead; a monthly trip up a step stool turns into a monthly reason to stop. The pegboard that takes this band is built in the pegboard panel wall guide.
- Weekly or more — the floor. The mower, the bike you ride, the bench you actually use. If that bench does not exist yet, the beginner workbench plans are a better first weekend than any deck.
Then the list that never goes up. Paint, propane, gas cans and anything pressurized stay at floor level away from a heat source — a falling can is a mess, a ruptured one far worse. Documents and photographs come inside the house; a garage ceiling is the hottest, dampest corner of the building. Heavy-per-volume things — a metal toolbox, a crate of hand tools — stay low too. One line settles it: if you would not lift it down with both hands balanced on a low step, it does not belong above the car.
Cost: $0. Time: two hours for an honest one-car sort.
3. Three overhead systems, and when each one wins
Almost every garage ceiling rack is one of three systems, and the right answer is one of them plus at most one helper — chosen by what you are storing rather than by what is on sale.
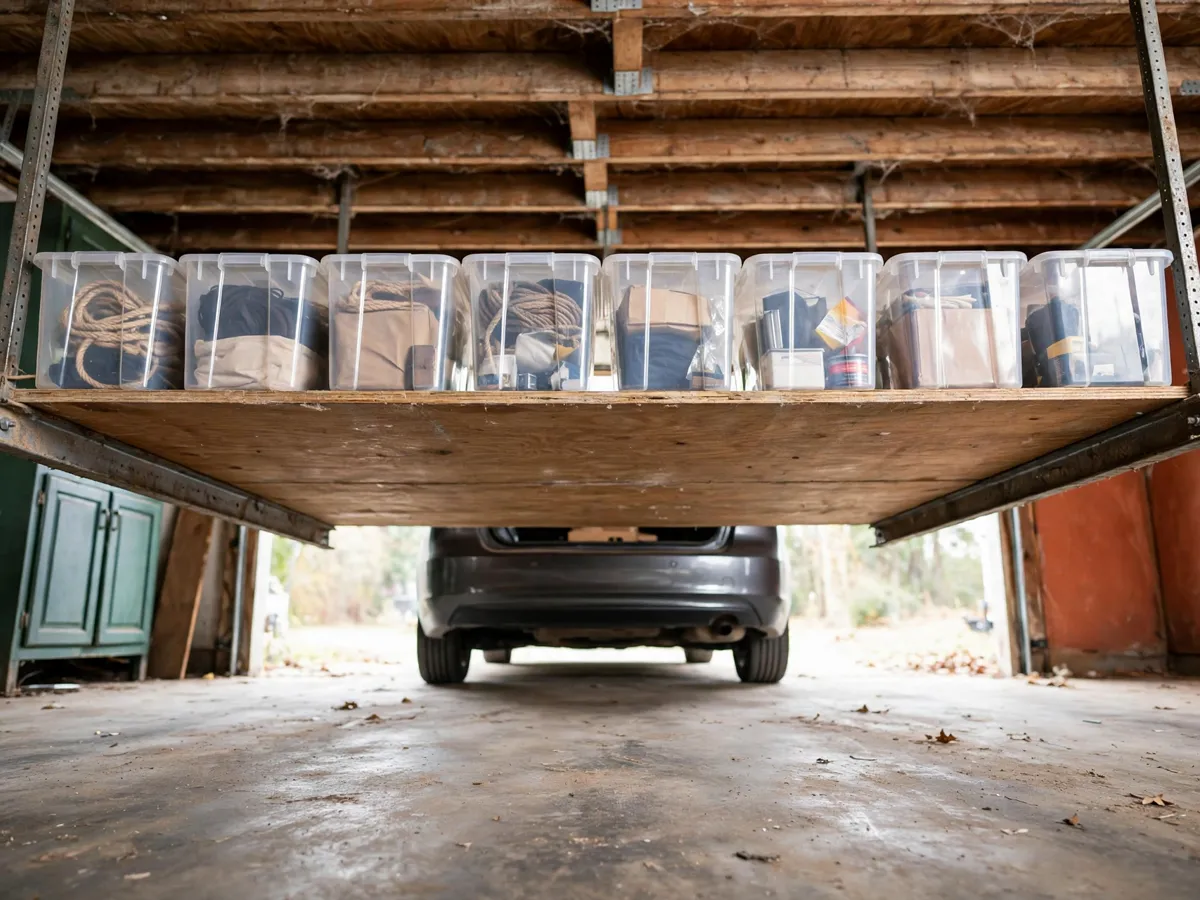
Suspended platform. A deck of 3/4-inch plywood carried on steel angle or a wire grid, hung flat beneath the joists. It takes uniform boxes, which is exactly what seasonal storage is: eight identical clear bins packed edge to edge. Materials for a two-by-eight-foot deck spanning three or four joists run about $90 to $140. Its weakness is height — a fixed platform sits at one fixed height, and whatever ends up at the back of a deep deck is gone for the season.
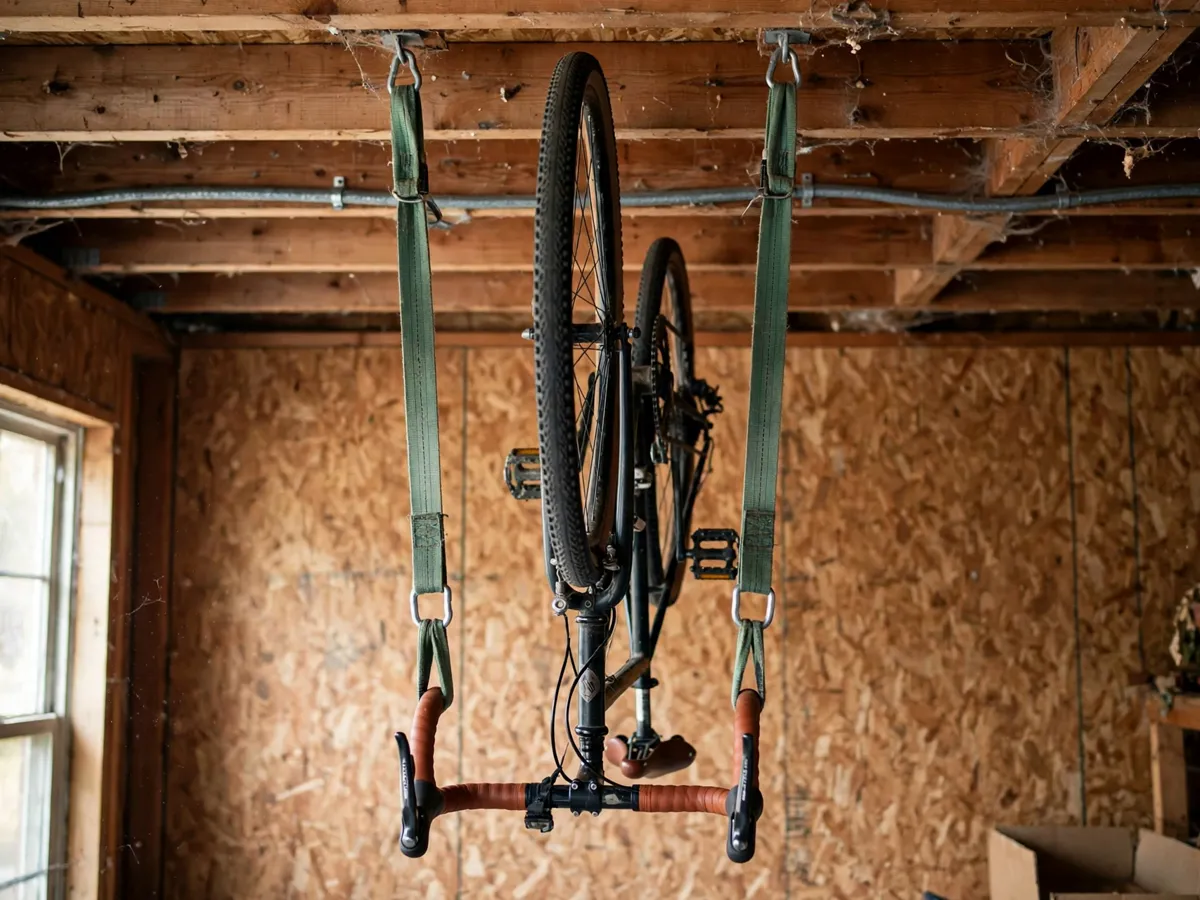
Sling. A pair of web straps with a spreader bar or a cradle, hooked to two anchor points: the bike hanger, the kayak cradle, the boat sling. Forty to ninety dollars per item, no lumber, and it comes down in a minute when the season turns. A sling holds one awkward object rather than a row of neat ones, and it needs two solid joist points spaced to the object.
Commercial track kit. Steel track bolted along the joists with a pulley that lowers the loaded deck to chest height, $250 to $500 for a unit you install yourself. It is the only option here that solves the reaching problem outright — you crank the boxes down instead of climbing toward them. It earns the difference in a garage with a tall ceiling, a heavier load, or an owner who would rather not stretch.
Compared on numbers: the platform is cheapest per square foot of storage, the sling is cheapest per awkward object, and the kit is the one most likely to still be used in year three. A sensible small garage takes one platform over the car plus a sling on the side and stops there.
Cost: $0 to choose, 30 minutes with your sort piles on paper. The expensive mistake is buying two platforms and no clearance for the car.
4. The car clearance math, done first
Overhead storage has one hard number, and ceiling height is only the starting point — the number that rules is the gap between the top of the car and the bottom of the rack: car height plus three inches of clearance must be no more than the floor-to-underside line you choose for the deck.
Measure the car where it actually parks rather than trusting a brochure: a lifted pickup or a three-row SUV can stand 78 to 84 inches tall while a sedan often sits at 58 to 62. Park it in the bay, run the tape from the floor to the highest point of the roof, subtract three inches — that is the lowest possible underside of your platform. If the line leaves less than a foot between rack and joists, there is no usable deck in this garage, and the honest answer is a sling on the side instead.
Second number: setback. A rack flush with the front of the parking space is a rack you will clip on the way in. Pull the deck back 12 to 18 inches from the car's footprint so the walk lane and door swings sit under open ceiling. Nothing goes over the driving path at all.
Third: the door. A sectional garage door travels up and back under the ceiling, and its springs store real energy. Check the highest arc of the track before you mark the deck line, and work from the installer's headroom figure.
Cost: $0 and a tape. Time: 15 minutes.
5. Weight, and what a joist actually carries
This is where an honest article stops handing out numbers. A single 2x6 pine joist carrying an evenly spread load across a 12-to-16-foot span sits somewhere near 50 to 80 pounds before it is doing more than it was set up to do. The range is wide on purpose: the real figure depends on species, grade, span, moisture, notches, old drill holes. No stranger can hand you that number, so treat every load figure here as a planner's conservative target rather than a rating.
The working rule for a do-it-yourself ceiling is deliberately modest: no more than 20 pounds at any one joist point, and a whole loaded rack between 150 and 200 pounds — a deck of clear bins, not a deck of tools. Above that, the next step is a paid structural opinion, and the check that unlocks it is the manufacturer's rating for the exact hardware and lumber in front of you.
Three mechanics make the target reachable. Spread it: a cross-member across three or four joists turns one heavy point into several light ones. Never hang a rack from a single joist — that concentrates everything on one member and twists it sideways. Keep bins low and centred, not cantilevered past the edge; an overhanging box turns a bolt into a lever.
One caution for an older garage: framing cut for a vent, notched for a conduit, or patched by a previous owner has a remaining capacity nobody knows. If you find a member that has been opened up, move the rack rather than negotiate with it.
Cost: $0. Time: 10 minutes of arithmetic.
6. Anchors, bolts, and the drop-down that saves your back
Hardware is where a ceiling rack either holds or comes down, and the rule is short: fasten to wood with a fastener long enough to bite deeply, never to the ceiling's thin finish material — a toggle bolt in a finished surface holds nothing you care about dropping. Drive through the finish into the joist, or leave the ceiling bare; many garage owners never drywall it precisely so they can see what they are bolting to.
Where the member allows it, a bolt all the way through the joist — nut and wide washer on the far side — beats a plain lag bolt: it works in shear across the grain rather than splitting along it, and it stays visible from below. Steel angle along the joist bottoms turns two attachment points into four or six, the difference between a rack that hangs and one that hangs level.
For anything loaded past 40 pounds, add a drop-down: a pulley or rope-and-cleat rig that lets the near edge of the platform come down to chest height removes the climb entirely. A manual winch adds control, but only while a capable adult turns the handle and the line is sound; read the winch maker's rating and stay well under it.
Whatever you choose, tighten twice. A new rack settles for its first month, and a bolt that has worked loose shows up as a deck that tilts. Re-check every anchor after 30 days and once a season; replace any hardware with a rusted or deformed shank rather than tightening it again.
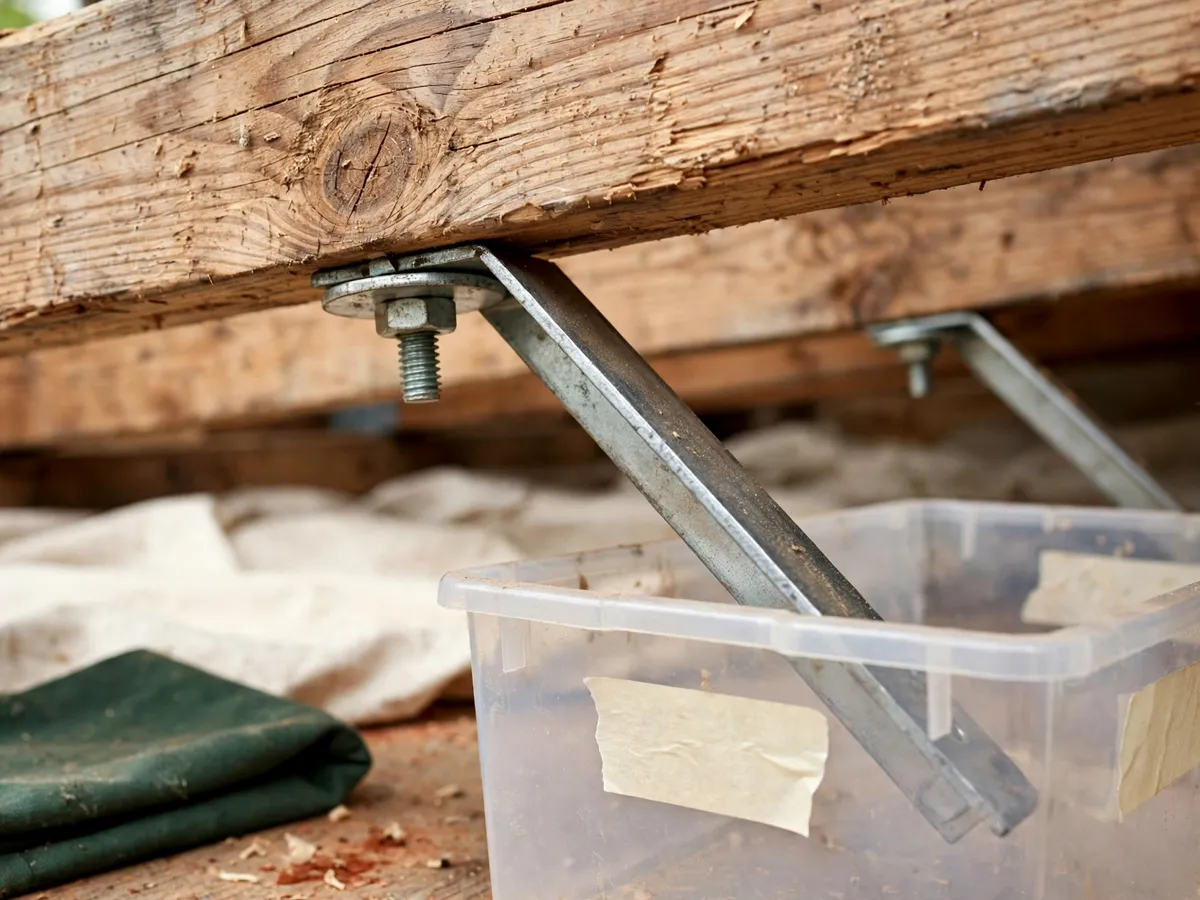
Cost: $25–$60 in bolts, washers, angle and strut for one deck. Time: half a day with a helper holding the cross-members level.
7. The things that are not boxes
A platform handles identical bins. Half a garage is not identical bins, and the classic mistake is forcing awkward objects onto a deck when the ceiling or the wall has a better answer for each one.
- Bikes — a sling on two joist points, front wheel toward the wall. Two bikes side by side on adjacent anchor pairs is fine; a bike stacked above a bike is a falling bike. Where the clearance is tight, a wall hook is the better buy.
- Kayak or canoe — a double sling, hull up, spaced to the beam. Never lay a hull flat on a plywood platform; it slides, and a sliding kayak walks off the edge.
- The ladder — wall brackets, horizontal, above head height on the wall you pass. A ladder does not go overhead; you need it fast, in one motion.
- Hoses and extension cords — coiled and hung in loops from a joist hook, off the floor. A hose slung overhead drains and dries; a hose packed in a bin rots in the bin.
- The Christmas tree — bagged and closed with a zip tie before it goes up, so the branches stay compressed and the bag carries the needles.
The pattern is one line: an awkward shape wants a hook or a cradle, not a shelf. Reserve the platform for boxes, give the rest of the ceiling its own pair of anchors, and let the wall keep the ladder.
Cost: $40–$90 per sling, about $15 for a hook pair.
8. Bins, labels, and the two-face rule
Overhead storage fails quietly through bad containers: a soft-sided bag sags between the deck's supports, a mismatched bin set leaves gaps that swallow the next box, and a lid that pops open mid-air empties onto the car below.
Standardise on one clear storage bin size. Pick 12-quart or 18-quart and buy nothing else. Identical bins pack edge to edge with no dead space and slide past one another when a single box has to come down first. Clear plastic matters at ceiling height, where a shadow makes opaque bins impossible to tell apart.
Label two faces. Every bin gets its contents written on the front and on the side that faces the aisle. Once a deck is loaded, the front of one bin is pressed against the back of the next, and the only readable surface is the side. A label that works only before you push the box up stops working the day you need it.
Photograph the inside before it goes up. Fill each bin, take one picture, keep them in an album named for the garage. Two years from now memory will not tell you which box holds the camp stove; the album will.
Use locking lids, keep the seasonal layer in plastic rather than cardboard — cardboard softens when a ceiling sweats — and put nothing dense at ceiling height; the heavy things stay on the wall where they belong.
Cost: $12–$25 per clear bin, so eight is $96–$200. Time: one evening to fill, label and photograph a row.
9. The no-ladder rule
A ceiling rack is built to hold bins. It is not built to hold a person, and no part of it — the deck, the angle, the bolts — should ever carry your standing weight, nor should a ladder ever lean against a deck to reach the back corner. This is the rule I would keep if I forgot every other number on this page.
The workable version: a low step stool of two or three steps, both feet on something solid, and a reach tool for the bin at the back — a grabber on a pole costs about fifteen dollars.
If a trip needs more than that, the design is wrong. Lower the deck, move the frequent items to the wall, or accept that the deep back corner of a platform is where things are filed rather than fetched.
Cost: $15 for a reach tool, $25–$45 for a stool. Buy both before the deck goes up.
What we would skip
- A full mezzanine loft over the car when the ceiling is under nine feet — a loft needs standing headroom beneath it, and a garage that height gives you a crouch rather than a second floor.
- Anything in the path of the opener rail, the track arc or the door springs. The door moves every day and the springs store real force; no deck is worth a door that binds.
- Using joists as a tie point for extension cords or shop lights — joists carry the rack, they are not a cable tray.
- Hanging a rack from a truss web member found by accident: if you cannot see what you are bolting to, you are bolting to nothing.
- Filling the deck to the paint line — leave the gap for the bolts, the washers and one hand working underneath.
Cost: $0 to skip. Time: two minutes of reading that prevents the one overhead mistake you cannot undo from the floor.
10. What it costs, honestly
Three routes, three bills, at big-box prices for a mid-size US market; treat these as the shape of the spend rather than a quote.
- Self-built platform, two to four joists — $90 to $140: half a sheet of 3/4-inch plywood, four 8-foot 2x4s for cross-members, two steel angles, six to ten 3-inch lag bolts with washers, screws. Add $30 to $60 for a wire deck in place of plywood.
- Commercial track kit — $250 to $500 for a pulley-lowering unit. It arrives with its own hardware and its own published rating, which is most of what you are paying for.
- Sling — $40 to $90 each for a bike, kayak or canoe cradle, plus about $10 for eye hardware if the kit arrives with hooks rather than through-bolts.
- Bins — $12 to $25 apiece for clear, locking-lid storage bins in one size. Eight of them is a real number, and it is the line that surprises people.
- Labour, if you want it — $80 to $150 for one person with an impact driver to drill the joist points and hold the cross-members level.
A wall system in the same garage runs a wider spread — the garage cabinet guide prices its route at $80 to $400 — and a ceiling deck is not cheaper than that, it spends on a different axis. Budget the storage bins and the labels with the deck rather than after it, or the platform goes up empty and stays empty.
Realistic all-in for one platform plus eight clear bins: $200–$340. Time: one weekend at beginner pace.
The before-you-hang checklist
- Ceiling height measured in three places, smallest number on the card; joist spacing confirmed with a finder and a test nail — never assumed at 16 inches.
- Car measured where it parks, plus 3 inches of clearance, and the deck underside set above that line.
- Deck pulled back 12 to 18 inches from the car footprint; nothing over the drive path or the walk lane.
- Load target held under 20 pounds per joist point and 150 to 200 pounds for the whole rack, with the hardware maker's rating checked against both.
- Cross-members on at least two joists, ideally three or four, with fasteners long enough for the member depth.
- Drop-down pulley fitted to anything loaded past 40 pounds.
- One clear bin size, labels on two faces, a photo of every bin's contents, and no ladder on the deck, ever.
Cost: $0 to check. Time: 10 minutes before the store run, and 30 days later to re-tighten every anchor.
Common questions
Can I stack boxes directly on the joists without a platform?
I would not, tempting as the bare framing looks. Boxes on joists tip on the narrow face, bridge the gaps inconsistently, and give every fastener a box to pass through before wood. There is no way to spread a load across members 16 inches apart. A deck turns a row of narrow strips into a usable floor; on a budget, two cross-members and a half sheet of plywood is the cheapest version, and it is the whole idea in section three.
What if my garage has a concrete ceiling?
Then nothing on this page applies as written. Concrete wants concrete anchor hardware, a hammer drill, and sleeve or wedge anchors sized by their maker; the load conversation moves to the slab. It is doable and it is a different article — get published values for your slab thickness, and if it is a thin pour over insulation, ask a professional before hanging anything overhead.
How far should the deck sit from the garage door opener?
Clear of the rail, the track arc and the springs entirely, with room for anything you lower on a line to swing without touching them. Work from the door installer's headroom figure first and the opener manual second. If a deck has to cross the track, shorten the deck rather than notch the track.
Is this safe for an RV or a boat?
Rarely, inside a home garage, and the clearance math is the reason: an RV or a boat on a trailer stands taller than a car and usually needs 10 to 12 feet at the door, so the ceiling that would carry a rack above it is not there. A sling in a shed with real framing or a purpose-built rack rated by its maker is the better path — check the published rating, and never guess a load for something you could not afford to drop.
I rent — is anything here usable for me?
Not the overhead part. Every option here bolts or drills into framing that belongs to somebody else, so take the frequency sort from section two, put the seasonal overflow on shelves instead, and skip the ceiling until the place is yours. The other pages in this collection are written for that situation.
Save these on Pinterest
Pin the clearance math and the before-you-hang checklist — the two pieces you will otherwise forget in the store parking lot, holding a sheet of plywood you cannot fit over your car. This guide and the rest of the organization and storage collection live together there.